Category Archives: Geeky
Control Interfaces :: U-HID :: BlueHID
How to Control (start/stop/mask/unmask) Services Using Systemd
How to Control (start/stop/mask/unmask) Services Using Systemd
Starting and Stopping Services
Services need to be stopped or started manually for a number of reasons: perhaps the service needs to be updated; the configuration file may need to be changed; or a service may need to be uninstalled, or an administrator may manually start an infrequently used service.
To start a service, first verify that it is not running with systemctl status. Then, use the systemctl start command as the root user (using sudo if necessary). The example below shows how to start the sshd.service service:
[root@host ~]# systemctl start sshd.serviceThe systemd service looks for .service files for service management in commands in the absence of the service type with the service name. Thus the above command can be executed as:
[root@host ~]# systemctl start sshdTo stop a currently running service, use the stop argument with the systemctl command. The example below shows how to stop the sshd.service service:
[root@host ~]# systemctl stop sshd.serviceRestarting and Reloading Services
During a restart of a running service, the service is stopped and then started. On the restart of service, the process ID changes and a new process ID gets associated during the startup. To restart a running service, use the restart argument with the systemctl command. The example below shows how to restart the sshd.service service:
[root@host ~]# systemctl restart sshd.serviceSome services have the ability to reload their configuration files without requiring a restart. This process is called a service reload. Reloading a service does not change the process ID associated with various service processes. To reload a running service, use the reload argument with the systemctl command. The example below shows how to reload the sshd.service service after configuration changes:
[root@host ~]# systemctl reload sshd.serviceIn case you are not sure whether the service has the functionality to reload the configuration file changes, use the reload-or-restart argument with the systemctl command. The command reloads the configuration changes if the reloading functionality is available. Otherwise the command restarts the service to implements the new configuration changes:
[root@host ~]# systemctl reload-or-restart sshd.serviceListing Unit Dependencies
Some services require that other services be running first, creating dependencies on the other services. Other services are not started at boot time but rather only on demand. In both cases, systemd and systemctl start services as needed whether to resolve the dependency or to start an infrequently used service. For example, if the CUPS print service is not running and a file is placed into the print spool directory, then the system will start CUPS-related daemons or commands to satisfy the print request.
[root@host ~]# systemctl stop cups.service
Warning: Stopping cups, but it can still be activated by:
   cups.path
   cups.socket
To completely stop printing services on a system, stop all three units. Disabling the service disables the dependencies. The ‘systemctl list-dependencies UNIT’ command displays a hierarchy mapping of dependencies to start the service unit. To list reverse dependencies (units that depend on the specified unit), use the –reverse option with the command.
[root@host ~]# systemctl list-dependencies sshd.service
sshd.service
● ├─system.slice
● ├─sshd-keygen.target
● │ ├─sshd-keygen@ecdsa.service
● │ ├─sshd-keygen@ed25519.service
● │ └─sshd-keygen@rsa.service
● └─sysinit.target
...output omitted...
Masking and Unmasking Services
At times, a system may have different services installed that are conflicting with each other. For example, there are multiple methods to manage mail servers (postfix and sendmail, for example). Masking a service prevents an administrator from accidentally starting a service that conflicts with others. Masking creates a link in the configuration directories to the /dev/null file which prevents the service from starting.
[root@host ~]# systemctl mask sendmail.service
Created symlink /etc/systemd/system/sendmail.service → /dev/null.
[root@host ~]# systemctl list-unit-files --type=service UNIT FILE STATE sendmail.service masked ...output omitted...Attempting to start a masked service unit fails with the following output:
[root@host ~]# systemctl start sendmail.service
Failed to start sendmail.service: Unit sendmail.service is masked
Use the systemctl unmask command to unmask the service unit.
[root@host ~]# systemctl unmask sendmail Removed /etc/systemd/system/sendmail.service.Note: A disabled service can be started manually or by other unit files but it does not start automatically at boot. A masked service does not start manually or automatically.Enabling Services to Start or Stop at Boot
Starting a service on a running system does not guarantee that the service automatically starts when the system reboots. Similarly, stopping a service on a running system does not keep it from starting again when the system reboots. Creating links in the systemd configuration directories enables the service to start at boot. The systemctl commands create and remove these links.
To start a service at boot, use the systemctl enable command.
[root@root ~]# systemctl enable sshd.service
Created symlink /etc/systemd/system/multi-user.target.wants/sshd.service → /usr/ lib/systemd/system/sshd.service.
The above command creates a symbolic link from the service unit file, usually in the /usr/lib/systemd/system directory, to the location on disk where systemd looks for files, which is in the /etc/systemd/system/TARGETNAME.target.wants directory. Enabling a service does not start the service in the current session. To start the service and enable it to start automatically during boot, execute both the systemctl start and systemctl enable commands.
To disable the service from starting automatically, use the following command, which removes the symbolic link created while enabling a service. Note that disabling a service does not stop the service.
[root@host ~]# systemctl disable sshd.service
Removed /etc/systemd/system/multi-user.target.wants/sshd.service.
To verify whether the service is enabled or disable, use the systemctl is-enabled command.
Summary of systemctl Commands
Services can be started and stopped on a running system and enabled or disabled for an automatic start at boot time.
Useful Service Management Commands:
TASK COMMAND View detailed information about a unit state. systemctl status UNIT Stop a service on a running system. systemctl stop UNIT Start a service on a running system. systemctl start UNIT Restart a service on a running system. systemctl restart UNIT Reload the configuration file of a running service. systemctl reload UNIT Completely disable a service from being started, both manually and at boot. systemctl mask UNIT Make a masked service available. systemctl unmask UNIT Configure a service to start at boot time. systemctl enable UNIT Disable a service from starting at boot time. systemctl disable UNIT List units required and wanted by the specified unit. systemctl list-dependencies UNIT
Source: How to Control (start/stop/mask/unmask) Services Using Systemd
Calculate Pendulum Length | Horology – The Index
What Exactly Is A Gaussian Blur? | Hackaday
How to Make a USB Laptop Keyboard Controller
How to Make a USB Laptop Keyboard Controller : This Instructable will provide a step by step procedure for building a USB laptop keyboard and touchpad controller. I created this guide and video to hopefully make it easier for people to re-purpose an old laptop. A typical laptop keyboard relies o…
Electrolytic Capacitor Identification
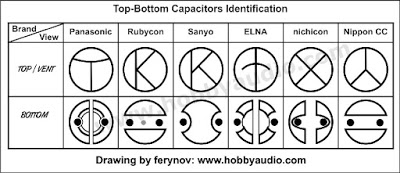
Capacitor Identification
Quicken interchange format (QIF)
Q: What is the Quicken interchange format (QIF)?
A: The Quicken interchange format (QIF) is a specially formatted text (ASCII) file that lets you to move Quicken transactions:
- From one Quicken account register into another Quicken account register, or
- To/From another application that supports the QIF format.
Note: For Quicken to translate data from a text file into the Quicken register as transactions, the text file must be in the QIF format.
Required File Formatting:
- Each transaction must end with a symbol, indicating the end of entry.
- Each item in the transaction must display on a separate line.
- When Quicken exports an account register or list, it adds a line to the top of the file that identifies the type of account or list. Listed below are the header lines Quicken adds to the exported files:
Header Type of data !Type:Bank Bank account transactions !Type:Cash Cash account transactions !Type:CCard Credit card account transactions !Type:Invst Investment account transactions !Type:Oth A Asset account transactions !Type:Oth L Liability account transactions !Account Account list or which account follows !Type:Cat Category list !Type:Class Class list !Type:Memorized Memorized transaction list
You can force Quicken to import all transfers, regardless of whether Ignore Transfers is selected when the file is imported. You must add a line to the file being imported into a Quicken account. Use a text editor or word processor to put the following line right after the header line at the top of the file:
!Option:AllXfr
Items for Non-Investment Accounts
Each item in a bank, cash, credit card, other liability, or other asset account must begin with a letter that indicates the field in the Quicken register. The non-split items can be in any sequence:
Field Indicator Explanation D Date T Amount C Cleared status N Num (check or reference number) P Payee M Memo A Address (up to five lines; the sixth line is an optional message) L Category (Category/Subcategory/Transfer/Class) S Category in split (Category/Transfer/Class) E Memo in split $ Dollar amount of split ^ End of the entry Note: Repeat the S, E, and $ lines as many times as needed for additional items in a split. If an item is omitted from the transaction in the QIF file, Quicken treats it as a blank item.
Items for Investment Accounts
Field Indicator Explanation D Date N Action Y Security I Price Q Quantity (number of shares or split ratio) T Transaction amount C Cleared status P Text in the first line for transfers and reminders M Memo O Commission L Account for the transfer $ Amount transferred ^ End of the entry Items for Account Information
The account header !Account is used in two places-at the start of an account list and the start of a list of transactions to specify to which account they belong.
Field Indicator Explanation N Name T Type of account D Description L Credit limit (only for credit card accounts) / Statement balance date $ Statement balance amount ^ End of entry Items for a Category List
Field Indicator Explanation N Category name:subcategory name D Description T Tax related if included, not tax related if omitted I Income category E Expense category (if category type is unspecified, quicken assumes expense type) B Budget amount (only in a Budget Amounts QIF file) R Tax schedule information ^ End of entry Items for a Class List
Field Indicator Explanation N Class name D Description ^ End of entry Items for a Memorized Transaction List
Immediately preceding the ^ character, each entry must end with one of the following file indicators to specify the transaction type.
- KC
- KD
- KP
- KI
- KE
With that exception, memorized transaction entries have the same format as regular transaction entries (non-investment accounts). However, the Date or Num field is included. All items are optional, but if an amortization record is included, all seven amortization lines must also be included.
Field Indicator Explanation KC Check transaction KD Deposit transaction KP Payment transaction KI Investment transaction KE Electronic payee transaction T Amount C Cleared status P Payee M Memo A Address L Category or Transfer/Class S Category/class in split E Memo in split $ Dollar amount of split 1 Amortization: First payment date 2 Amortization: Total years for loan 3 Amortization: Number of payments already made 4 Amortization: Number of periods per year 5 Amortization: Interest rate 6 Amortization: Current loan balance 7 Amortization: Original loan amount ^ End of entry
Examples of QIF files
Normal Transactions Example
Transaction Item Comment (not in file) !Type:Bank Header D6/ 1/94 Date T-1,000.00 Amount N1005 Check number PBank Of Mortgage Payee L[linda] Category S[linda] First category in split $-253.64 First amount in split SMort Int Second category in split $-746.36 Second amount in split ^ End of the transaction D6/ 2/94 Date T75.00 Amount PDeposit Payee ^ End of the transaction D6/ 3/94 Date T-10.00 Amount PJoBob Biggs Payee MJ.B. gets bucks Memo LEntertain Category A1010 Rodeo Dr. Address (line 1) AWaco, Tx Address (line 2) A80505 Address (line 3) A Address (line 4) A Address (line 5) A Address (line 6) ^ End of the transaction
Investment Example
Transaction Item Comment (not in file) !Type:Invst Header line D8/25/93 Date NShrsIn Action (optional) Yibm4 Security I11.260 Price Q88.81 Quantity CX Cleared Status T1,000.00 Amount MOpening Balance Memo ^ End of the transaction D8/25/93 Date NBuyX Action Yibm4 Security I11.030 Price Q9.066 Quantity T100.00 Amount MEst. price as of 8/25/93 Memo L[CHECKING] Account for transfer $100.00 Amount transferred ^ End of the transaction
Memorized List Example
Transaction Item Comment (not in file) !Type:Memorized Header line T-50.00 Amount PJoe Hayes Payee MRent Memo KC Check transaction ^ End of the transaction T-25.00 Amount T-25.00 Company Payee LTelephone Category KP Payment transaction ^ End of the transaction
How the browser renders a web page – DEV
My thinking: if I’m going to build websites that are fast and reliable, I need to really understand the mechanics of each step a browser goes through to render a web page, so that each can be considered and optimised during development. This post is a summary of my learnings of the end-to-end process at a fairly high level.
A lot of this is based on the fantastic (and FREE!) Website Performance Optimization course by Ilya Grigorik and Cameron Pittman on Udacity. I’d highly recommend checking it out.
Also very helpful was the article How Browsers Work: Behind the scenes of modern web browsers by Paul Irish and Tali Garsiel. It’s from 2011 but many of the fundamentals of how browsers work remain relevant at the time of writing this blog post.
Ok, here we go. The process can be broken down into these main stages: