Category Archives: Computer
Beyond basic modal editing. Using vim’s command-line mode.
Vim is famous for its fabulous modal editing. Its
normal,insert, andvisualmodes quickly become magic in the hands of an able user. But many are unaware or ignore the existence of vim’scommand-linemode with its Ex commands.Whereas vim’s
normalandinsertmode work in the locale of your cursor, vim’scommand-linemode can help you deal with things far from your cursor. Or as Drew Neil puts it in his Practical Vim book,Vim’s Ex commands strike far and wide.
Let’s look at a few of them.
Copy (copy, t), move (m), and delete (d)
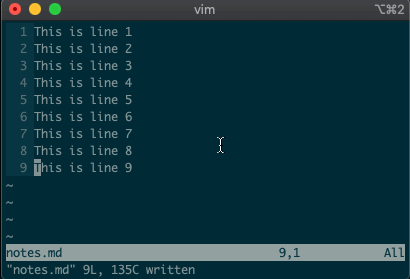
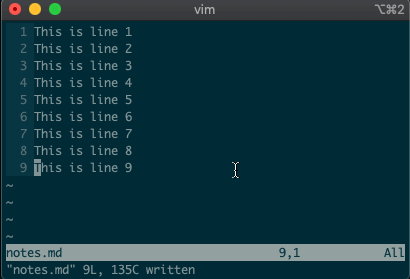
We’ll start by copying, moving, and deleting lines. You access vim’s
command-linemode with:. Copying, moving, and deleting can be intuitive. What would you say this command did?:3copy5If you guessed copy line three to line five, then you got it!
tis shorthand for copy (think copy to). So:3t5does the same thing as the command above.Do move and delete work the same way? You betcha.
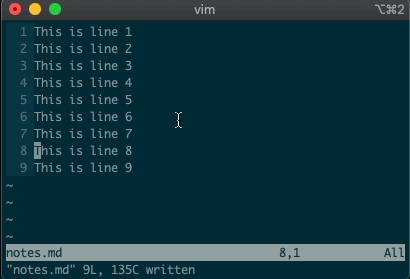
Try moving a line with
:3m5.
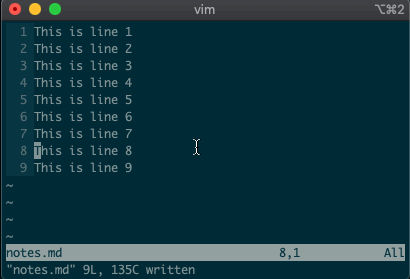
Now try deleting a line with
:3d.
Acting on ranges
But that’s not all. Ex commands aren’t limited to single lines. They can act on ranges. Want to move lines 3-5 to line 8? You got it:
:3,5m8
Relative ranges
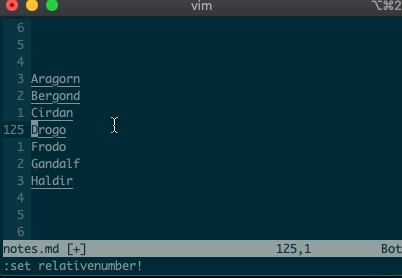
I know what you’re thinking, “But what if I’m on line 125, and I use relative numbers!” Not to worry. Vim has a range for you too:
:-2,+1d
The visual range
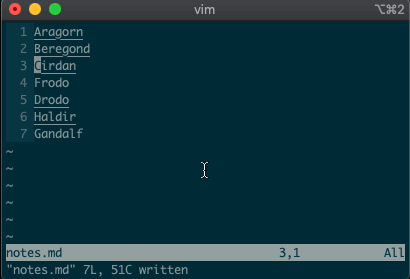
What about using a visual selection as a range? If you’re like me, you’ve probably used vim to help you sort lines by visually selecting them and typing
:sort. Did you ever notice the range vim inserts for us? It’s the special visual selector range::'<,'>sort
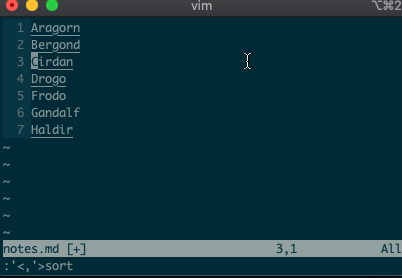
Want to perform other actions on that same visual block? The visual selector range (
'<,'>) continues to operate on the previous visual selection, even when that range is no longer selected! Let’s delete the lines we sorted last time::'<,'>d
Want to learn more about the visual selector range? As it turns out, ranges can be delimited by marks, and
'<and'>are just a couple of special marks. That opens ranges to a world of possibilities! Try'{,'}for paragraphs and'(,')for sentences.Search and replace
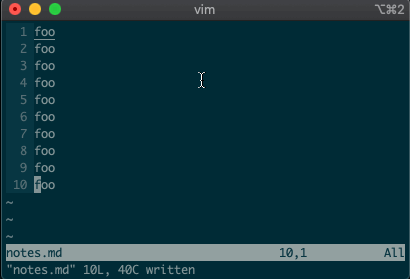
Perhaps you’ve never stopped to think about the magical incantation you use to search and replace words in a file. Well, we can finally uncover the mystery:
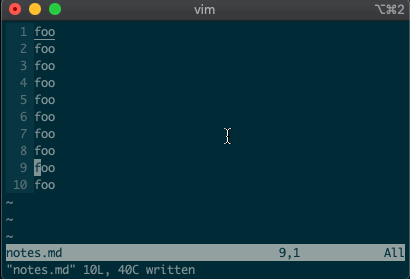
swill replace things (think substitute). Want to replacefoowithbaron line 3?:3s/foo/bar/g
What if you want to search and replace in the entire file? We can use a range from the first line to the end of the file:
1,$, or even better, we can use vim’s shorthand for the whole file:%. Go ahead. Type it in, and see the magic work::%s/foo/bar/g
Repeat a normal command
In addition to modal editing, vim is known for its ability to repeat the last command with
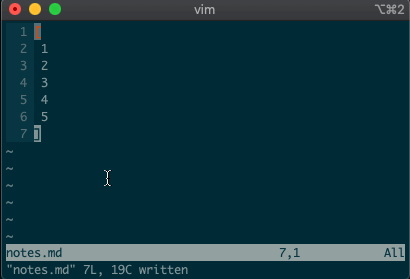
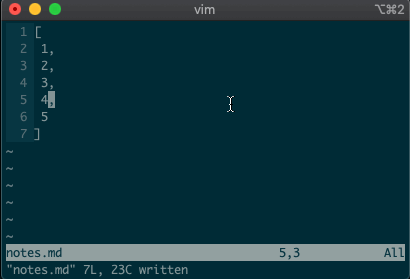
.. Maybe you delete a line withdd, then you realize you need to delete the next one. No need to pressddagain, just type.and you’re good to go.But what about repeating the same command across many lines? What would you do if you wanted to append a comma at the end of each line in a list? Ex commands are here to help you:
:2,5normal A,
Repeat the last Ex command
.repeats the last normal command. What if we want to repeat the last Ex command? We can do that too.@:
If you’ve ever used macros in vim, you might notice this looks like a macro for the
:register. Find that interesting? Take a look at your registers (:reg) and see what you find for:.What next?
I hope you see the power of Ex commands. Instead of typing
2Gddto go to the second line and delete it, you can delete it from afar with:2d. And instead of going to line 3, visually selecting lines 3-5, yanking them, going down to line 10, and pasting the lines with3GVjjjy10Gp, you can just do it from anywhere in the file with:3,5t10.If you want to learn more, I highly recommend Drew Neil’s Practical Vim book, or take a look at the excellent documentation for different vim modes and for the Ex commands copy, move, delete, substitute. And if you want to dig deeper, help is just a
:helpaway.Until next time!
Source: Beyond basic modal editing. Using vim’s command-line mode.
The Ultimate Guide to Robocopy
Common Robocopy Syntax Reference
Why such a long blog post on a single utility? Just feast your eyes on the tables below. You have a lot of options to copy or move files with robocopy! You will more options in the individual sections.
These tables were built from the help syntax returned from
robocopy /?. They’ve been broken up into more meaningful sections, added to over time and cleaned up to provide more useful info.Source Options
Switch Explanation Default Behavior Equivalent Switch Notes /S Copy subfolders /E Copy subfolders including empty subfolders /COPY:[DATSOU] Copy options /COPY:DAT D=Data, A=Attributes, T=Timestamps S=Security=NTFS ACLs, O=Owner info, U=aUditing info. File Data (D) always includes file Timestamps (T) /SEC Copy files with SECurity /COPY:DATS /DCOPY:T Copy directory timestamps /COPYALL Copy ALL file info /COPY:DATSOU This will prevent dehydrating offline files and will instead copy the file’s tag (on emc VNX/Unity systems at least). This is not officially documented! If dehydration is what you need (reason i found this issue), you can’t copy the ACLs along your files. CREDIT: Monsieurx (Reddit) /NOCOPY Copy NO file info useful with /PURGE /A Copy only files with the Archive attribute set /M like /A, but remove Archive attribute from source files /LEV:n Only copy the top n LEVels of the source tree /MAXAGE:n MAXimum file AGE – exclude files older than n days/date /MINAGE:n MINimum file AGE – exclude files newer than n days/date If n < 1900 then n = no of days, else n = YYYYMMDD date /FFT Assume FAT File Times 2-second date/time granularity. This replaces NTFS timestamps. Seems to be more reliable when transferring over a network. /256 Turn off very long path (> 256 characters) support Destination Options
Switch Explanation Default Behavior Equivalent Switch Notes /A+:[RASHCNET] Set file attribute(s) on destination files + add /A-:[RASHCNET] Remove file attribute(s) on destination files /FAT Create destination files using 8.3 FAT file names only /CREATE Create directory tree structure + zero-length files only /DST Compensate for one-hour DST time differences Copy Options
Switch Explanation Default Behavior Equivalent Switch Notes /L List files only Don’t copy, timestamp or delete any files /MOV Move files Delete from source after copying /MOVE Move files and directories Delete from source after copying /sl Copy file symbolic links instead of the target /Z Copy files in restartable mode Survive a network glitch /B Copy files in backup mode /J Copy using unbuffered I/O Recommended for large files /NOOFFLOAD Copy files without using the Windows copy offload mechanism https://docs.microsoft.com/en-us/previous-versions/windows/it-pro/windows-server-2012-R2-and-2012/hh831628(v=ws.11) /EFSRAW Copy any encrypted files using EFS RAW mode /TIMFIX Fix file times on all files, even skipped files /XO Exclude older if destination file exists and is the same date or newer than the source – don’t bother to overwrite it. /XC Exclude changed files /XN Exclude newer files /XX Exclude files present in destination but not source /XX /XF file [file]… Exclude files matching given names/paths/wildcards /XD dirs [dirs]… Exclude directories matching given names/paths. /XF and /XD can be used in combination e.g. ROBOCOPY c:\source d:\dest /XF *.doc *.xls /XD c:\unwanted /S /IA:[RASHCNETO] Include files with any of the given attributes /XA:[RASHCNETO] Exclude files with any of the given attributes /IS Overwrite files even if they are already the same /IT Include tweaked files /XJ Exclude junction points from source /XJ /XJD Exclude junction points from source directories /XJF Exclude junction points from source files /MAX:n Exclude files bigger than n bytes /MIN:n Exclude files smaller than n bytes /MAXLAD:n Exclude files unused since n /MINLAD:n Exclude files used since n If n < 1900 then n = n days, else n = YYYYMMDD date /MIR Mirror a directory tree /PURGE /E /PURGE Delete dest files/folders that no longer exist in source /XL Exclude files present in source but not destination /SECFIX Robocopy /secfix fixes file security on all files, even skipped files. Specify the type of security information you want to copy by also using one of these options: /COPYALL /COPY:O /COPY:S /COPY:U /SEC /ZB Use restartable mode; if access denied use Backup mode Monitoring Options
Switch Explanation Default Behavior Equivalent Switch Notes /R:n Number of retries on failed copies /R:1000000 Always try to set this option. I recommend setting this to 10-20 to not waste time retrying. /W:n Wait time between retries /W:30 Always try to set this option to a lower number to retry more quickly. I suggest 5-10. /REG Save /R:n and /W:n in the Windows registry as default settings /RH:hhmm-hhmm times when new copies can be started /TBD Wait for sharenames to be defined retry error 67 /PF Check run hours on a per file (not per pass) basis /MON:n Run again when more than n changes seen /MOT:m Run again in m minutes, if changed
Source: The Ultimate Guide to Robocopy
mod_rewrite Cheat Sheet by DaveChild
A mod_rewrite Cheat Sheet – a quick reference guide for mod_rewrite, with rewrite flags, regular expression syntax and sample rules.
mod_rewrite Tutorialsmod_rewrite RewriteRule Flags
mod_rewrite RewriteCond Flags
Redirection Header Codes
mod_rewrite Directives
|
Regular Expressions Syntax
There’s an excellent regular expression tester at: http://regexpal.com/
mod_rewrite Server Variables: HTTP Headers
mod_rewrite Server Variables: Server Internals
|
mod_rewrite Sample Rule: Site Moved
Rewrites domain.com to domain2.com
mod_rewrite Sample Rule: Temporary Page Move
Rewrites domain.com/page.html to domain.com/new_page.html
mod_rewrite Sample Rule: Nice URLs
Rewrites domain.com/category-name-1/ to domain.com/categories.php?name=category-name-1
mod_rewrite Server Variables: Special
mod_rewrite Server Variables: Request
mod_rewrite Server Variables: Time
|
|||||||||||||||||||||||||||||||||||||||||||||||||||||||||||||||||||||||||||||||||||||||||||||||||||||||||||||||||||||||||||||||||||||||||||||||
Group Policy Administrative Templates Catalog
New BootHole Vulnerability Revealed, Impacts Billions of Devices | Tom’s Hardware
5 Powerful Python IDEs for Writing Analytics and Data Science Code
Overview Picking a Python IDE is an important choice for any analyst, data scientist, or programmer to make Here are 5 Python IDEs that are popularly used in the analytics and data science industry Introduction Coding is a very personal experience for any data scientist, business analyst, data analyst, or
Source: 5 Powerful Python IDEs for Writing Analytics and Data Science Code
Overview of Pi-hole
Source: Overview of Pi-hole
How to rotate and flip videos using Handbrake – IT Support Guides
How to rotate and flip videos using Handbrake
HandBrake is a free tool that’s available for Windows, Mac OS and Ubuntu that allows you to take a video in various formats and convert it to an MP4.
The steps below show how to rotate the video being processed.
Before beginning, you need to download and install HandBrake.
- Open HandBrake and load your video using the ‘Source’ button to select the video you want to rotate or flip
- Choose where to save the rotated video by clicking on the ‘Browse’ button to select where the converted file will be saved.
- Open the ‘Filters’ tab
- The ‘Rotate’ option allows you to choose four different options
- 0 – do nothing
- 90 – rotate to the right
- 180 – turn upside down
- 270 – rotate to the left
- Choose the rotate option you require
- Click ‘Start Encode’ to begin
- At the bottom of the window you will see the progress
Help! It didn’t work
Try the manual way of rotating, by applying manual filters.
- Open the ‘Video’ tab
- We’ll be working with the ‘Extra Options’ setting.
- Once you have the required command entered, click ‘Start Encode’ to begin.
Rotate 90 degrees clockwise
To rotate 90 degrees clockwise, enter the following command into the ‘Extra Options’ setting:
, --rotate=4Rotate 90 degrees anti-clockwise
To rotate 90 degrees anti-clockwise, enter the following command into the ‘Extra Options’ setting:
, --rotate=7Rotate 180 degrees (upside down)
To rotate 180 degrees so that the video is upside down, enter the following command into the ‘Extra Options’ setting:
, --rotate=3Other options?
The official HandBrake documentation has more detail on what other options are available.
1 : x flip
2 : y flip
3 : 180 degrees rotate (also the DEFAULT)
4 : 90 degrees rotate (clockwise)
5 : 90 degrees rotate + y flip
6 : 270 degrees rotate + y flip
7 : 270 degrees rotate


Source: How to rotate and flip videos using Handbrake – IT Support Guides
How to Configure Networking In Linux With Netplan
Here’s how to use Netplan to configure your Ubuntu Server network interfaces for a static IP address.