Online link generator for Microsoft Store.
Enter the link from the Microsoft Store and click on the checkbox – to get all available links.
Source: Microsoft Store – Generation Project (v1.2) [by @rgadguard & mkuba50]
Online link generator for Microsoft Store.
Enter the link from the Microsoft Store and click on the checkbox – to get all available links.
Source: Microsoft Store – Generation Project (v1.2) [by @rgadguard & mkuba50]
How to force all traffic through OpenVPN
Add the following directive to the server configuration file:
push “redirect-gateway def1”
If your VPN setup is over a wireless network, where all clients and the server are on the same wireless subnet, add the local flag:
push “redirect-gateway local def1”
Pushing the redirect-gateway option to clients will cause all IP network traffic originating on client machines to pass through the OpenVPN server. The server will need to be configured to deal with this traffic somehow, such as by NATing it to the internet, or routing it through the server site’s HTTP proxy.
If you want to configure this on the client side, put
redirect-gateway def1in your client.ovpn file.
How to Allow Users to Install Software without Admin Rights in Windows 10
An admin account on a Windows PC enjoys more privileges than any other account types. This account can install apps and make modifications to the system easily without too many steps. However, sometimes you may want to enable allow users to install software without admin rights in Windows 10. It’s totally cool and possible for you. The following guide will demonstrate multiple ways to do that.
Method 1: Change Your Standard Account to Admin Account to Install Programs
One of the ways to be able to install program without admin rights in Windows 10 is to convert your standard user account to an administrator account on your PC. You can ask your administrator to do this for you by following the following steps:
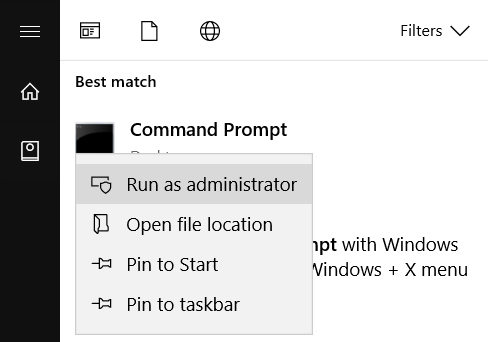
Open the Start Menu, search for Command Prompt, right-click on it and select Run as administrator.
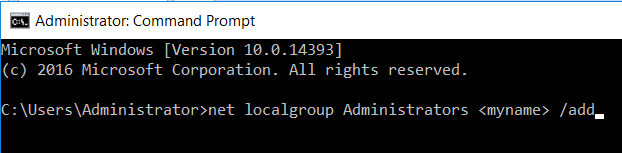
When the command prompt window opens, type in the following command and hit enter. Make sure to replace myname with the username of the account you’re converting to an admin account.
net localgroup Administrators <myname> /add
The account should instantly be converted to an admin account and you should then be able to install programs on your Windows 10 machine.
Source: Guide for Allowing Users to Install Programs without Admin Password in Windows 10
List Hard Drives using Command Prompt & PowerShell in Windows 10
If you frequently work with the Command Prompt or PowerShell, you may need to copy files from or to an external drive, at such, and many other times, you may need to display the drives within the console window. In this post, we will show you how you can list drives using Command Prompt or PowerShell in Windows 10/8/7.
List Hard Drives using Command Prompt
If you need to simply list the drives, you may use WMIC. Windows Management Instrumentation (WMI) is the infrastructure for management data and operations on Windows-based operating systems.
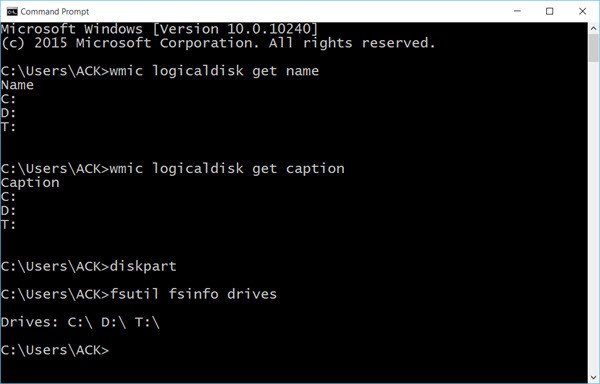
Open a command prompt, and type the following command:
wmic logicaldisk get namePress Enter and you will see the list of Drives.
You can also use the following parameter:
wmic logicaldisk get caption
Using the following will display Device ID and volume name as well:
wmic logicaldisk get deviceid, volumename, descriptionWindows also includes an additional command-line tool for file, system and disk management, called Fsutil. This utility helps you list files, change the short name of a file, find files by SID’s (Security Identifier) and perform other complex tasks. You can also use fsutil to display drives. Use the following command:
fsutil fsinfo drivesIt will show mapped drives too.
You can also use diskpart to get a list of drives along with some more details. The Diskpart utility can do everything that the Disk Management console can do, and more! It’s invaluable for scriptwriters or anyone who simply prefers working at a command prompt.
Open CMD and type diskpart. Next use the following command:
list volume
You will see that the console displays the Volume number and letter, label, formatting type, partition type, size, status, and other information.
List Hard Drives using PowerShell
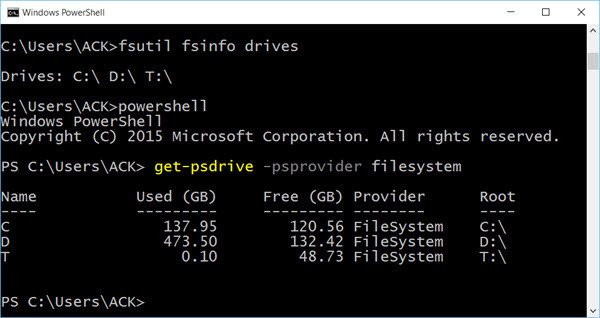
To display drives using PowerShell, type powershell in the same CMD windows and hit Enter. This will open a PowerShell window.
Now use the following command:
get-psdrive -psprovider filesystem
Source: List Hard Drives using Command Prompt and PowerShell
Windows 10 includes the new Resilient File System (ReFS) to overcome the limitations of NTFS while providing compatibility, data protection, and scalability, and here we show you how to try out the new file system.
HKEY_CURRENT_USER\SOFTWARE\Policies\Microsoft\Windows\Explorer
If it doesn’t exist, and you’re stuck in the “Windows” folder, simply right-click on the right-hand sidebar and create a new key. Name it “Explorer,” without the quotes. Click on that new key in the left-hand sidebar, and then right-click again on the right-hand sidebar and create a new DWORD (32-bit value). Name it “DisableSearchBoxSuggestions,” without the quotes or the comma. Then, double-click on it and set its value to 1. Finally, reboot your computer.
Source: How to Disable Bing Search in Windows 10’s Start Menu