This is a beginner-to-beginner post. I can’t emphasize that enough. What I mean is I’m no expert, I’ve just put together this based on my learnings so far.
After many years of bouncing around email clients, I found myself quite dissatisfied with the options. I actually kind of liked the Mail app in Windows, it was basic but worked pretty good. When MS switched over to New Outlook, I hated it due to built in advertising. I tried a ton of new email clients like eMclient, Bluemail etc. but they all had issues on things that I didn’t like. I settled on Thunderbird (TB) just before v.115 was launched (current version 128).
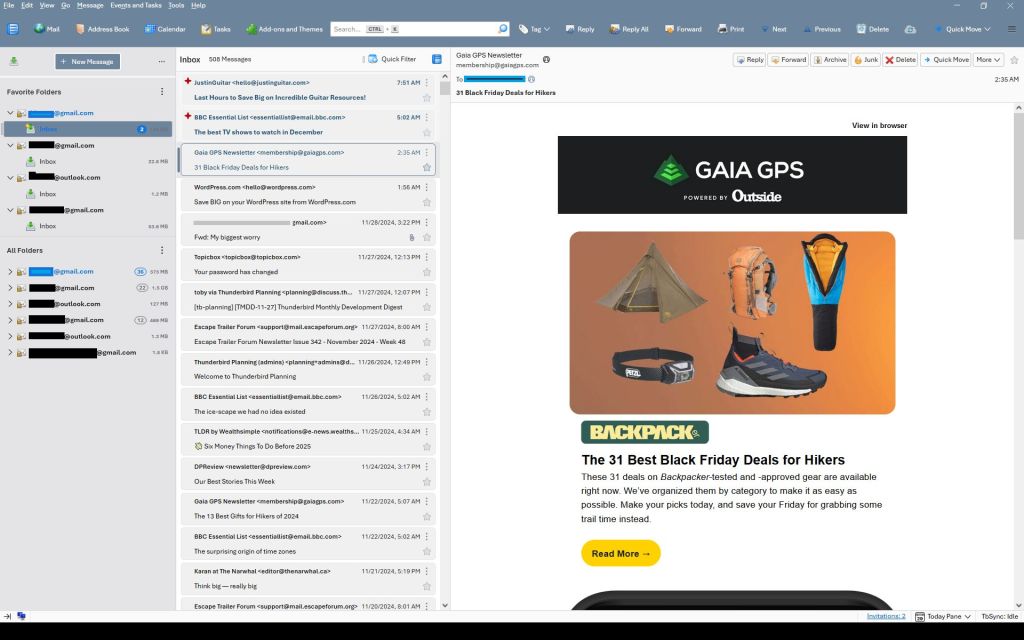
I used TB in the 2000s but forgot why I dropped it. But coming back to it was pretty good right out of the box using three gmail accounts and an outlook account. Mostly through Reddit I started compiling code to customize the UI and some behaviors. So little by little, I learned how to tweak TB to make it look better to me now:
Note just about every color you see can be changed easily if you prefer. This is just one example.
Key changes I made:
Rearranged menus, with drop down and window controls above the search bar
Filled the search bar (Unified bar) with shortcuts to make it more useful
Custom colored the menu, search bar, folder pane, message list etc.
Made sort order so new emails on top, not bottom.
Ditched threaded view
Ditched “hover” highlights when the cursor went over folders or emails
Added detailed message colors for Unread, Read and New emails
Fixed the New Message button and other buttons
Got rid of the many colored lines that occur when emails are forwarded or responded to.
Set up inboxes as favorites to avoid using unified folders
Used alternate TB buttons and icons
Changed the UI base font
Other small changes
This guide is intended to walk you through the basics of setting up TB from original state to something like above, where you can also change colors and other settings to suit your own needs. Some changes are through Settings, but some are through “CSS”. CSS (cascading style sheets) is a way of using text-based coding to make changes. It basically is a new file you add to your profile that overrides settings in the program. I’m no expert but I now know how to set it up, and it isn’t hard.
A few words of warning…this was how I did it on a Windows computer. I imagine it works the same on iOS or Linux, but I have no experience with either of those.
You’ll note I use Vertical View – Folder pane, then Message pane (in card view) then the email window. I don’t know if those are the right names are not. If you want table view of message list, or vertical view…go ahead, I don’t know how much of what follows works with that set up.
Before you start, if you follow some of these changes but don’t see the effect right away, make sure you close and restart TB as many only work after a restart.
Before starting on CSS changes, there are several settings you can make:
Where’s the drop down menu?
Right click in the empty space beside the long search bar and select Menu Bar. It’ll appear below the search bar – we’ll fix that later. Also, menu bar and search bar are the color of windows accent colors but that can be customized as well later.
Hide the Spaces toolbar:
Use View>Toolbars and choose Spaces to hide it. Or use the left pointing arrow at the bottom of it. Or keep it if you like it, but I chose to put similar buttons adjacent to the Search Bar so I don’t use the Spaces bar.
Sort Order:
Default is newest email on bottom of the list – I prefer newest on top.
Click on Tools> Settings. Settings tab opens up.
Scroll to bottom of General Settings section and click on Config Editor
type into the search box: mailnews.default_sort_type (or select it when you see it as you type)
make sure value is set to 18 by selecting the pencil icon, change value, click check mark to save it.
type into the search box: mailnews.default_sort_order (or select it when you see it as you type)
Value default is 1 (ascending), change to 2 (descending) by selecting the pencil icon, change value, click check mark to save it.
NOTE: with this change all messages will now be in descending order unless you previously clicked on the folders before making the change. If you clicked on them before changing the order, those folders will not be affected by the global change. You have to manually change them by selecting them, then View>Sort By> Descending.
Threaded/Unthreaded. Default is threaded – I prefer unthreaded. To change permanently:
View > Sort by > Unthreaded, then
Go to Config Editor (see above under Sort Order)
Type in mailnews.default_view_flags and change the value to 0. Click the check mark and restart TB.
You may need to go back to View>Sort by>Unthreaded but it should stick.
Group By. I like seeing the emails grouped by the date sorts: Today, Yesterday, Last 7 Days, Last 14 days, Older.:
View>Sort by>Group by Sort. But the problem is, it doesn’t stay that way so now you have to
View>Threads> Expand all Threads.
Add-ons Tools > AddOn and Themes > Extensions then use search bar for these – some worth exploring:
Old Icons (I like these the best and use them)
Phoenity Buttons
Phoenity Icons
Unified and or Favorite folders:
For multiple accounts and using unified folders:
Click the 3 dots to the right of the New Message box in the folder pane, then Folder Mode.
Choose both Unified Folders and Favorite Folders.
Right click on an Inbox and choose Favorite, then click on the 3 vertical dots by Favorite Folders and move up or down as you want.
Then down the list in the folders pane you should see a Unified folder structure that has a Unified Inbox. (I keep this off as I’m not a fan of unified inboxes – I have all account Inboxes set a favorites).
Unified Toolbar
I customized it with buttons. To do that, right click in a blank space on it and choose customize. You’ll see I used Mail, Address Book, Calendar, Tasks, Add Ons and Themes on the left side, and Tag, Reply, Reply All, Forward, Print, Next Previous, Delete on the right side. Do what works for you.
I also hid the side vertical Spaces menu. Now that the Unified toolbar has the items from the Spaces toolbar, you can hide it by unchecking View>Toolbars>Spaces
CSS Editing:
Customizing TB through css is quite fun and you can get quite creative. But first you have to enable it as its not ready by default (officially it’s not supported by TB and new program coding can break the following codes at any time):
Enabling css:
go to TB menu Tools > Settings > General
scroll all the way down and click the ‘Config editor’ button on the right
click the double arrow on the right to toggle the value to ‘true’
Next, locate and open your profile folder:
Menu: Help > Troubleshooting Information
Under Application Basics, click on the Open Folder button next to “Profile folder”. You should now see your profile folder being opened in your file manager.
Next, create the folder and its files:
Inside your profile folder, create a new folder named chrome (all lower case) – the chrome folder should end up in a folder that includes stuff like prefs.js and places.sqlite.
Inside the chrome folder, create two new text files (i.e. new Notepad text files) by right clicking and select “new text file”
Name one userChrome.css and userContent.css (case sensitive)
Note: In Windows, you might want to disable the “Hide extensions for known file types” setting in Explorer. Once that’s done, simply create a new text file (Right click ➝ New ➝ Text Document), then make sure to replace the .txt file-extension with .css.
You should now have two empty files called: userChrome.css; userContent.css
You are now ready to enter css code into the userChrome.css file and make changes:
Note: the code parts below are the parts written in Courier Font. Make sure you copy all the parts as there can be a “}” symbol on its own on the last line.
Working with Colors
You’ll see a lot of code includes hex color codes (e.g. #174a70 or just words like white, black, gainsboro). If you are not familiar with codes, see this page: https://htmlcolorcodes.com Note that as you select colors, it gives you the # and then a six number/letter code that comes after the # symbol (e.g. #174a70 is a shade of blue used in Windows).
Its minimal, but the eyedropper lets you select specific colors you might already be using that you want to make the same.
So if you want to change color, just replace the six character code but make sure you keep the # symbol. You can also replace the numbers in front of the “px” code to change sizing.
CSS Codes:
The first section takes the unified tool bar which has menu items etc. and puts it above the search bar. You can change the color code and replace “white” with a color code or name. Changing px values changes heights etc. The maximize, minimize and close controls are moved to the top right corner. You can also change the height and color of the unified search/tool bar:
/*******Move tool bar above unified bar*******/
toolbar#toolbar-menubar {
  Order:            -1 !important;
  background-color: #6D859C !important;  /* Color of menu bar */
  color:            white   !important;  /* Color of the text - if needed */
  padding-top:      0px     !important;
  padding-bottom:   0px     !important;
  margin:           0px     !important;
}

/***** Move window controls up to the menu bar ******/
.titlebar-buttonbox-container { position: fixed;
  top: 0px;
  right: 0px;
  height: 19px !important;
  color:            white   !important;
/******** adjust if necessary **********/ }

/******Adjust and color unified toolbar******/
#unifiedToolbar {
  height:  60px  !important;
  padding-block:   1px  !important;
  margin-block:    0px  !important;
  background:  #6D859C  !important;
  color: white  !important;
}
I’m not a fan of changing colors when you mouse over a folder. This codes makes the hover transparent. You can replace “transparent” with a hex color code if you want a hover color:
This next part changes background color on the left side folder list, changes New Message button color and border, and changes the font family used for the UI:
/*******Background color on folder list******/
#folderPane,
#folderPaneHeaderBar { background-color: #E4E4E6 !important; }

/******Fix the new message button*******/
#folderPaneWriteMessage { background-color: #6D859C !important; border: 2px solid white !important; color: white !important; }

/*******Change universal fonts *******/
*{ font-family: Arial}
This sets background and font color for selected folder:
This next group of three items changes card view from three lines to two lines. You won’t need this if you prefer 3 line card view or use table view, but I think two-line card view is a nice blend of the two standard views:
Note: as of Thunderbird V.139 2 line view option is included in the programs Tools>Settings>Appearance. This code section is no longer needed if using V.139 or newer.
This section allows you to set your message background or message text in the message list to match the color of any tags you are using. Use one or the other if you want but not both as your text and background would be the same.
This next section is what I call the “Detailed Colors” section is super detailed. It gives you total control on colors of emails depending if they are New, Unread or Read. You can change colors of text, the button if it has one, backgrounds, borders etc. The way it works is it first gives a long list of parameters you can change based on email status. E.g. – for Unread messages you can change colors and fonts for when they are default, hover over them, select them, select it and others etc. Same for Read messages, same for New messages – tons of control but a lot to go through. Following setting the conditions, they cade near the bottom applies those conditions so only make changes up to the point where it says “/*table*/”:
For new event and task buttons, this changes the button colors:
/******Fix New Event and New Task buttons***********/
#sidePanelNewEvent { background-color: #E4E4E6 !important; border: 1px solid white !important; color: white !important; }

#sidePanelNewTask { background-color: #E4E4E6 !important; border: 1px solid white !important; color: white !important; }
Hint: You can keep a copy of the userChrome.css file in the same folder and call it userChrome.old or .bak or something – in case you screw up your .css file, you can go back to the last version that worked.
Fixing the multiple lines in forwarded/replied emails:
When emails go back and forth through reply/reply/all/forward, TB adds colored vertical lines to the previous parts. After a few back and forth’s and the email chain can have a lot of these. I like them gone.
This fix is done using the userContent.css file that was created when you enabled css. This file should be alongside you userChrome.css file.