![[ ]](https://www.marcsiegel.us/wp-content/uploads/2025/10/layout.gif)
![[ ]](https://www.marcsiegel.us/wp-content/uploads/2025/10/unknown.gif)
Welcome to Winutil Documentation!
irm "https://christitus.com/win" | iex
Welcome to the official documentation for Winutil, your go-to utility for optimizing and managing your Windows environment. Whether you’re an IT professional, power user, or regular user, Winutil provides a comprehensive set of tools to enhance your Windows experience.
Mayo – 3D CAD viewer and converter – LinuxLinks
Mayo is a 3D CAD viewer and converter which can can read/write 3D files from/to STEP, IGES, STL and many other CAD formats.
GitHub – f3d-app/f3d: Fast and minimalist 3D viewer.
Fast and minimalist 3D viewer. Contribute to f3d-app/f3d development by creating an account on GitHub.
Source: GitHub – f3d-app/f3d: Fast and minimalist 3D viewer.
V1 Engineering Inc

The Mostly Printed CNC
The Mostly Printed CNC, or “MPCNC”, is a highly configurable, easily sourced, and inexpensive CNC platform.
The LowRider CNC
The LowRider CNC is a CNC router that can handle up to full sheet material! If the MPCNC is not big enough for you, this picks up where that left off.
Source: V1 Engineering Inc
Home: ImportYeti – Find Quality Suppliers
ImportYeti finds suppliers & manufacturers based on actionable data
STLGears.com
The Free STL Gear Designer For 3D Printing
Source: STLGears.com
How to Login with a Local Account instead of Domain Account
How to Enable Remote Desktop Using PowerShell?
Recently, one IT team member asked about a PowerShell script to enable remote desktops. In this tutorial, I will explain how to enable Remote Desktop (RDP) using PowerShell with detailed steps.
Table of Contents
Enable Remote Desktop Using PowerShell
Remote Desktop is useful for administrators and users who need to access their computers remotely. Using PowerShell to enable RDP can save time and ensure consistency across multiple machines.
Note: You need administrative privileges on the target machine to enable RDP.
Now, follow the steps to enable remote desktop using PowerShell.
Step 1: Open PowerShell with Administrative Privileges
To enable Remote Desktop, you need to run PowerShell as an administrator. Right-click on the Start menu, select Windows PowerShell (Admin), and click Yes when prompted by User Account Control (UAC).
Step 2: Check the Current RDP Status
Before enabling RDP, it’s a good practice to check if it is already enabled. You can do this by querying the registry:
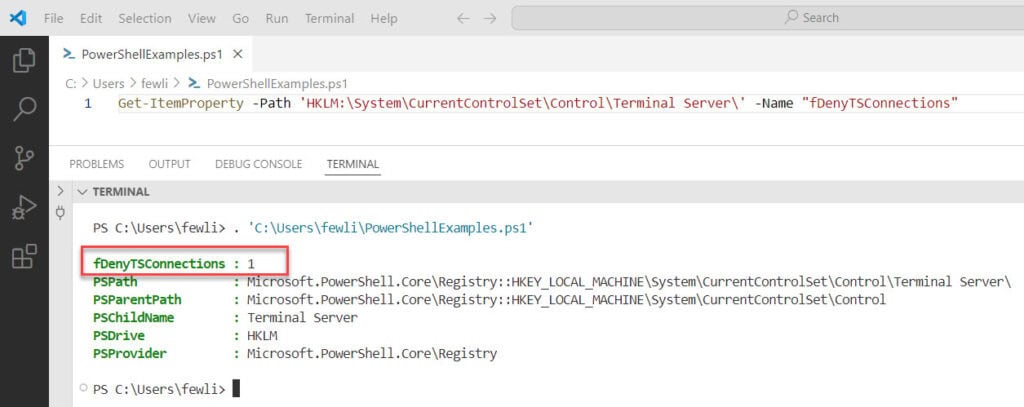
Get-ItemProperty -Path 'HKLM:\System\CurrentControlSet\Control\Terminal Server\' -Name "fDenyTSConnections"If the output is 1, RDP is disabled. If it is 0, RDP is already enabled.
I executed the above PowerShell script on my local machine; you can see the exact output as 1, which means the RDP is disabled.
Step 3: Enable Remote Desktop
To enable Remote Desktop, modify the registry setting and configure the firewall to allow RDP connections. Here’s the PowerShell script to do this:
# Enable RDP
Set-ItemProperty -Path 'HKLM:\System\CurrentControlSet\Control\Terminal Server\' -Name "fDenyTSConnections" -Value 0

# Enable RDP through the firewall
Enable-NetFirewallRule -DisplayGroup "Remote Desktop"
This script sets the fDenyTSConnections value to 0 (enabling RDP) and configures the firewall to allow RDP traffic.
Step 4: Verify RDP is Enabled
After running the script, verify that RDP is enabled by checking the registry value again:
Get-ItemProperty -Path 'HKLM:\System\CurrentControlSet\Control\Terminal Server\' -Name "fDenyTSConnections"The output should now be 0.
Check out Rename a Computer Using PowerShell
Enable RDP on Multiple Machines using PowerShell
If you need to enable RDP on multiple machines, you can use PowerShell remoting. Here’s an example script to enable RDP on a list of remote computers:
$computers = @("PC1", "PC2", "PC3") # Replace with your computer names

foreach ($computer in $computers) {
    Invoke-Command -ComputerName $computer -ScriptBlock {
        Set-ItemProperty -Path 'HKLM:\System\CurrentControlSet\Control\Terminal Server\' -Name "fDenyTSConnections" -Value 0
        Enable-NetFirewallRule -DisplayGroup "Remote Desktop"
    }
}
This script loops through a list of computer names and enables RDP on each one.
Check out Get the Windows Version Using PowerShell
Troubleshoot Common Issues
Now, let me tell you some common issues that you might face while enabling RDP using PowerShell.
Issue 1: PowerShell Remoting Not Enabled
If you encounter an error indicating that PowerShell remoting is not enabled, you can enable it using the following command:
Enable-PSRemoting -ForceThis command configures the computer to receive remote commands.
Issue 2: Firewall Blocking RDP
If the firewall is blocking RDP, ensure that the necessary firewall rules are enabled. You can manually check the firewall settings or use the following command:
Enable-NetFirewallRule -DisplayGroup "Remote Desktop"This command enables the firewall rules for the Remote Desktop.
Now, let me show you some advanced-level settings you can do using PowerShell.
Read Get a List of Installed Programs Using PowerShell
Configure Network Level Authentication (NLA)
Network Level Authentication (NLA) adds an extra layer of security to Remote Desktop connections. To enable NLA, use the following PowerShell script:
Set-ItemProperty -Path 'HKLM:\System\CurrentControlSet\Control\Terminal Server\WinStations\RDP-Tcp\' -Name "UserAuthentication" -Value 1This script sets the UserAuthentication value to 1, enabling NLA.
Set RDP Port
By default, RDP uses port 3389. If you need to change this port for security reasons, you can do so using PowerShell:
Set-ItemProperty -Path 'HKLM:\System\CurrentControlSet\Control\Terminal Server\WinStations\RDP-Tcp\' -Name "PortNumber" -Value 3390Replace 3390 with your desired port number. Ensure you update your firewall rules to allow traffic on the new port.
Ports that are used by Remote Desktop Services
This article introduces the ports that need to be open on firewalls to configure Remote Desktop Services (RDS) correctly.
The information and taxonomy are broken down by role, service, and component, and all inbound and outbound ports used are listed.
From client to RD resource
- TCP 443 (HTTPS): Required if RDWeb is deployed.
- TCP and UDP 3389: Standard Remote Desktop Protocol (RDP) port. It can be configured to a different port number on the host and client.
Remote Desktop Connection Broker (RDCB)
- TCP 5504: Used for connections to RD Web Access.
- TCP 3389: Used for connections to RD Session Host.
- TCP 3389: Used for connections to non-managed VM pools. Managed machines use Virtual Machine Bus (VMBus) to open ports.
- TCP 3389: Client port for clients not using RD Gateway.
- TCP 445 and RPC: Used for connections to RD Virtualization Host.
- TCP 445 and RPC: Used for connections to RD Session Host.
- TCP 5985: Used by Windows Management Instrumentation (WMI) and PowerShell Remoting for administration.
Remote Desktop Gateway
Inbound external internet-based traffic from RD clients to the Gateway
- TCP 443: Used for HTTP (including RPC over HTTP) over SSL. This port can be configured using the RD Gateway Management console.
- UDP 3391: Used for RDP over UDP. This port can be configured using the RD Gateway Management console.
Note
Firewalls that have directional UDP analysis, such as TMG, require UDP “Send Receive” to be configured.
Internal traffic between the Gateway and the required user AD, resource AD, DNS, NPS, and so on
- TCP 88: Used by Kerberos for user authentication.
- TCP 135: Used by the RPC Endpoint Mapper.
- TCP 135: Port that NTDS RPC services listens on AD.
- TCP and UDP 389: Used by the Lightweight Directory Access Protocol (LDAP) for user authentication. It’s required when using LDAP for Certificate Revocation Lists (CRLs).
- TCP and UDP 53: Used by the Domain Name System (DNS) for internal resource name resolution.
- TCP 80: Required when using HTTP for CRLs.
- TCP 21: Required when using FTP for CRLs.
- UDP 1812 and 1813: Required when Network Policy Server (NPS) is used.
- TCP 5985: Used by WMI and PowerShell Remoting for administration.
Internal traffic from the Gateway and the internal RD resources
- TCP and UDP 3389: Used by RDP.
Note
Firewalls that have directional UDP analysis, such as TMG, require UDP “Send Receive” to be configured in the UDP protocol.
Remote Desktop Web Access
If RD Web Access is on a perimeter network, configure the following ports:
- TCP: <WMI Fixed Port>
- TCP 5504: Used for connections to RDCB for centralized publishing.
- TCP 5985: Used by WMI and PowerShell Remoting for administration.
Remote Desktop Session Host
- RD License Server: RPC ports.
- TCP 389 and 636: Used for AD communication.
- TCP 5985: Used by WMI and PowerShell Remoting for administration.
Remote Desktop Virtualization Host
- RD License Server: RPC ports.
- TCP 389 and 636: Used for AD communication.
- TCP 5985: Used by WMI and PowerShell Remoting for administration.
Remote Desktop Licensing Server
For more information, see RDS Licensing (RDSL).
TCP
- TCP 135: Used for RPC for License Server communication and Remote Desktop Session Host.
- TCP 1024-65535 (randomly allocated): Used for RPC in Windows Server versions that are earlier than Windows Server 2008.
- TCP 49152-65535 (randomly allocated): Used for RPC in Windows Server 2008 and later versions.
- TCP 445: Used by the Server Message Block (SMB) protocol.
- TCP 443: Used for communication over the internet to the Microsoft Clearing House.
- TCP 5985: Used by WMI and PowerShell Remoting for administration.
- TCP 139: Used by the NetBIOS session service.
For more information, see How to configure RPC dynamic port allocation to work with firewalls.
NetBIOS
- UDP 137: Used for NetBIOS name resolution.
- UDP 138: Used by the NetBIOS Datagram Service.
- UDP and TCP 389: Used by LDAP with per-user Client Access Licenses (CALs) in AD.
From a proxy standpoint, the registry key HKLM\Software\Microsoft\TermServLicensing\lrwiz\Params shows the Microsoft service that the RD License Server communicates with.