Source: Microsoft Update Catalog
Category Archives: Windows
Installing MS Office Group Policy Administrative Templates (ADMX) | Windows OS Hub
You can use Microsoft Office administrative templates (ADMX) to centrally manage the settings of MS Office programs (Word, Excel. Outlook, Visio, PowerPoint, etc.) in the Active Directory domain using Group…
Source: Installing MS Office Group Policy Administrative Templates (ADMX) | Windows OS Hub
How to Hide or Show User Accounts from Login Screen on Windows | Windows OS Hub
How to Hide or Show User Accounts from Login Screen on Windows
By default, the Windows login screen displays the account of the last user who logged on to this computer and a list of all local users. Windows allows you to hide or show the last signed-in user name, or even list all local or active domain users on the computer sign-in screen.
Contents:
Hide Last Signed-in Username from Windows Login Screen
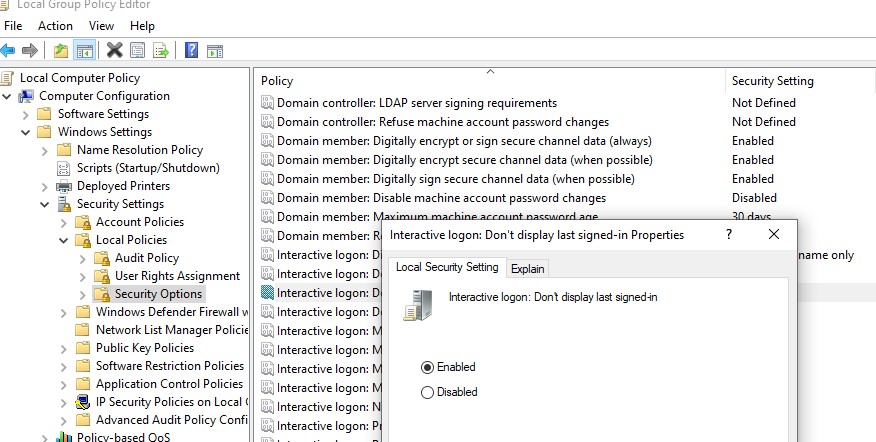
Users find it convenient to see the last logged account name on the Windows Logon Screen without having to type it in manually each time. For security reasons, you can prevent the last username from being displayed on the Windows logon screen on public computers (or other insecure locations) by using GPO:
- Open the domain (
gpmc.msc) or local Group Policy editor (gpedit.msc) and go Computer Configuration -> Windows Settings -> Security Settings -> Local Policies -> Security Options;- Enable the policy Interactive logon: Don’t display last signed-in. This policy is disabled by default;
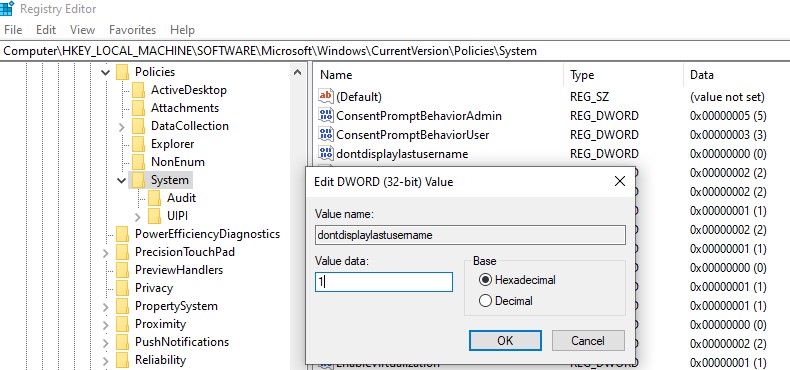
 You can hide the last logged username from the sign-in screen by changing the registry parameter. Go to reg key HKLM\SOFTWARE\Microsoft\Windows\CurrentVersion\Policies\System, create a new DWORD parameter named dontdisplaylastusername with the value 1.
- To hide the logged-in username on the lock screen (when the computer is locked by pressing
Win+Lor through the lock screen GPO), enable the Group Policy option “Interactive logon: Display user information when the session is locked” and set the value “Do not display user information”.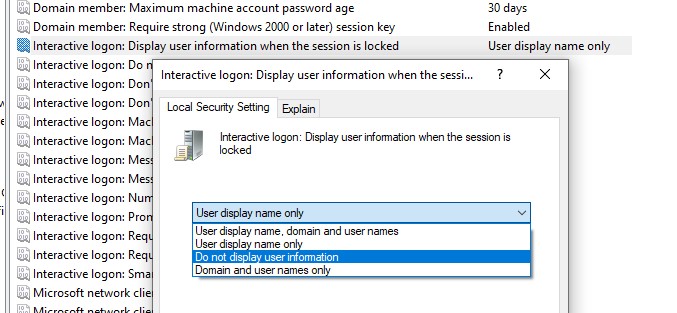 The registry parameter DontDisplayLockedUserId in the same registry key with a value of 3 matches this policy setting.
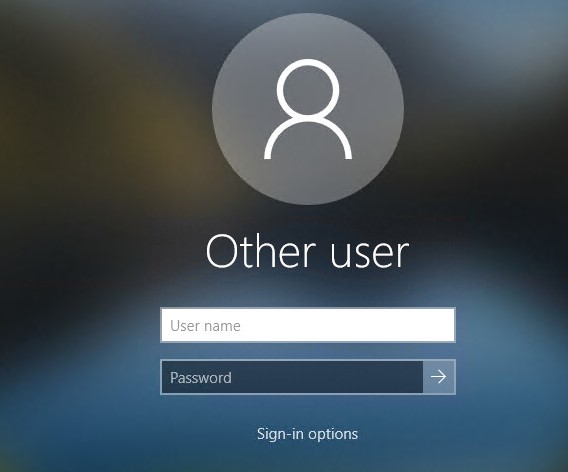
Blank username and password fields now appear on the Windows logon and lock screens instead of the previously signed-in username.
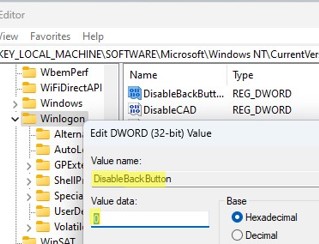
You can hide the list of users from the Windows lock screen by using the DisableBackButton registry parameter:
reg add "HKLM\SOFTWARE\Microsoft\Windows NT\CurrentVersion\Winlogon" /t REG_DWORD /f /d 0 /v DisableBackButtonTo unlock the computer, the user must enter their password. To view a list of local user accounts, the user must first press the Switch User button on the lock screen.
Show All Local Users on the Windows Sign-in Screen
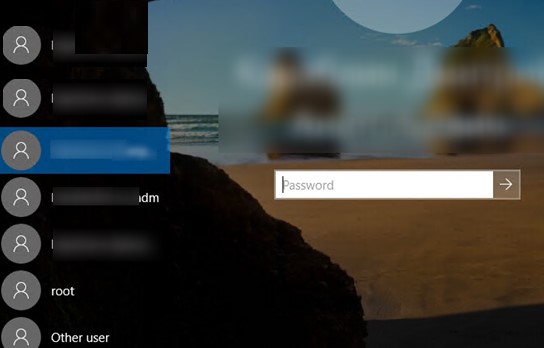
By default, modern Windows builds (tested on Windows 11 23H2 and Windows 10 22H2) always show a list of enabled local users in the bottom left corner of the login screen. This only works on computers that are not joined to the Active Directory domain. Hidden (see below) and disabled user accounts are not displayed on the sign-in screen.
To log on to the computer, the user simply clicks on the required user account and enters its password.
If there is no password set for the user account (blank password), simply select a user and click the Sign-In button to automatically log on to Windows without a password.If the list of local users is not displayed on the Windows logon screen, check the following settings in the Local GPO editor (
gpedit.msc):
- Interactive Logon: Do not display last signed-in =
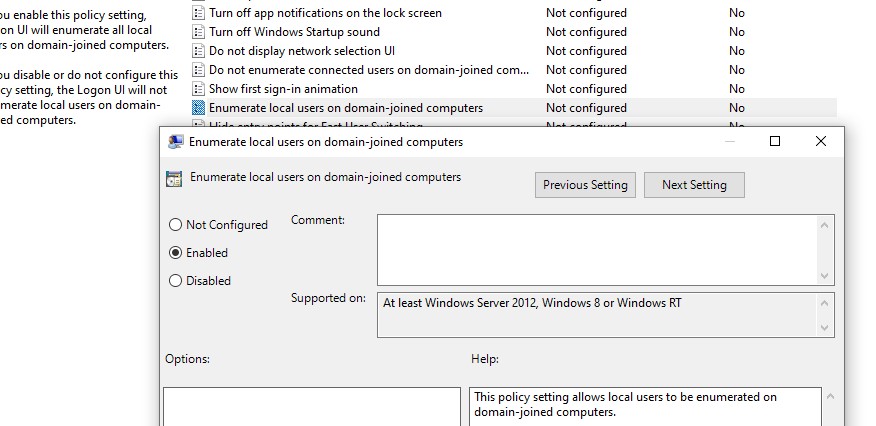
Disabled(Computer Configuration -> Windows Settings -> Security Settings -> Local Policies -> Security Options);- Enumerate local users on domain-joined computers =
Enabled(Computer Configuration -> Administrative Templates -> System -> Logon).
Restart your computer to apply the new Group Policy settings.
Show Logged In Domain Users on Windows Logon Screen
If more than one user is using the same computer, you can see a list of users with active sessions on the Windows sign-in screen. An active session means that the user is logged on to the computer. This can be a shared computer (used in user switching mode), a kiosk, Windows Server hosts running the RDS role, or Windows 11/10 devices that allow multiple RDP connections).
Check that the following policies are disabled in Computer Configuration -> Windows Settings -> Security Settings -> Local Policies -> Security Options:
- Interactive logon: Don’t display last signed-in: Disabled
- Interactive logon: Don’t display username at sign-in: Disabled
Then disable the GPO options in Computer Configuration -> Administrative Templates -> System -> Logon:
- Block user from showing account details on sign-in: Disabled
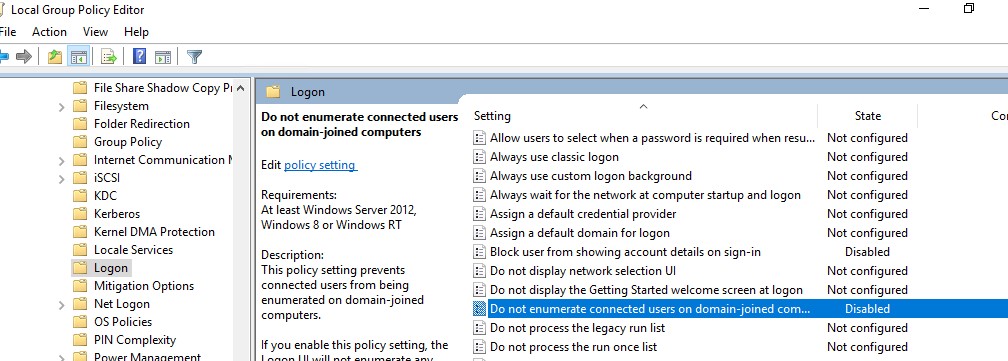
- Do not enumerate connected users on domain-joined computer: Disabled
On a domain-joined computer, you can check the resulting settings of these GPO options using thersop.mscor gpresult.A list of logged-in users will then appear on the Windows Welcome Screen. Both active and disconnected user sessions (for example, due to RDP timeout) are displayed.
You can display Active Directory user profile photos on the Windows logon screen instead of the default user icons.Hide Specific User Accounts from the Windows Sign-in Screen
The Windows Welcome screen always displays users who are members of one of the following local groups: Administrators, Users, Power Users, and Guests (except the disabled user accounts).
You can hide specific users from the list on the Windows login screen through the registry. For each user you want to hide, create a DWORD parameter under the reg key
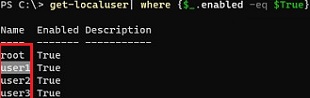
HKLM\SOFTWARE\Microsoft\Windows NT\CurrentVersion\Winlogon\SpecialAccounts\UserListwith the username and value 0.List all local user account names using PowerShell or cmd:
Get-LocalUser | where {$_.enabled –eq $true}Or:
Net user
To hide a specific user account (for example, user123) from the Windows sign-in screen, run the command:
reg add "HKLM\SOFTWARE\Microsoft\Windows NT\CurrentVersion\Winlogon\SpecialAccounts\UserList" /t REG_DWORD /f /d 0 /v User123
If you want to show the hidden user on the login screen, remove this registry entry or change its value to 1.If the built-in Windows Administrator account is enabled, and it is not the only account with local administrator permissions on the computer (!!!), you can also hide it:
reg add "HKLM\SOFTWARE\Microsoft\Windows NT\CurrentVersion\Winlogon\SpecialAccounts\UserList" /t REG_DWORD /f /d 0 /v administratorTo hide all users except the last logged-on user, set the following GPO settings in Computer Configuration -> Administrative Templates -> System -> Logon:
- Enumerate local users on domain-joined computers = Disabled
- Do not enumerate connected users on domain-joined computer = Enabled


Source: How to Hide or Show User Accounts from Login Screen on Windows | Windows OS Hub
Setting up Vim for YAML editing
Setting up Vim for YAML editing
In this blog post I’m going to show how to set up Vim for easier YAML editing.
You can scroll down to the end for a summary of all installed plugins and config file changes.
Syntax Highlighting
There’s not much to do here. VIM has YAML syntax highlighting built-in and it’s great.
A few years back YAML highlighting in Vim was very slow, and there was often a noticeable lag when opening large files. The workaround was to use the vim-yaml plugin for fast syntax highlighting.
I decided to make a performance benchmark. I loaded up a large YAML file (6100 lines) and compared the time:
# default syntax highlighting
$ vim gen-istio-cluster.yaml --startuptime default.log
$ tail -1 default.log
055.563

# vim-yaml plugin
$ vim gen-istio-cluster.yaml --startuptime vimyaml.log
$ tail -1 vimyaml.log
060.320
As we can see the default syntax highlighting is just as fast as the plugin and there’s no need to install a separate plugin to fix the slow syntax highlighting anymore.
Indentation
Indentation probably the most annoying part about editing YAML files. Large documents with deeply nested blocks are often hard to track and errors are easily made.
YAML documents are required to have a 2 space indentation. However, Vim does not set this by default but it’s an easy fix by putting the following line in the vim config:
autocmd FileType yaml setlocal ts=2 sts=2 sw=2 expandtab
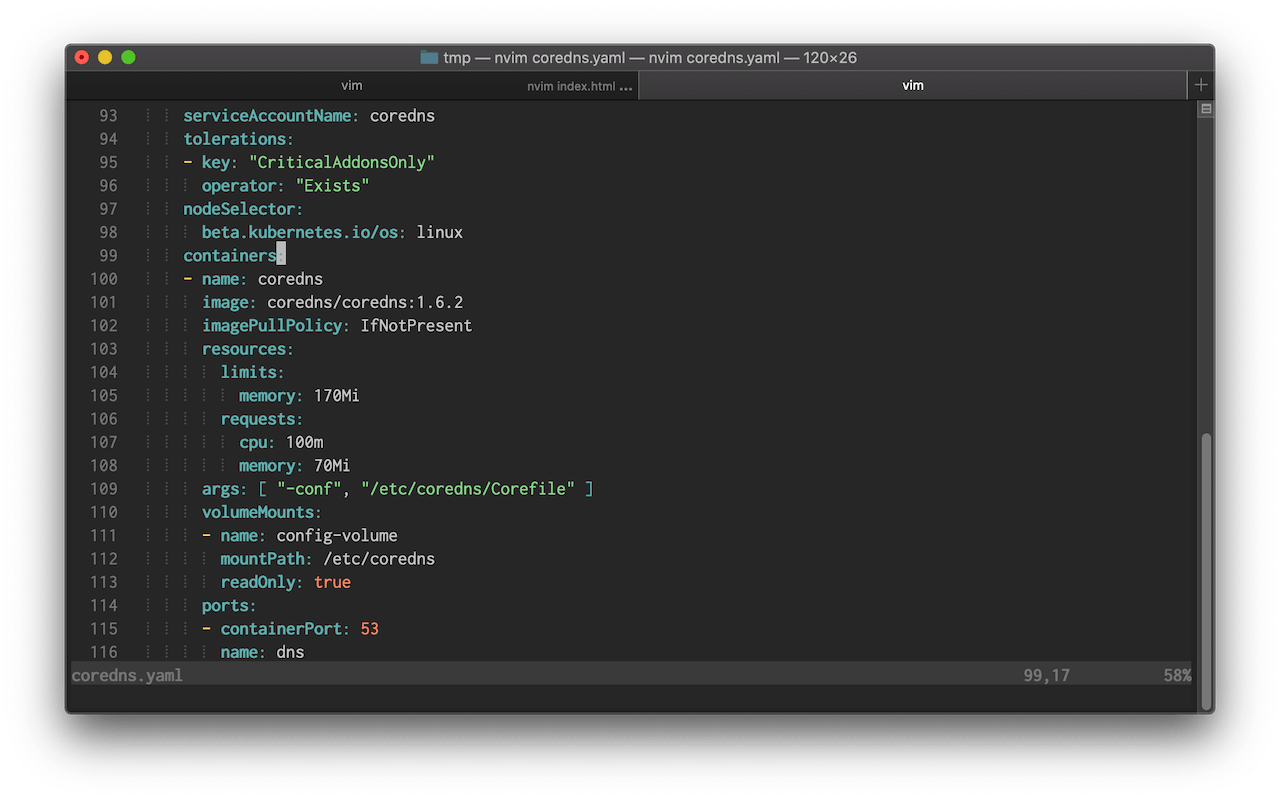
We can also setup Indentation guides. Indentation guides are thin vertical lines at each indentation level and useful to help line up nested YAML blocks.
We can display those lines by using the indentLine plugin. I’ve modified the indentation character to display a thinner line (default is “¦”):
let g:indentLine_char = '⦙'
The result should look like this:
Folding
With folding we can hide parts of the file that are not relevant to our current task.
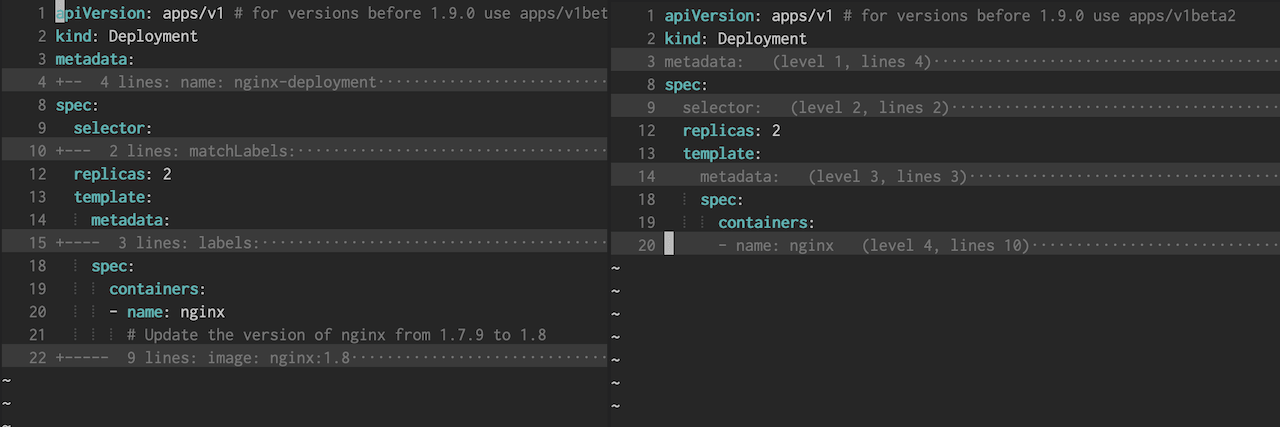
Vim has built-in support for folding based on the indentation level but the default folding rules make it hard to tell what is folded. This is because the folding starts on the line following the start of a block. To change this we can install the vim-yaml-folds plugin.
Here’s a side-by-side comparison of the default folding (left) compared to vim-yaml-folds (right):
To work with folding we need to remember a few keyboard commands. Vimcasts has a great episode on this here. Most of the time I use the following commands:
- za: Toggle current fold
- zR: Expand all folds
After the plugin is installed and folding is enabled the default settings will fold all blocks by default. To start with unfolded content we can set:
set foldlevelstart=20
There’s also a plugin called restore_view which will save the folds for each file. But be aware that this plugin will create an extra file with folding information for each opened document.
Linting
Linting will analyze the code and show any potential errors while we’re writing it which helps us catch formatting or syntax errors early on.
To do this in Vim we can use ALE, an asynchronous linting framework that has support for many languages and tools including YAML. To enable YAML linting in ALE we have to install yamllint, a Python-based YAML linter.
Installation instructions are here. On macOS we can install it with Homebrew:
$ brew install yamllint
The default configuration is fairly strict and shows errors in document style such as line length, trailing spaces or comment indentation.
We can modify the configuration to be less strict. Yamllint already comes with a relaxed version of the default config that is a good starting point. The only additional thing I’ve decided to disable is line length checking.
To do this we open up ~/.config/yamllint/config and paste the following:
extends: relaxed

rules:
  line-length: disable
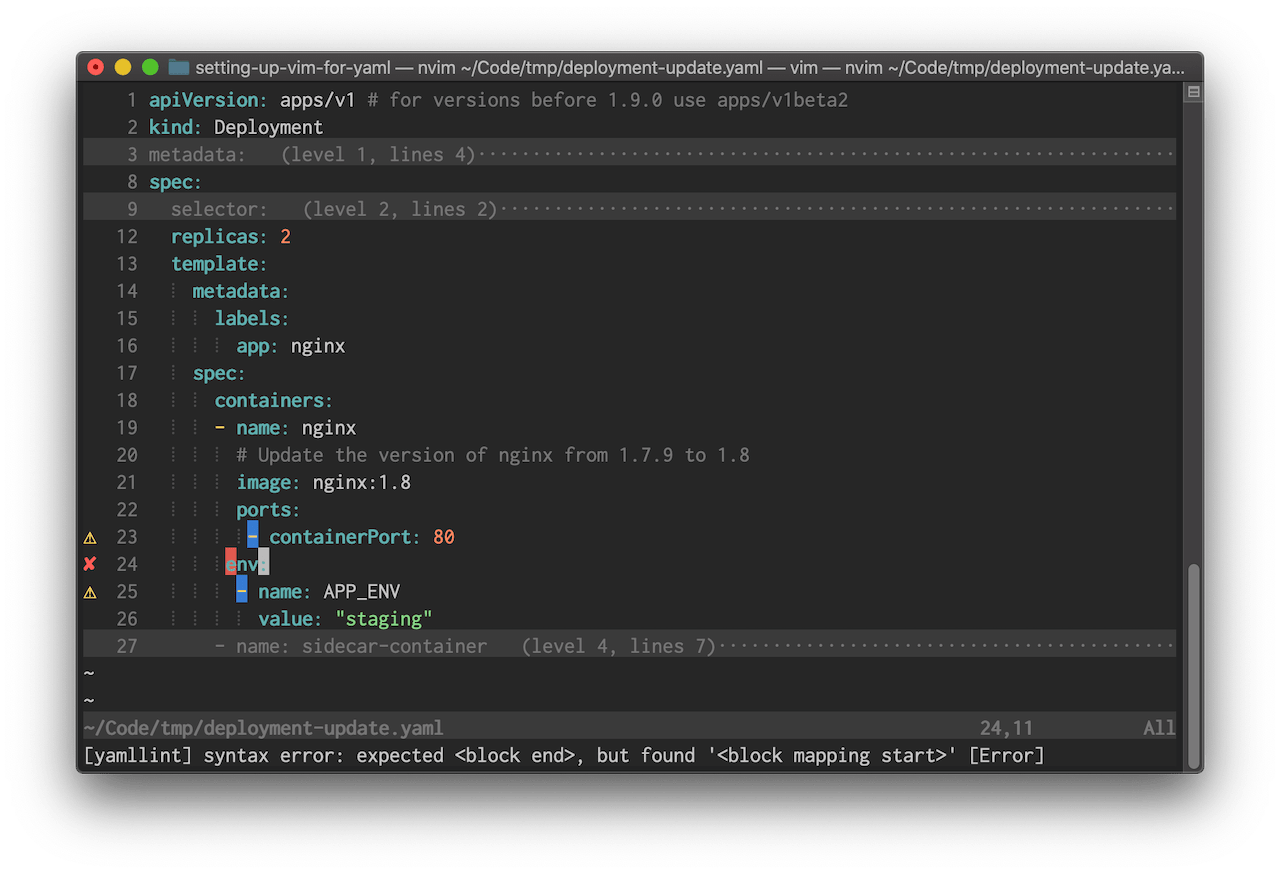
I’ve modified the ALE configuration to change the message format, error symbols and only lint when the file is saved:
let g:ale_echo_msg_format = '[%linter%] %s [%severity%]'
let g:ale_sign_error = '✘'
let g:ale_sign_warning = '⚠'
let g:ale_lint_on_text_changed = 'never'
We can see the errors and warnings on the left side:
Summary
Here’s a summary of the plugins, applications and config modifications:
Vim Plugins
Applications
Config
In ~/.vimrc or ~/.config/nvim/init.vim
autocmd FileType yaml setlocal ts=2 sts=2 sw=2 expandtab

set foldlevelstart=20

let g:ale_echo_msg_format = '[%linter%] %s [%severity%]'
let g:ale_sign_error = '✘'
let g:ale_sign_warning = '⚠'
let g:ale_lint_on_text_changed = 'never'
In ~/.config/yamllint/config
extends: relaxed

rules:
  line-length: disable
Source: Setting up Vim for YAML editing
How to Change Window Border Settings on Windows 11 [Color, Size]
How do I change the window border size on Windows 11?
- Press Windows +R to open the Run dialog box.
- Type regedit and click OK to open Registry Editor.
- Navigate to this path:
Computer\HKEY_CURRENT_USER\Control Panel\Desktop\WindowMetrics- Locate the Border Width option from the right pane and double-click to open it.
- Change the Value data to any value between 0 to -750, then click OK.
- Now locate PaddedBorderWidth, double-click it, change the Value data to 0, then click OK.
- Close Registry Editor and restart your computer to change the border thickness.
Other Windows 11 Changes to Windows Border
- Rounded corners – Windows 11 introduced rounded corners for all windows, including the title bar and borders, giving the OS a cohesive look.
- New accent color feature– Customize the color of the border and title bars irrespective of the theme selected; launch Settings>Personalization>Colors, then Accent color and choose a color.
- Dark Themes – This can be applied to the entire system; for that, press Windows + I to open Settings>Personalization>Colors, locate Choose your mode, & select Dark on drop-down.
- Light Theme – Choose a light theme for the entire system; for that, open Settings>Personalization>Colors, then Choose your mode, and select Light on the drop-down menu.
- Colors on Title Bar – Open Settings>Personalization>Colors, then switch the toggle on for the Show accent color on title bars and windows borders option, then select a color from the palette.
How do I remove window borders in Windows 11?
To disable window border color on Windows 11, all you need to do is switch off the toggle next to the Show accent color on title bars and windows borders in the Settings app.


Source: How to Change Window Border Settings on Windows 11 [Color, Size]
Sysinternals
Win11 Setup for local account
Go through the normal installation process until you get to the sign-in screen
Press <Shift> + <F10> to open elevated command prompt
net user "YourUserName" */add
net localgroup administrators "YourUserName" / add
net user "YourUserName" /active:yes
net user "YourUserName" /expires:never
net user "Administrator" /active:no
net user "defaultUser0" /delete
Run net user to ensure that all was done properly. You should see the new user as admin account, and no default user.
Run regedit Computer\HKEY_LOCAL_MACHINE\SOFTWARE\Microsoft\Windows\CurrentVersion\OOBE
Delete 3 values: DefaultAccountAction, DefaultAccountSAMName, DefaultAccountSID
Rename value LaunceUserOOBE to SkipMachineOOBE and sure value is 1. Case is important.
Exit regedit.
Reboot machine with shutdown /r /t 0
Welcome to Winutil Documentation!
irm "https://christitus.com/win" | iex
Welcome to the official documentation for Winutil, your go-to utility for optimizing and managing your Windows environment. Whether you’re an IT professional, power user, or regular user, Winutil provides a comprehensive set of tools to enhance your Windows experience.
How to Login with a Local Account instead of Domain Account
How to Enable Remote Desktop Using PowerShell?
Recently, one IT team member asked about a PowerShell script to enable remote desktops. In this tutorial, I will explain how to enable Remote Desktop (RDP) using PowerShell with detailed steps.
Table of Contents
Enable Remote Desktop Using PowerShell
Remote Desktop is useful for administrators and users who need to access their computers remotely. Using PowerShell to enable RDP can save time and ensure consistency across multiple machines.
Note: You need administrative privileges on the target machine to enable RDP.
Now, follow the steps to enable remote desktop using PowerShell.
Step 1: Open PowerShell with Administrative Privileges
To enable Remote Desktop, you need to run PowerShell as an administrator. Right-click on the Start menu, select Windows PowerShell (Admin), and click Yes when prompted by User Account Control (UAC).
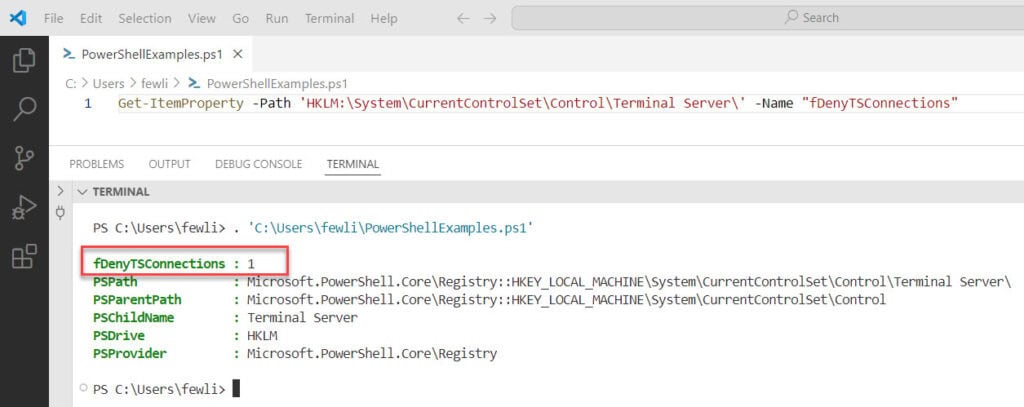
Step 2: Check the Current RDP Status
Before enabling RDP, it’s a good practice to check if it is already enabled. You can do this by querying the registry:
Get-ItemProperty -Path 'HKLM:\System\CurrentControlSet\Control\Terminal Server\' -Name "fDenyTSConnections"If the output is 1, RDP is disabled. If it is 0, RDP is already enabled.
I executed the above PowerShell script on my local machine; you can see the exact output as 1, which means the RDP is disabled.
Step 3: Enable Remote Desktop
To enable Remote Desktop, modify the registry setting and configure the firewall to allow RDP connections. Here’s the PowerShell script to do this:
# Enable RDP
Set-ItemProperty -Path 'HKLM:\System\CurrentControlSet\Control\Terminal Server\' -Name "fDenyTSConnections" -Value 0

# Enable RDP through the firewall
Enable-NetFirewallRule -DisplayGroup "Remote Desktop"
This script sets the fDenyTSConnections value to 0 (enabling RDP) and configures the firewall to allow RDP traffic.
Step 4: Verify RDP is Enabled
After running the script, verify that RDP is enabled by checking the registry value again:
Get-ItemProperty -Path 'HKLM:\System\CurrentControlSet\Control\Terminal Server\' -Name "fDenyTSConnections"The output should now be 0.
Check out Rename a Computer Using PowerShell
Enable RDP on Multiple Machines using PowerShell
If you need to enable RDP on multiple machines, you can use PowerShell remoting. Here’s an example script to enable RDP on a list of remote computers:
$computers = @("PC1", "PC2", "PC3") # Replace with your computer names

foreach ($computer in $computers) {
    Invoke-Command -ComputerName $computer -ScriptBlock {
        Set-ItemProperty -Path 'HKLM:\System\CurrentControlSet\Control\Terminal Server\' -Name "fDenyTSConnections" -Value 0
        Enable-NetFirewallRule -DisplayGroup "Remote Desktop"
    }
}
This script loops through a list of computer names and enables RDP on each one.
Check out Get the Windows Version Using PowerShell
Troubleshoot Common Issues
Now, let me tell you some common issues that you might face while enabling RDP using PowerShell.
Issue 1: PowerShell Remoting Not Enabled
If you encounter an error indicating that PowerShell remoting is not enabled, you can enable it using the following command:
Enable-PSRemoting -ForceThis command configures the computer to receive remote commands.
Issue 2: Firewall Blocking RDP
If the firewall is blocking RDP, ensure that the necessary firewall rules are enabled. You can manually check the firewall settings or use the following command:
Enable-NetFirewallRule -DisplayGroup "Remote Desktop"This command enables the firewall rules for the Remote Desktop.
Now, let me show you some advanced-level settings you can do using PowerShell.
Read Get a List of Installed Programs Using PowerShell
Configure Network Level Authentication (NLA)
Network Level Authentication (NLA) adds an extra layer of security to Remote Desktop connections. To enable NLA, use the following PowerShell script:
Set-ItemProperty -Path 'HKLM:\System\CurrentControlSet\Control\Terminal Server\WinStations\RDP-Tcp\' -Name "UserAuthentication" -Value 1This script sets the UserAuthentication value to 1, enabling NLA.
Set RDP Port
By default, RDP uses port 3389. If you need to change this port for security reasons, you can do so using PowerShell:
Set-ItemProperty -Path 'HKLM:\System\CurrentControlSet\Control\Terminal Server\WinStations\RDP-Tcp\' -Name "PortNumber" -Value 3390Replace 3390 with your desired port number. Ensure you update your firewall rules to allow traffic on the new port.