WoeUSB is an application for GNU/Linux that enables you to create bootable USB media for Windows from Windows ISO images or DVDs.
Source: Easily make a Windows bootable USB from within Linux Mint with WoeUSB – gHacks Tech News
Source: Easily make a Windows bootable USB from within Linux Mint with WoeUSB – gHacks Tech News
Enterprise Policy Generator is a new add-on for the Firefox web browser by Sören Hentzschel to create cross-platform policy files for Firefox.
Source: Enterprise Policy Generator add-on for Firefox – gHacks Tech News
By Mark Russinovich
Updated: February 18, 2019
Download Sysinternals Suite (23.2 MB)
Download Sysinternals Suite for Nano Server (4.6 MB)
The Sysinternals Troubleshooting Utilities have been rolled up into a single Suite of tools. This file contains the individual troubleshooting tools and help files. It does not contain non-troubleshooting tools like the BSOD Screen Saver.
The Suite is a bundling of the following selected Sysinternals Utilities: AccessChk, AccessEnum, AdExplorer, AdInsight, AdRestore, Autologon, Autoruns, BgInfo, BlueScreen, CacheSet, ClockRes, Contig, Coreinfo, Ctrl2Cap, DebugView, Desktops, Disk2vhd, DiskExt, DiskMon, DiskView, Disk Usage (DU), EFSDump, FindLinks, Handle, Hex2dec, Junction, LDMDump, ListDLLs, LiveKd, LoadOrder, LogonSessions, MoveFile, NotMyFault, NTFSInfo, PageDefrag, PendMoves, PipeList, PortMon, ProcDump, Process Explorer, Process Monitor, PsExec, PsFile, PsGetSid, PsInfo, PsKill, PsList, PsLoggedOn, PsLogList, PsPasswd, PsPing, PsService, PsShutdown, PsSuspend, PsTools, RAMMap, RegDelNull, RegHide, RegJump, Registry Usage (RU), SDelete, ShareEnum, ShellRunas, Sigcheck, Streams, Strings, Sync, Sysmon, TCPView, VMMap, VolumeID, WhoIs, WinObj, ZoomIt
Download Sysinternals Suite (22.6 MB)
Download Sysinternals Suite for Nano Server (4.7 MB)
Source: Sysinternals Suite – Windows Sysinternals | Microsoft Docs
psexec executable is located..\psexec -s -i cmd.exe to open a new cmd window.taskschd.msc (or %windir%\system32\taskschd.msc).Source: windows 10 – Can’t modify task “Reboot” in win10 home – Super User
Customize a Windows 10 update without receiving any forced updates on your computer. Here’s how to make the change in Registry:
1. Use the Windows key + R keyboard shortcut to open the Run command.
2. Type regedit, and click OK to open the Registry.
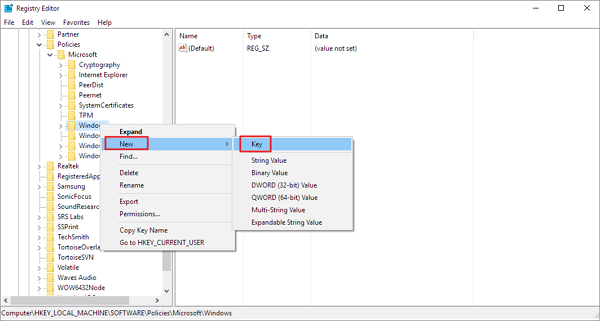
Browse the following path:
HKEY_LOCAL_MACHINE\SOFTWARE\Policies\Microsoft\Windows
3. Right-click the Windows (folder) key, select New, and then click Key.
4. Name the new key WindowsUpdate and press Enter.
5. Right-click the newly created key, select new, and click Key.
6. Name the new key AU and press Enter.
Inside the newly created key, right-click on the right side, select New, and click on DWORD (32-bit) Value.
7. Name the new key AUOptions and press Enter.
Double-click the newly created key and change its value to 2. It’s for “Notify for download and notify for install”. Click OK.
8. Close the Registry to complete the task.
Using this value prevents Windows 10 from downloading updates automatically, and you’ll get a notification when new updates are available. By this way, you can avoid any auto Windows 10 update effectively.
Source: How to Disable Windows 10 Update in Every Way – EaseUS
How to Start, Stop, Restart, Enable, and Disable Services in Windows 10
Source: Start, Stop, and Disable Services in Windows 10 – Windows 10 Help Forums
This post will show you how to remove the 3D Objects folder in the This PC folder of Windows 10 File Explorer using the Registry Editor or Ultimate Windows Tweaker.
Source: Remove 3D Objects folder under This PC in Windows 10
First of all, to disable all the other Xbox services: right-click Start, click Run, enter ‘services.msc’—backup the list before making changes by right-clicking at the top left ‘Services (Local)’ -> ‘Export List’.
Now find all the services involving Xbox, right-click each one and do the following:
General tab: change Startup type to ‘Disabled’
Recovery tab: change all three conditions to ‘Take no action’
Feel free, with caution, to do this for any other unwanted app eg., wallet, maps, fax/printer, cloud and/or updating services for Razer/Adobe/Skype
Now to get around Denied Access to Xbox Game Monitoring. Do the following. Right-click Start, click Run, type ‘regedit’. Always backup registry before making changes.
Locate: Computer\HKEY_LOCAL_MACHINE\SYSTEM\CurrentControlSet\Services\xbgm
Change Start REG_DWORD—-> (by right-clicking Start ‘change binary’) then change the first 03 to 04 —-> the value will update from 0x00000003 (3) to 0x00000004 (4)
The service is now disabled. You can Restart your computer. Also if you want, you can now delete/rename the dll file located at C:\Windows\System32\xbgmsvc.dll
If you get an error that you need permission from the owner to make changes, then google how to transfer ownership of the System32 folder. I’d highly suggest backing up the System32 folder before altering any of the files.
After every Windows update check and re-disable the above along with the other Windows Gaming settings. Updates are highly likely to undo these changes.
Originally from the reddit article in:
How do I disable "Xbox Game Monitor" Service?
byu/ReadFoo inWindows10