Prerequisite and Basic Configuration:
Install Java SDK: See Java SDK download and Linux install
Web Browser Configuration: Mozilla Firefox/SeaMonkey
GNOME Desktop Proxy configuration: (required by Ximian Evolution below)
See YoLinux GNOME Desktop tutorial: Proxy configuration
Mounting/Integrating with the Microsoft File Servers:
Accessing MS/Windows file servers:
MS/Windows file shares are accessed using a MS/Windows login and password thus I mount the file systems in user directories as they are user resources. Check to see if the proper SAMBA packages are installed: rpm -qa | grep samba. The packages samba-common, samba-client and samba should be installed.
Mount points: The local Linux system mount point choice and method of access is actually important. If it is a multiuser system and the file server is using user privileges to mount and access the file then it might be prudent to use a mount point local to the user. If the system is owned and used solely by the user then I recommend creating a directory in /mnt and using it as a mount point. In either case a soft link (ln -s) to the $HOME/.gnome-desktop/ (RH 7-9) directory will create a nice user interface icon for access purposes. (Fedora Core 3: Use the directory $HOME/Desktop/)
[Potential Pitfall]: The mount point to the user’s home directory MUST be recognized by the admin as a potential pitfall. When removing a user from the system, the command “userdel -r” will recursively delete files and directories found below the home directory. The command “rm -R” will NOT follow sym links thus sym links to $HOME/.gnome-desktop/ are safe. The directories mounted to directories below the $HOME/ path may not be safe from mass deletion.
Create the desktop mount point which will provide a desktop icon and app link to the Nautilus file manager to view files on the server:
- System mount point: /mnt/
[root]# mkdir $HOME/.gnome-desktop/MS-SERVER-NAME
[root]# mkdir /mnt/MS-SERVER-NAME
[root]# mkdir /mnt/MS-SERVER-NAME/MS-Windows-Share
[root]# ln -s /mnt/MS-SERVER-NAME/MS-Windows-Share $HOME/.gnome-desktop/MS-SERVER-NAME
Note Fedora Core 3: $HOME/Desktop/
or
- User mount point: $HOME/
[root]# mkdir $HOME/.gnome-desktop/MS-SERVER-NAME
[root]# mkdir $HOME/MS-SERVER-NAME
[root]# mkdir $HOME/MS-SERVER-NAME/MS-Windows-Share
[root]# ln -s $HOME/MS-SERVER-NAME/MS-Windows-Share $HOME/.gnome-desktop/MS-SERVER-NAME
See “Potential Pitfall” above before using your home directory as a mount point!!
Use one of the following methods: (I prefer method 1)
- Directly and upon system boot, mount MS/Windows file server:
Create file ~/.smbpassword (chmod 400 $HOME/.smbpassword)
username = ms-windows-login-name
password = ****
Edit file: /etc/fstab
(you need to be root to edit this file.) and add the following line: (one line. May be shown here as word-wrapped)
CIFS:
//MS-SERVER-NAME/MS-Windows-Share /mnt/MS-SERVER-NAME/MS-Windows-Share cifs credentials=/home/linux-user-id/.smbpassword,workgroup=MS-WINDOWS-DOMAIN,uid=linux-user-id,gid=linux-user-group-name 0 0
or SMBFS:
//MS-SERVER-NAME/MS-Windows-Share /mnt/MS-SERVER-NAME/MS-Windows-Share smbfs credentials=/home/linux-user-id/.smbpassword,workgroup=MS-WINDOWS-DOMAIN,uid=linux-user-id,gid=linux-user-group-name 0 0
Mount: [root]# mount /mnt/MS-SERVER-NAME/MS-Windows-Share
Unmount: [root]# umount /mnt/MS-SERVER-NAME/MS-Windows-Share
Note:
- “cifs” is a newer virtual file system supporting locking, Unicode, hardlinks, etc while “smbfs” (Server Message Block) is an older less advanced protocol.
CIFS man pages:
- If the uid and gid are omitted you may only have read access to the MS/Windows server. The uid/gid may be the alphanumeric name or the system user/group numbers.
- Directly mount MS/Windows file server: (as root) (one line – may be shown wordwrapped)
[root]# mount -t smbfs -o username=ms-windows-user-id,workgroup=MS-WINDOWS-DOMAIN,uid=linux-user-id,gid=linux-user-group-name //MS-SERVER-NAME/MS-Windows-Share /mnt/MS-SERVER-NAME/MS-Windows-Share
password:
[root]# umount /mnt/MS-SERVER-NAME/MS-Windows-Share
Password can also be specified on the command line:
- username=ms-windows-user-id,password=supersecret
- username=ms-windows-user-id,password=
(This will specify a “null” password.)
Note that enterprise systems may be using higher levels of security in which case a mount may look more like the following:
[root]# mount -t cifs -o user=WinDomain/userid -o sec=ntlmv2 //MS-SERVER-NAME/MS-Windows-Share-name /mnt/local-linux-mount-point
Note:
- The option “,_netdev” may be added after the user to delay mounting until the network has been enabled.
- The CIFS filesystem was introduced as a sucessor to the SMBFS file system and is more feature rich to support MS/Windows applications and OS security.
- Use Samba smbmount: (as root) (one line – may be shown wordwrapped)
[root]#smbmount //MS-SERVER-NAME/MS-Windows-Share /mnt/MS-SERVER-NAME/MS-Windows-Share -o username=ms-windows-login-name,workgroup=MS-WINDOWS-DOMAIN
Password:
[root]#smbumount /mnt/MS-SERVER-NAME/MS-Windows-Share
- Use Samba shell: (non-root user)
smbclient //MS-SERVER-NAME/MS-Windows-Share -U MS-WINDOWS-DOMAIN/ms-windows-login-name
Password:
This places you in a shell mounted to the MS/Windows server. You can enter commands such as ls, put and get like in an ftp client. Type ? for a full list of commands.
Note: If the share is a hidden share append a “$” to the name of the share. i.e.: //MS-SERVER-NAME/MS-Windows-Share$
[Potential Pitfall]: If the Microsoft login password is changed, unmount the drive, change the $HOME/.smbpasswd password entry and remount the drive.
[Potential Pitfall]: Spaces in share names are often problematic. Escape with “\040”.
Example: //HOSTNAME/share\040name
[Potential Pitfall]: Using OpenOffice to edit an MS/Word document on a cifs mounted file system. OpenOffice Writer may freeze when editing the document when performing a “saving as” on the file as it does not use cisf byte range locks. Fix using the cisf mount option nobrl.
GUI Mount/Configuration Tools:
List and Browse MS/Windows Shares:
- smbclient:
smbclient -u winlogin -W MsWindowsDomain -L MsWindowsServer
This will list all available servers in the domain and all the shares on the MS/Windows server specified.Man Pages:
- File browser access: The system browsers Gnome/Nautilus and newer versions of KDE/Konqueror can also browse the Microsoft file servers using the URL “smb://“
[Potential Pitfall]: The version of Nautius which ships with Red Hat 8.0 is limited to 12 character (8.3 legacy) problems.Start Nautilus (“Start Here” icon on desktop) and use URL “smb://”
Choose Domain folders then “Shares” folders. Login as MS-WINDOWS-DOMAIN\ms-windows-user-id and password.
- SMB4k: Sourceforge: SMB4K
Scan for active workgroups, hosts and shares, mount/unmount, access files (using Konqueror), printer shares, …
Requires QT libraries 3.1+. (RH 9.0 uses QT3.1 thus OK) Binaries for Fedora, SUSE and Debian.
Note: Requires root access to dynamically mount MS/Windows shares. To give users this privilege, apply the “sticky bit” to smbmnt:
chmod a+t /usr/bin/smbmnt
- Also see:
Mounting a MS/Windows NTFS or DOS Hard Drive:
This procedure is common for dual boot systems and for those who wish to access legacy data. The NTFS file system is used with MS/Windows NT, 2000 and XP. Read only access is available with the NTFS kernel module. The default Red Hat compiled kernels support these NTFS modules. If compiling from source be sure to set the following in kernel-XXXXX.config: CONFIG_NTFS_FS=m (read-only NTFS support. Write support is at your own risk: CONFIG_NTFS_RW=y)
Note: DOS and MS/Windows 3.1, 95, 98 or 2000ME can be mounted for read/write using file system types, msdos, umsdos, vfat with no additional kernel module installation required. (NTFS requires extra module) Example for MS/Windows 95:
/dev/hda1 /mnt/win95 vfat defaults 0 0
For more information see the man pages for: modprobe, dmesg, mount, umount, fstab, dump and fs.
USB NTFS devices in userspace:
Many external drives and USB thumb drives can be found to be preformatted with NTFS. This requires a NTFS userspace driver.
Use NTFS-3G is a stable, open source, GPL licensed, POSIX, read/write NTFS driver for Linux developed by Tuxera
Red Hat/Fedora/CentOS RPM based systems will require the following RPM packages:
- ntfsprogs-gnomevfs – NTFS GNOME virtual filesystem module
- ntfsprogs – NTFS filesystem libraries and utilities
- ntfs-3g – Linux NTFS userspace driver
- dkms – Dynamic Kernel Module Support Framework
These are available from the Extra Packages for Enterprise Linux (EPEL) repository
[Potential Pitfall]: Without the proper driver you will get the following error:
Unable to mount Drive
Error mounting: mount: unknown filesystem type 'ntfs'
Interfacing with the Microsoft Exchange Mail Servers:
Email, Calendar, Outlook and Microsoft Exchange: Use (1) MS/Outlook on Linux, (2) MS/OWA webmail or (3) Linux Outlook clone, Ximian
- Run MS/Outlook on Linux:
Run the Codeweavers Crossover commercial version of Wine and run Microsoft Outlook on Linux. See the YoLinux Tutorial on Installing Crossover and Outlook.
- MS/Exchange OWA webmail:
Use your browser: http://webmail.megacorp.com (Company specific)
Note: Java JVM must be installed and browser JVM support must be configured as described above to enable full appointment calendar functionality.
- Microsoft Exchange Access with Ximian Evolution email client and Ximian Connector: – Novell CONNECTOR REQUIRES EXCHANGE SERVER 2000! It does not work with MS/Exchange 5.5.
Install Instructions: http://www.novell.com/products/connector/
Red Hat Linux 8.0 comes with the Novell/Ximian/Evolution version 1.0 email client. The Novel MS/Exchange connector requires Evolution version 1.2.
- Download Novell Red-Carpet, Novell/Ximian Evolution 1.2 and Novell/Ximian Connector:
- Red Carpet:
- Download Ximian Evolution 1.2 and Ximian Connector:
- Run: /usr/bin/red-carpet
- Configure HTTP Proxy if required.
- You will be presented with packages to update. Select “Update Now”.
- Choose “Unsubscribed Channels”
- Select “Ximian Connector” + “Subscribe” button (lower right) + “Install” icon (upper right) + select the “check” box.
This will install the connector and update Ximian Evolution (V1.2).
- Select “OK” + “File” + “Exit”.
- Install License:
- File: connector-key.txt
Place in directory: /home/user-dir/evolution/
- Ximian Evolution Configuration:
- Start Ximian Evolution email client: (Select envelope icon on the Linux desktop tool bar.)
- Select “Tool” + “Setting”
- Select the “Mail Accounts” icon (left hand panel) + “Add” button on right.
- Exchange OWA server: webmail.megacorp.com
Ximian Connector Notes:
- Uses webdav protocol to a OWA (Outlook Web Access) server to support email, address book and calendar functions.
- Ximian connector requires MS/Exchange server 2000 or better.
- KDE KMail and appointment calendar:
Use KDE KMail and appointment calendar which interface with MS/Exchange 2000 using webdav interface.
- OMC: Open Message and Collaboration – MS/Exchange 5.5+ connector and Brutus development MAPI to CORBA framework.
IBM Lotus:
Lotus Notes:
On 07/10/2006, IBM announced Lotus Notes client for Linux.Installation: Notes 7.0.1 client on Red Hat Enterprise 4/CentOS 4
- IBM customers can download the licensed C93D1NA.zip from the IBM “Partnerworld program“, “Passport Advantage” to a working directory. i.e. Lotus7.0.1
- Perform this step as root – create target install directory: mkdir /opt/IBM/Workplace Managed Client
chmod +w /opt/IBM/Workplace Managed Client
- Uncompress: unzip C93D1NA.zip
Results in Personality.zip, readme.pdf, setuplinux.bin
- Uncompress: unzip Personality.zip
- Set permissions: chmod +x setup_wct_platform.bin setuplinux.bin
- cp setuplinux.bin updateSite/features/com.ibm.workplace.notesinstall.linux.feature_7.0.1.0000-0900/bin/linux/
- Run install program: ./setup_wct_platform.bin
- Accept license and specify target directory: /opt/IBM/Workplace Managed Client (default)
- Select “Finish”
Lotus Notes client start script:
04 |
NOTESDATA=~/notes/data |
06 |
LD_LIBRARY_PATH=$NOTESBIN:$NOTESBIN/jvm/bin/classic:$NOTESBIN/jvm/bin:$LD_LIBRARY_PATH |
07 |
PATH=$NOTESBIN/jvm/bin:$NOTESBIN:$PATH |
08 |
CLASSPATH=./:$NOTESBIN/:$CLASSPATH |
09 |
export NOTESBIN NOTESDATA NOTESDIR LD_LIBRARY_PATH PATH CLASSPATH |
12 |
/opt/IBM/Workplace\ Managed\ Client/rcp/richclient \ |
13 |
-personality com.ibm.workplace.noteswc.standalone.linux.personality |
Lotus Notes 7 documentation
Lotus Sametime:
“Meanwhile” is an IBM/Lotus Sametime plugin which is available for the Linux IM client Gaim. Use the following RPM packages:
Connect with the user id (LDAP format): CN=Joe R Blow/OU=US/O=MegaCorp and regular Sametime password.
Links:
Printing:
The current and latest Linux printing system is the Common UNIX Printing System which supports the Internet Printing Protocol (IPP), MS/Windows printing via SAMBA (SMB), networked UNIX (lpd), networked Novell (NCP), HP JetDirect (App Socket), etc. This allows Linux to print directly to network or attached printers, independant of a Microsoft print server environment. the printer configuration GUI tools are sufficient and simple to use. Using CUPS is the preferred printer configuration but it should be known that Linux can be configured to work with Microsoft Windows print servers. CUPS has been available since RH 9.
Accessing The Local Microsoft Printer Network:
Configuring the printer and lpr command: (lprNG)
- As root run the CUPS GUI configuration tool command: /usr/bin/system-config-printer (RHEL 5/6 and Ubuntu 14.04) (older Red Hat systems: /usr/bin/redhat-config-printer)
- Select the “New” icon + “Next”.
- Give it a Queue name. (Make up your own name.)
Select “Windows Printer”.
Select “Forward”.
- Enter Ms/Windows info:
(This example is for a Windows network printer.)
Share: \\MS-SERVER-NAME\MS-Windows-Print-Share
Host IP: XXX.XXX.XXX.XXX
Workgroup: WORKGROUP-NAME
User: Your MS/Windows login name
Password: Your MS/Windows password
- Select a driver: If it is not listed, pick the closest you can find. Typically there will be an emulation mode for ljet4 or some other popular mode.
- Select “Apply”
- Select “File” + “Save Changes”.
- Select “File” + “Quit”.
Find the “Host IP” address with the command:
When multiple printers have been defined, use this gui to select the default. the command “lpr file-name” will use the default printer. Use the “-P queue-name” flag to specify a non-default printer.
When sending print jobs directly to an HP network printer (instead of through a MS/Windows print server), configure the queue to use TCP/IP port 9100.
The default Mozilla printer device specification: lpr ${MOZ_PRINTER_NAME:+'-P'}${MOZ_PRINTER_NAME} will print to the default unless modified.
Printing uses the following configuration files:
Linux Printer Man pages:
- lpr – print files
- lpstat – print cups status information
- lpq – show printer queue status
- lprm – cancel print jobs
- cancel – cancel existing print jobs
- lpadmin – configure cups printers and classes
- lpoptions – display or set printer options and defaults
- printers.conf – printer configuration file for cups
- cupsd – cups scheduler
- cupsd.conf – server configuration file for cups
- classes.conf – print class configuration file for cups
Links:
Create a script to print:
- Use smbclient shell:
smbclient //MS-PRINT-SERVER/printer-share -U MS-WINDOWS-DOMAIN/ms-windows-login-name
Use the command: smb: \> print file-name
- Command line: smbclient //MS-PRINT-SERVER/printer-share windows-login-password -N -U ms-windows-login-name -W MS-WINDOWS-DOMAIN -c "print file-to-print.ps"
- Shell script to print a PostScript or printer ready file: $HOME/bin/print
2 |
/usr/bin/smbclient //<i>MS-PRINT-SERVER</i>/<i>printer-share</i> <i>windows-login-password</i> \ |
4 |
-U <i>ms-windows-login-name</i> \ |
5 |
-W <i>MS-WINDOWS-DOMAIN</i> \ |
7 |
echo "Printing file $1" |
- Shell script to print a text file: $HOME/bin/printTXT
2 |
BASENAME=`/bin/basename $1` |
3 |
/usr/bin/enscript -o /tmp/$BASENAME.ps $1 |
4 |
/usr/bin/smbclient //<i>MS-PRINT-SERVER</i>/<i>printer-share</i> <i>windows-login-password</i> \ |
6 |
-U <i>ms-windows-login-name</i> \ |
7 |
-W <i>MS-WINDOWS-DOMAIN</i> \ |
8 |
-c "print /tmp/$BASENAME.ps" |
9 |
echo "Printing file $1" |
Links:
Granting remote shell access (telnet) and file transfer (ftp) access:
To turn on telnet and ftp access, edit the files /etc/xinetd.d/telnet and /etc/xinetd.d/ftp and change the line:
disable = yes
to:
disable = no
Restart xinetd: service xinetd restart (or: /etc/init.d/xinetd restart)Man pages:
Also see YoLinux tutorials on the following:
Remote access of Linux server by MS/Windows PC users:
There are three basic ways to access your Linux system remotely:
- Text terminal with telnet or SSH
- Text terminal with telnet or SSH to launch individual X-Window applications displayed by the local X-server.
- Full Linux desktop access using XDMCP by MS/Windows PC running the local X-server.
Remote X-Windows access by a MS/Windows PC requires the installation of X-Windows server software:
Open Source MS/Windows PC X-Windows server software:
Commercial MS/Windows PC X-Windows server software:
1) Text terminal access:
Grant Linux access to remote users. See xinetd configuration above.
Telnet and SHH text terminal client programs for MS/Windows:
- Putty [Download putty.exe to your desktop]
Putty: SSH configuration. Select from LHS:
- Session >> Port 22 and SSH
- Connection + SSH >> “Preferred SSH protocol version:” >> “2”
- Cygwin – MS/Windows text terminal shell with telnet and ssh client (and an entire Linux shell environment with applications).
For SSHd server configuration see the YoLinux.com Internet security SSH server configuration tutorial.
For more information on xinetd, see the YoLinux.com Networking and xinetd configuration tutorial.
[Potential Pitfall]: When trying to connect to the Linux system using Putty we got the following error with Red Hat Enterprise 6.1:
Could not chdir to home directory /home/user1: Permission denied
/usr/bin/xauth:  timeout in locking authority file /home/user1/.Xauthority
also check the Linux log file /var/log/secure error
Oct  3 15:57:44 sil-lab sshd[25965]: Accepted password for user1 from 192.168.1.64 port 53950 ssh2
Oct  3 15:57:44 sil-lab sshd[25965]: pam_unix(sshd:session): session opened for user user1 by (uid=0)
Oct  3 15:58:04 sil-lab login: pam_securetty(login:auth): Error opening /etc/securetty: Permission denied
The temporary fix was to turn off SELinux: setenforce 0
For more on SELinux see the YoLinux Systems Administrations tutorial: SELinux.
2) Launch individual X-Window applications from text terminal:
Steps:
- Launch X-Windows server: (Cygwin or XMing)Cygwin:
Start X server on MS/Win32: C:\cygwin\lib\Singular\startxserver.bat
X-Windows applications will be launched individually from the text terminal console.
or
Start X-server from a Cygwin shell: xwin -multiwindow -unixkill -multimonitors
where:
- -multiwindow: specifies the use of the MS/Windows window manager
- -multimonitors: implied use of both monitors on dual headed displays
- -unixkill: Ctrl+Alt+Backspace exits the server
If your application requires the Motif Window Manager (mwm): xwin -rootless -unixkill -multimonitors
Then start the Cygwin Motif Window Manager: /usr/bin/mwm &
Then start your application.
Note that the default Cygwin terminal window is not very X aware. The Cygwin rxvt terminal is superior and will set your X DISPLAY environment variables.
XMing:Xming – [instructions] – X-Windows for MS/Windows
Note that “Xming-mesa” has Open-GL 3D support while basic “Xming” has 2D X-windows support only. You don’t need both.
Configure: Programs + Xming + XLaunch
- Select “Multiple windows” + next
- Select “Start no client” + next
- Select “No Access Control” (this allows remote Linux system to write to your local Xming X-server) + next
Set remote access control to your local X-server:
 Note that the default setting blocks remote access to your local X-server.
- Configure terminal and shell DISPLAY variable:
- Putty: SSH configuration
Select from LHS:
- Session >> Port 22 and SSH
- Connection + SSH >> “Preferred SSH protocol version:” >> “2”
- Connection + SSH >> “Enable X11 forwarding”
- Configure your environment to support display to remote X-server.
Create script: /opt/bin/setip
2 |
clientip=`echo $SSH_CLIENT | cut -d' ' -f1 | sed -e 's,::ffff:,,'` |
4 |
if [[ ! ($clientip =~ "^server|^192.168.0.1") ]]; then |
5 |
export DISPLAY=$clientip:0.0 |
6 |
echo DISPLAY set to SSH Client $DISPLAY |
8 |
echo Server to Server SSH Detected. Keeping DISPLAY set to $DISPLAY |
Note:
- Do NOT add this to your ~/.bashrc as it will prevent XDMCP access as well as Linux console access.
- Before switching to a root account (“sudo su -” or “su -“) allow the existing display to accept X protocol: xhost +
A regular ssh connected user will often use display :10.0 while root will use :0.0
3) Full Linux desktop access using XDMCP:
Granting X-Window access to your PC using Xming (or Cygwin, ReflectionX, HummingBird Exceed):
To allow a full Linux login screen (GDM or XDM) and Linux desktop access to another Linux system or to a MS/Windows system requires allowing remote GDM (or XDM) and XDMCP X-Windows access. First configure the Linux system to allow remote access, then use X-Windows software to remotely access the system from MS/Windows (or another Linux system).
Step 1:
Allow remote XDMCP access
- See the YoLinux GDM and XDMCP tutorial on configuring Linux to allow remote access.
or
You can use the config tool /usr/sbin/gdmsetup to configure GDM (Gnome login screen) and XDMCP (X-Windows remote full screen access).
- You can test the GDM login screen locally: X -query localhost :1
Step 2:
Use X-Window software which runs on MS/Windows
Using XMing on your PC to connect to full Linux GUI desktop with XDMCP:
Xming – [instructions] – X-Windows for MS/Windows
Note that Xming-mesa has Open-GL 3D support while basic Xming has 2D X-windows support only. You don’t need both.
Configure Xming: Programs + Xming + XLaunch
- Select “Full screen” + next
- Select “Open session via XDMCP” + Next
- Select “Connect to host” and enter IP address (or node name) of Linux system + next
- next
- Finish
Use MS/Windows alt-tab to leave the X-windows session.
Click (left mouse button) on the toolbar “X” icon to restore the session.
Click (right mouse button) on the toolbar “X” icon to terminate the session.
Using Cygwin on your PC to connect to full Linux GUI desktop with XDMCP:
- Download XFree86 for MS/Windows and install. Be sure to select the “loop” graphic to change from “Default” to “Install” to install all packages. The default is to exclude the X-window server. Packages to install may be selected individually.
- Start Cygwin: Windows 2000 menu: “Start” + “Programs” + “Cygwin” + “Cygwin Bash Shell”
- Start MS/Windows X-Server for XDMCP connection: (/usr/X11R6/bin/xwin)
- xwin -query Ip-address-of-Unix-computer
Used to display Linux desktop on MS/Windows PC.
- xwin -multiplemonitors -scrollbars -indirect Ip-address-of-Unix-computer
Used to display Linux desktop on MS/Windows with multiple monitors.
- xwin -ac -multiwindow Ip-address-of-Unix-computer
Starts X server but does not generate a desktop window. Each Linux application will create its’ own window. In a shell set your display environment to the IP address of your PC and individual applications will be displayed to your MS/Windows desktop.
In cygwin remote ssh or telnet shell: export DISPLAY=ip-of-local-pc:0.0
The local IP address can be obtained on MS/Windows through the DOS command: IPCONFIG
- [Potential Pitfall]: If your Cygwin bash shell command line prompt is “i have no name” then it is because your uid in the file /etc/passwd is too large. It must be less than the 16 bit limit of 65536. The uid is the third field demarked by the colon (“:”). Change the uid to an integer value less than 65536. This will also fix X/Server problems which arise when trying to connect to other computers using X.
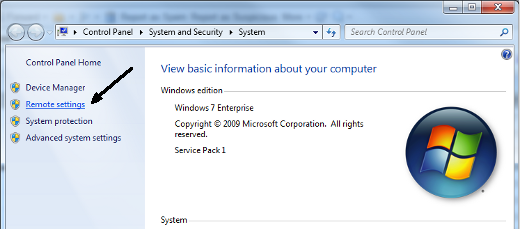
Connecting to a Microsoft Windows Terminal Server (NT, 2000 or XP) using RDP:
One may graphically connect to a Microsoft Windows Terminal NT Server, server 2000 or a Microsoft Windows XP system (Professional and Home edition) with a Microsoft Windows Terminal RDP (Remote Desktop Protocol) client for Linux known as “rdesktop”. Use version 1.2 or later (which comes with Red Hat 9.0 or later). Version 1.1 which ships with Red Hat Linux 8.0 is buggy.
Note that Microsoft Windows XP uses RDP 5.2 (an extension to the ITU-T T.128 application sharing protocol) using 24 bit color and supports sound. The older RDP 4.0 only supported 8 bit color and did not support sound.
If there is an active rdesktop session, MS/Windows XP will not allow one to login at the console. You will get an error message which states that the system is locked. Only one active MS/Windows desktop is allowed. MS/Windows terminal server is required for more than one simultaneous user login.
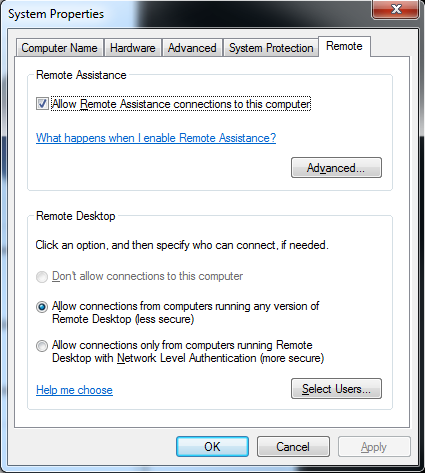
Configure MS/Windows to allow a remote RDP connection:
Using the Linux RDP rdesktop client:
Links:
Integrating with Citrix Winframe NT Application Servers:
Citrix Winframe ICA Client for Linux:
(ICA: Independent Computing Architecture)
- Download: https://www.citrix.com/downloads/citrix-receiver/linux/receiver-for-linux-latest.html
(Citrix ICA is now Citrix Receiver)
- Select “RPM Packages”, “Debian Packages” or “Tarball Packages”
- Select: “Download File”
- As root Install: [root]# rpm -ivh ICAClient-8.0-1.i386.rpm
- Run/Configure (as user) ICA Client Manager: /usr/lib/ICAClient/wfcmgr
Note: This tool allows full capabilities to configure and run the ICA Citrix winframe client.

- Select “Options” + “Settings…” [screenshot]
- Select from pull-down menu: “Server Locations”
- Network Protocol: TCP/IP
- Server Group: Primary
- Address List: (Auto-Locate)
- Select “Entry” + “New…”
- Select (default option showing: Network) radio button “Published Application”
- Select button to the right “…“.
- Select “Citrix-App“
- Test Application:
- Select the “Lightning Bolt” icon to connect.
- This will bring up the Microsoft NT server login dialog box.
- User name: NT-Login-Name
- Password: NT-Password
- Domain: MS-WINDOWS-DOMAIN
- As a Linux user, run Citrix ICA Client only: First Citrix Application
This will bring up the specified ICA application where the “description” is defined in $HOME/.ICAClient/appsrv.ini section heading. i.e. “Citrix-App”
You can also create a desktop launcher icon: right click on a free area of the desktop and select “New Launcher”. Use icon /usr/lib/ICAClient/icons/citrix48.xpm
Application Command: /usr/lib/ICAClient/wfica -desc "Citrix-App" -username NT-Login-Name -password NT-Password -domain MS-WINDOWS-DOMAIN
- ICA Client: Second, Third,… Citrix Application
- Configure:
- Start ICA manager: /usr/lib/ICAClient/wfcmgr
- Select “New” Icon (or “Entry” + “New”)
- Network:
- Network Protocol: TCP/IP
- Server Location: MS-NT-CITRIX-SERVER
- Select “Server” radio button
- Description: Application/Server Description
- Server: MS-NT-CITRIX-SERVER
- Login:
- Username: ms-windows-login-name
- Domain: MS-WINDOWS-DOMAIN
- Password:
- Select “Apply”
- Run Application:
- FYI:
- Uninstall: (rpm -e) Manually delete cache: /usr/lib/ICAClient/cache/
Send/Receive a “WinPopup” Message:
Send a WinPopup Message:
MS/Windows can send a message to another MS/Windows PC which will pop-up (using “WinPopup” protocol) and appear in a dialog box. This is used by admins for notification purposes. The DOS command is:
NET SEND NetBIOS-computer-name "Message to send to user"
Linux can send the same message to a MS/Windows PC using the command:
[prompt]$ smbclient -M NetBIOS-computer-name
Message to send to user
ctrl-d
Notes:
- Message limit is 1600 bytes.
- Alternate method: cat mymessage.txt | smbclient -M NetBIOS-computer-name
Receive a WinPopup Message:
To handle incoming ” WinPopup” messages on Linux, set the “message command” parameter in the smb.conf.
message command = csh -c 'xedit %s;rm %s' &
This will use the application “xedit” to display the message. The message is then removed.
- %s : The filename containing the message.
- %t : Message destination (computer or server to which it was sent.)
- %f : Message sender.
Default smb.conf config file is no message command.Notes:
Also see LinPopUp available from LittleIgloo.org.
Authenticating Linux with Microsoft Active Directory:
The following approaches are available:
- Use a software package such as Likewise Open which allows the Linux system to connect to the MS/Active Directory in Microsoft native protocols.
- Use “Microsoft’s Unix services for Windows” to enhance AD to include Linux and Unix support. This will support NIS or LDAP protocols. LDAP can be used with or without Kerberos. Thus we have the following three options:
- Standard NIS authentication
- Standard LDAP authentication (with or without SSL)
- Kerberos authentication with LDAP
The following shows a basic LDAP only configuration.
This requires that the Microsoft Active Directory server have its schema enhanced to support Unix/Linux systems, specifically the uid and gid which are numerical representations of the user and group id.
This requires installing Microsoft’s Unix services for Windows server 2003 (and earlier) or for server 2008, Microsoft’s “Cross platform authentication utilites”:
Unix services for Windows Info and download
On the Linux system it requires adding the following /etc/ldap.conf file which defines the translation between native Linux LDAP attribute names and those used by Microsoft Active Directory:
host XXX.XXX.XXX.XXX XXX.XXX.XXX.XXX
base dc=megacorp,dc=com
binddn cn=SysAdmin,dc=megacorp,dc=com
bindpw bindPassword
scope sub
ssl no

nss_base_passwd ou=accounts,dc=megacorp,dc=com
nss_base_shadow ou=accounts,dc=megacorp,dc=com
nss_base_group  ou=accounts,dc=megacorp,dc=com

nss_map_objectclass posixAccount user
nss_map_objectclass shadowAccount user
nss_map_objectclass posixGroup Group

nss_map_attribute uid sAMAccountName
nss_map_attribute uidNumber msSFU30UidNumber
nss_map_attribute gidNumber msSFU30GidNumber
nss_map_attribute loginShell msSFU30LoginShell
nss_map_attribute gecos name
nss_map_attribute userPassword msSFU30Password
nss_map_attribute homeDirectory msSFU30HomeDirectory
nss_map_attribute uniqueMember msSFU30PosixMember
nss_map_attribute cn cn

nss_login_attribute sAMAccountName
pam_member_attribute msSFU30PosixMember
Note:
- The “host” statement lists the primary and failover AD servers.
The file /etc/pam.d/system_auth can be configured with the console tool /usr/bin/authconfig or the GUI configuration tool /usr/bin/system-config-authentication.
See the YoLinux LDAP authentication tutorialEdit /etc/nsswitch.conf so that Linux will authenticate to the Active Directory server using LDAP.
..
...
passwd files ldap
shadow files ldap
group  files ldap
...
..
This is the simplest authentication configuration. The prefered configuration will include Kerberos and SSL. (not covered here – yet) Microsoft’s Unix services for Windows also supports the use of Active directory as an NIS server although the LDAP configuration is more current and when used with SSL and Kerberos, it is also more secure.