If you haven’t poked around inside Windows’ command line, you’re missing out. There are lots of handy tools you can use if you know the correct things to type.
Most files on Windows are associated with a specific program that is assigned to open the file by default. At times, remembering these associations can become confusing. You can remind yourself by entering the command assoc to display a full list of filename extensions and program associations.
You can also extend the command to change file associations. For example, assoc .txt= will change the file association for text files to whatever program you enter after the equal sign. The assoc command itself will reveal both the extension names and program names, which will help you properly use this command.
In Windows 10, you can view a more user-friendly interface that also lets you change file type associations on the spot. Head to Settings (Windows + I) > Apps > Default apps > Choose default app by file type.
Deleting files on a mechanical hard drive doesn’t really delete them at all. Instead, it marks the files as no longer accessible and the space they took up as free. The files remain recoverable until the system overwrites them with new data, which can take some time.
The cipher command, however, lets you wipe a directory on an NTFS-formatted volume by writing random data to it. To wipe your C drive, for example, you’d use the cipher /w:d command, which will wipe free space on the drive. The command does not overwrite undeleted data, so you will not wipe out the files you need by running this command.
When you run the cipher command by itself, it returns the encryption state of the current directory and the files it contains. Use cipher /e:<filename> to encrypt a file, cipher /c:<filename> to retrieve information about encrypted files, and cipher /d:<filename> to decrypt the selected file. Most of these commands are redundant with the Windows encryption tool BitLocker.
You can use this command to identify differences in text between two files. It’s particularly useful for writers and programmers trying to find small changes between two versions of a file. Simply type fc and then the directory path and file name of the two files you want to compare.
You can also extend the command in several ways. Typing /b compares only binary output, /c disregards the case of text in the comparison, and /l only compares ASCII text.
So, for example, you could use the following:
fc /l "C:\Program Files (x86)\example1.doc""C:\Program Files (x86)\example2.doc"
The above command compares ASCII text in two Word documents.
This command relays the IP address that your computer is currently using. However, if you’re behind a router (like most computers today), you’ll instead receive the local network address of the router.
Still, ipconfig is useful because of its extensions. ipconfig /release followed by ipconfig /renew can force your Windows PC into asking for a new IP address, which is useful if your computer claims one isn’t available. You can also use ipconfig /flushdns to refresh your DNS address. These commands are great if the Windows network troubleshooter chokes, which does happen on occasion.
Entering the command netstat -an will provide you with a list of currently open ports and related IP addresses. This command will also tell you what state the port is in; listening, established, or closed.
This is a great command for when you’re trying to troubleshoot devices connected to your PC or when you fear a Trojan infected your system and you’re trying to locate a malicious connection.
Sometimes, you need to know whether packets are making it to a specific networked device. That’s where ping comes in handy.
Typing ping followed by an IP address or web domain will send a series of test packets to the specified address. If they arrive and are returned, you know the device is capable of communicating with your PC; if it fails, you know that there’s something blocking communication between the device and your computer. This can help you decide if the root of the issue is an improper configuration or a failure of network hardware.
This is a more advanced version of ping that’s useful if there are multiple routers between your PC and the device you’re testing. Like ping, you use this command by typing pathping followed by the IP address, but unlike ping, pathping also relays some information about the route the test packets take.
The tracert command is similar to pathping. Once again, type tracert followed by the IP address or domain you’d like to trace. You’ll receive information about each step in the route between your PC and the target. Unlike pathping, however, tracert also tracks how much time (in milliseconds) each hop between servers or devices takes.
Powercfg is a very powerful command for managing and tracking how your computer uses energy. You can use the command powercfg hibernate on and powercfg hibernate off to manage hibernation, and you can also use the command powercfg /a to view the power-saving states currently available on your PC.
Another useful command is powercfg /devicequery s1_supported, which displays a list of devices on your computer that support connected standby. When enabled, you can use these devices to bring your computer out of standby, even remotely.
You can enable this by selecting the device in Device Manager, opening its properties, going to the Power Management tab, and then checking the Allow this device to wake the computer box.
Powercfg /lastwake will show you what device last woke your PC from a sleep state. You can use this command to troubleshoot your PC if it seems to wake from sleep at random.
You can use the powercfg /energy command to build a detailed power consumption report for your PC. The report saves to the directory indicated after the command finishes.
This report will let you know of any system faults that might increase power consumption, like devices blocking certain sleep modes, or poorly configured to respond to your power management settings.
Windows 8 added powercfg /batteryreport, which provides a detailed analysis of battery use, if applicable. Normally output to your Windows user directory, the report provides details about the time and length of charge and discharge cycles, lifetime average battery life, and estimated battery capacity.
This is, of course, redundant with the already easily accessed shutdown button, but what’s not redundant is the shutdown /r /o command, which restarts your PC and launches the Advanced Start Options menu, which is where you can access Safe Mode and Windows recovery utilities. This is useful if you want to restart your computer for troubleshooting purposes.
You will need to run the command prompt with administrator privileges and enter the command sfc /scannow. If SFC finds any corrupt or missing files, it will automatically replace them using cached copies kept by Windows for this purpose alone. The command can require a half-hour to run on older notebooks.
You can use the tasklist command to provide a current list of all tasks running on your PC. Though somewhat redundant with Task Manager, the command may sometimes find tasks hidden from view in that utility.
There’s also a wide range of modifiers. Tasklist -svc shows services related to each task, use tasklist -v to obtain more detail on each task, and tasklist -m will locate DLL files associated with active tasks. These commands are useful for advanced troubleshooting.
Our reader Eric noted that you can “get the name of the executable associated with the particular process ID you’re interested in.” The command for that operation is tasklist | find [process id].
Tasks that appear in the tasklist command will have an executable and process ID (a four- or five-digit number) associated with them. You can force stop a program using taskkill -im followed by the executable’s name, or taskkill -pid followed by the process ID. Again, this is a bit redundant with Task Manager, but you can use it to kill otherwise unresponsive or hidden programs.
Windows automatically marks your drive for a diagnostic chkdsk scan when symptoms indicate that a local drive has bad sectors, lost clusters, or other logical or physical errors.
If you suspect your hard drive is failing, you can manually initiate a scan. The most basic command is chkdsk c:, which will immediately scan the C: drive, without a need to restart the computer. If you add parameters like /f, /r, /x, or /b, such as in chkdsk /f /r /x /b c:, chkdsk will also fix errors, recover data, dismount the drive, or clear the list of bad sectors, respectively. These actions require a reboot, as they can only run with Windows powered down.
If you see chkdsk run at startup, let it do its thing. If it gets stuck, however, refer to our chkdsk troubleshooting article.
Schtasks is your command prompt access to the Task Scheduler, one of many underrated Windows administrative tools. While you can use the GUI to manage your scheduled tasks, the command prompt lets you copy&paste complex commands to set up multiple similar tasks without having to click through various options. Ultimately, it’s much easier to use, once you’ve committed key parameters to memory.
For example, you could schedule your computer to reboot at 11pm every Friday:
When you need to format a drive, you can either use the Windows File Explorer GUI or you can turn to the command prompt. You’ll need Administrator rights to use this command. Be sure you specify the volume you want to format, followed by the desired parameters.
The command below will quick-format the D drive with the exFAT file system, with an allocation unit size of 2048 bytes, and rename the volume to “label” (without the quotes).
format D: /Q /FS:exFAT /A:2048 /V:label
You can also use this command to dismount a volume (/X) or, if it’s formatted with NTFS, make file compression the default setting (/R). If you’re stuck, use format /? to summon help.
This command will give you a detailed configuration overview of your computer. The list covers your operating system and hardware. For example, you can look up the original Windows installation date, the last boot time, your BIOS version, total and available memory, installed hotfixes, network card configurations, and more.
Use systeminfo /s followed by the hostname of a computer on your local network, to remotely grab the information for that system. This may require additional syntax elements for the domain, user name, and password, like this:
Drivers remain among the most important software installed on a PC. Improperly configured, missing, or old Windows drivers can cause all sorts of trouble, so it’s good to have access to a list of drivers on your PC.
That’s exactly what the driverquery command does. You can extend it to driverquery -v to obtain more information, including the directory in which the driver is installed. Unfortunately, this command isn’t relevant post Windows 8 or Windows Server 2012.
Virtually all Windows 8/8.1 computers ship from the factory with a recovery image, but the image may include bloatware you’d rather not have re-installed. Once you’ve uninstalled the software you can create a new image using the recimg command. Entering this command presents a very detailed explanation of how to use it.
You must have administrator privileges to use the recimg command, and you can only access the custom recovery image you create via the Windows 8 refresh feature.
In Windows 10, system recovery has changed. Windows 10 systems don’t come with a recovery partition, which makes it more important than ever to back up your data.
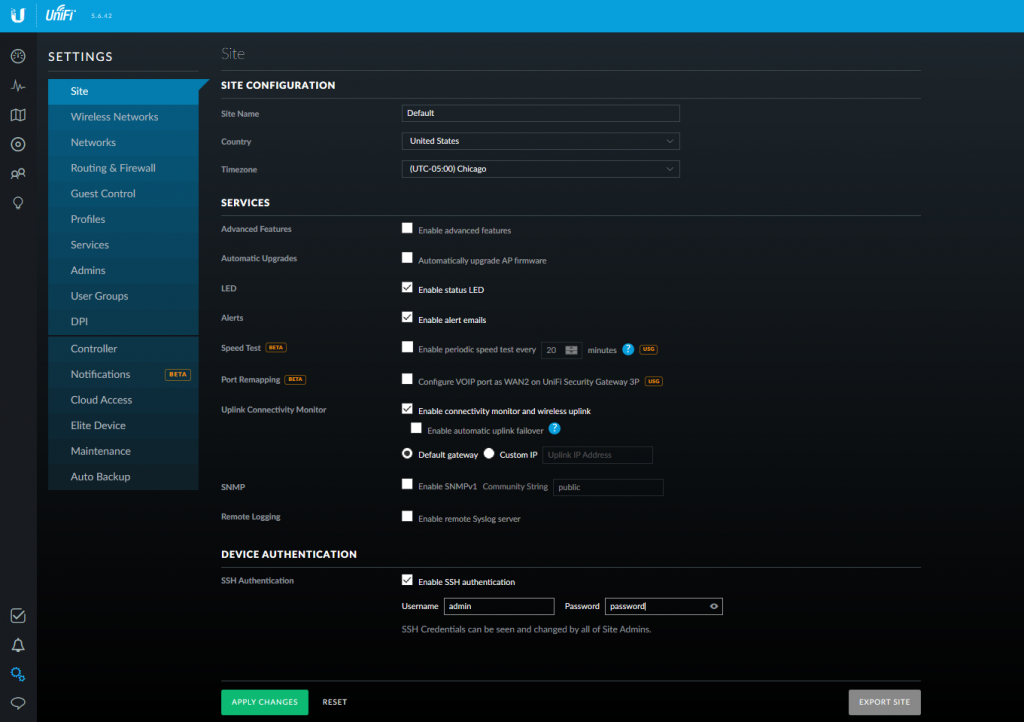
As of May 2022:
Home>Protect>Unifi Devices>(select camera)>Settings>Advanced>(toggle which resolution you want)>and then you will get a link such as:
rtsps://192.168.1.1:7441/QxJCVMefFHfBnqrp?enableSrtp
this link will need to be modified in three ways.
Using Command-Line Interface (CLI) Clients with Whois
The information provided on this page for Whois search functions, command syntax, flags, and examples only applies to ARIN’s Whois, and not Whois services provided by any other entity.
You can access ARIN’s Whois information by connecting to a Whois server using CLI commands entered into a terminal window. The following sections provide instructions for accessing ARIN’s Whois using the CLI.
This method uses the port 43 Whois. The following instructions are specific to ARIN and will not work for other RIRs or domain registries.
To use Whois from a terminal window, enter your query from the CLI. You can use different flags to restrict your search or display specific output.
Note: Depending on your operating system and terminal program, you may need to enter commands slightly differently. For example, when using Apple OS, you need to surround flags and search terms with quotes, and separate each type of flag with quotes. Quotes are not needed when using UNIX terminals.
Submitting a Whois Query from a Terminal
To submit a Whois query from a terminal, enter:
whois -h whois.arin.net “flag search-term”
The parts of this command are:
whois: the command itself
-h: specifies that the hostname of the Whois server will follow
whois.arin.net: the name of ARIN’s Whois server
flag: narrows the search by restricting the results to those that match criteria designated by the flag (see the following table)
search-term: the information for which you are searching
Using Flags
You may use flags with the query to narrow down the search criteria. Depending on the terminal client, you may not have to include quotes around the flag and/or search term. If you do not include a flag, the Whois server attempts to guess what information you are looking for and parses the query.
The flags to restrict the records are listed in the following table. Flags must be separated from each other and from the search term by a space. You can only use one flag of each type in a query (for example, one record type, one attribute, or one display flag).
Query Flags
In this table, all examples assume that the user is on a Mac and entering commands within the terminal app window.
Flag
Type
Description
Formatting Example
n
Record Type
Searches for the specified network address space.
whois -h whois.arin.net “n 198.51.100.0”
r
Record Type
Searches for the specified network address space in CIDR notation. If a hierarchy (<, >, or =) is not used, the Whois server attempts to guess the range of results desired.
Searches for the specified POCs. For example, the query at right searches for POCs with the name Smith.
whois -h whois.arin.net “p smith”
o
Record Type
Searches for the specified organization.
whois -h whois.arin.net “o *Philadelphia*”
c
Record Type
Searches for the specified end user customer. If you know the customer ID, you can use it with the customer query to narrow down results and display information for only that customer (see 2nd example).
Searches for the specified POC, organizations, and end user customers.
whois -h whois.arin.net “e icann”
z
Record Type
Searches the database with all of the previously-listed flags (n, r, d, a, p, o, c, and e).
whois -h whois.arin.net “z icann”
@ domain-name
Record Attribute
Limits the query results to those containing the specified domain name in an email address. For example, the query at right searches for the domain name arin.net in the POC, organizations, and end user customers.
whois -h whois.arin.net “e @ arin.net”
! handle
Record Attribute
Limits the query results to those containing the specified handle or identifier of the POC. Searching for the handle can deliver more accurate results than an email or name search. For example, the query at right searches for the organization named ICANN with a handle containing IANA.
whois -h whois.arin.net “o icann ! iana”
/ name
Record Attribute
Limits the query results to those containing the specified name.
whois -h whois.arin.net “n / IANA-V6-RESERVE2”
. name
Record Attribute
This flag has the same function as the / name flag, but can be used when performing searches on Whois clients that do not work well with / name.
Output Flags
Searches that retrieve a single record will display the full record. Searches that retrieve more than one record will be displayed in list output. You can use the + and – flags to modify the output if a query retrieves more than one record.
Flag
Description
Formatting Example
+
Using this flag in the query requires that full output is displayed with detailed information for each match.
whois -h whois.arin.net “+ n / TEST-NET-1”
–
Using this flag in the query requires that list output is displayed with summary information only (even if a single record is returned).
whois -h whois.arin.net “e – icann”
Record Hierarchy Flags
Records in ARIN’s Whois have hierarchical relationships with other records. For example, a network can have parent networks and child networks. To display those related records, use the flags described as follows.
Note: The + flag cannot be used with these flags.
Flag
Description
Formatting Example
<
Displays the record related moving up the hierarchy. For a network, displays the supernet, or parent network, in detailed format.
whois -h whois.arin.net “n < 198.51.100.55”
>
Displays the record related moving down the hierarchy. For a network, displays the subdelegations, or subnets below the network, in list format. For an organization or customer, displays the resources issued to that organization or customer, in list format.
whois -h whois.arin.net “n > 192.0.0.0”
=
Displays only an exact match in the hierarchy.
Using Wildcards
To perform a wildcard query, substitute an asterisk (*) for the alphanumeric characters that you want to leave off the end of the query term. For example, this query performs a search for POCs beginning with or equal to North, and would also return results with Northcutt, Northington, Northrup, etc.:
whois -h whois.arin.net “p north*”
Wildcards can be used with any other flags.
Interpreting Whois Results
Results for Whois queries performed using the ARIN website or the command-line interface contain information about IPv4 and IPv6 address space, ASNs, POCs, and Orgs. Depending on the query options chosen or query flags used, the fields shown in the following tables may or may not be displayed in the result. Some fields appear in results from multiple query types; these are listed in the Common Fields Found on Multiple Record Types section.
Network Information
Network records (NETs) define a range of IPv4 or IPv6 addresses and show the organizations and POCs with authority over them.
Result Field
Description
NetRange
IP address range of a network resource.
CIDR
The IP address specified in CIDR notation.
NetName
Name given to the network by the organization.
NetHandle
A unique auto-generated handle that identifies the network in ARIN’s database. It cannot be changed.
Parent
The NetName and NetHandle of the parent IP address range.
NetType
The type of network: Direct Allocation (ISP), Direct Assignment (End user), Reallocated (downstream ISP customer), Reassigned (end user customer)
Optional field collected during all IPv4 and IPv6 block transactions that records a list of the Autonomous System Numbers (ASNs), separated by commas or whitespace, from which the addresses in the address block(s) may originate.
Organization Information
Organization information includes the Org ID to which resources are issued and the contact information for the Org POCs.
Result Field
Description
Organization/OrgName
The name of the Organization who is assigned the resource(s)
OrgId
A unique auto-generated name that identifies the organization in ARIN’s database. It cannot be changed.
AdminHandle
A unique auto-generated handle that identifies the Admin POC for this org in ARIN’s database. It cannot be changed.
AdminName
Name of the Admin POC for the org.
AdminPhone, AdminEmail
Phone number and email address for the Admin POC for the org.
TechHandle
A unique auto-generated handle that identifies the Tech POC for this org in ARIN’s database. It cannot be changed.
TechName
Name of the Tech POC who manages the org.
TechPhone, TechEmail
Phone number and email address for the Tech POC for the org.
AbuseHandle
A unique auto-generated name that identifies the handle of the Abuse POC for this org in ARIN’s database. It cannot be changed.
AbuseName
Name of the contact for the reporting and resolution of network abuse issues.
AbusePhone, AbuseEmail
Phone number and email address for the Abuse POC for the org.
RoutingHandle
A unique auto-generated name that identifies the handle of the Routing POC for this org in ARIN’s database. It cannot be changed.
RoutingName
Name of the contact responsible for routing registry and RPKI certification information for the organization.
RoutingPhone, RoutingEmail
Phone number and email address for the Routing POC for the org.
DNSHandle
A unique auto-generated name that identifies the handle of the DNS POC for this org in ARIN’s database. It cannot be changed.
DNSName
Name of the contact responsible for reverse DNS and secure DNS information for the organization.
DNSPhone, DNSEmail
Phone number and email address for the DNS POC for the org.
ASN Information
ASN records, much like NET records, display the specific ASN and the Org with authority over it.
Result Field
Description
ASNumber
Displays the number that represents an autonomous system—networks or connected groups of networks that adhere to a single unique routing policy that differs from the routing policies of their border peers.
ASName
Name given to the ASN by the organization.
ASHandle
Number used to identify the AS in the ARIN database. Typically consists of the prefix AS and the AS number (for example, AS26299).
Point of Contact
POC information provides a name, mailing address, and contact information, and lists any organizations or resources over which the POC has authority.
Result Field
Description
Name
The name of the POC.
Handle
A unique auto-generated handle that identifies the POC in ARIN’s database. It cannot be changed.
Company
Company for which the person is the POC.
Delegation/Reverse DNS
Delegations are entries that relate IP addresses to domain names using the Domain Name System (DNS) of the Internet. Delegations contain the information necessary for Reverse DNS, including the associated nameservers, and DNS Delegation Signer (DS Record) information.
Result Field
Description
Name
The name of the POC.
NameServer
The name of one or more nameservers for a domain object. There can be multiple nameservers shown.
Common Fields Found on Multiple Record Types
These fields may display in the results of multiple types of queries.
Result Field
Description
Address, City, StateProv, PostalCode, Country
Typically the location information for a resource, an organization, or POC. May not always reflect the exact physical location of the actual resource, org, or POC, as there is no policy requirement to do so.
RegDate
Date that the resource was initially registered in the ARIN database.
Updated
Date that the registration record was last updated.
Comments
Text comment that applies to the resource. There can be multiple Comment fields displayed in a result. These comments are typically added by an organization POC. Comments can include: Customer comments, Org comments, Resource comments, POC comments
Ref
URL of the information as it appears in ARIN’s database. It can have a prefix appended to indicate the type of reference. For example, this is a URL for the Org Tech POC that is shown in a result: OrgTechRef: https://whois.arin.net/rest/poc/IANA-IP-ARIN