Source: Using PSScriptAnalyzer to check your PowerShell code for best practices – Mike F Robbins
Category Archives: PowerShell
List and change BIOS settings with PowerShell – Syst & Deploy
In this post I will show you how to list and change BIOS settings for HP, Dell and Lenovo with PowerShell only.In my previous posts, I did some tools and module to list, export and change BIOS settings for local and remote computers and many manufacturers.I will now show you how to manage BIOS settings with PowerShell only:- List settings- Change settings without BIOS password – Change settings with BIOS password configured – Change settings from a CSV file that contains settings to changeI say only, because there are some tools available to manage BIOS with PowerShell. For instance for HP, there is a utility called BCU.As I don’t want any other tools to manage BIOS I just used PowerShell.
Source: List and change BIOS settings with PowerShell – Syst & Deploy
List and change BIOS settings with PowerShell
In this post I will show you how to list and change BIOS settings for HP, Dell and Lenovo with PowerShell only.In my previous posts, I did some tools and module to list, export and change BIOS settings for local and remote computers and many manufacturers.I will now show you how to manage BIOS settings with PowerShell only:- List settings- Change settings without BIOS password – Change settings with BIOS password configured – Change settings from a CSV file that contains settings to changeI say only, because there are some tools available to manage BIOS with PowerShell. For instance for HP, there is a utility called BCU.As I don’t want any other tools to manage BIOS I just used PowerShell.
Source: List and change BIOS settings with PowerShell – Syst & Deploy
How to secure PowerShell Remoting in a Windows Domain
Out of the box, PowerShell remoting is very secure but there are enhancements you can make to increase security.
Source: How to secure PowerShell Remoting in a Windows Domain
PowerShell is an awesomely powerful tool for configuring, managing and controlling your environment. Out of the box, PowerShell remoting is very secure but there are enhancements you can make to increase security.
I was recently asked to come up with a security posture for my organization and to communicate that stance to my leaders. I knew PS was secure from the start but I couldn’t rely on what I thought, so I needed to dive in and do some research to confirm my opinion of security in PowerShell with respect to remoting.
This is a reference guide I originally built for myself that I thought would be useful for others when trying to figure out how to secure PowerShell remoting or at least answer the questions someone may be asked from management or security teams in a corporate environment. I have pulled relevant data from a number of sources including, but not limited to:
- Microsoft: Authentication for Remote Connections
- Microsoft: PowerShell Remoting Security Considerations
- FireEye: Greater Visibility Through PowerShell Logging
- FoxDeploy.com: Is WinRM Secure or do I need HTTPs?
One big caveat before I begin: There are different settings that can be put in place for domain-based machines and workgroup based machines. I am largely ignoring the workgroup scenarios because I do not have to worry about that consideration. I’ll make a few references to configs for workgroup computers, but this guide is targeted at securing connections in an Active Directory domain running mostly Windows computers. Also of note, I am not going to talk at all about PS remoting to Linux because, again, not a big requirement for me or my org. Please visit the links above and see the security considerations for those two scenarios.
Lets’ get started!
Security & Authentication
PowerShell was designed from the start with security in mind. The default method of authentication out of the box is Kerberos. Connections between the two computers in a domain will use Kerberos for initial authentication and fall back to NTLM for workgroup computers. You can change these default settings and actually lower the authentication settings, but I would not recommend that.
Once the authentication phase has completed, all session communications are encrypted using a symmetric 256-bit key, even with HTTP as the protocol. Domain-joined computers never pass credentials in the clear; this is the default setting.
Remote connections between domain-joined computers can be made with a number of different methods. The three most common methods when using PowerShell are:
- Connect via WMI
- Connect via CIM
- Connect via PS remoting/WinRM
The main difference between these remote connection methods is what protocol is used to make the remote connection. Connections via WMI use DCOM to access remote machines. Connections via CIM or WinRM use the WSMan protocol.
- WMI is the Microsoft implementation of Web-Based Enterprise Management and provides users with information about the status of local or remote computer systems. The main knock against WMI is that it isn’t very firewall friendly. For the connection to succeed, the remote computer must permit incoming network traffic on TCP ports 135, 445, and additional dynamically-assigned ports, typically in the range of 1024 to 1034.
- WS-Management protocol, a SOAP-based, firewall-friendly protocol, was designed for systems to locate and exchange management information. The intent of the WS-Management protocol specification is to provide interoperability and consistency for enterprise systems that have computers running on a variety of operating systems from different vendors. It only requires TWO ports (one for http, one for https) to be open and has much greater security posture than WMI.
By default, PowerShell Remoting relies on WinRM to make connections to other machines unless a WMI call is being made. WinRM (and WMI) only allow connections from members of the Administrators group. If you have a handle on who has admin access to your servers and desktops, then you’re off to a great start in securing your PS remoting environment. PS remote sessions are launched under the user’s context, so all operating system access controls applied to individual users and groups continue to apply to them while connected over PowerShell remoting.
Certificate-Based Authentication
When you authenticate with Kerberos to a remote PC, you are verifying that you are who you say you are. However, neither you or the remote node can verify if the either computer is who they say they are. Certificate-Based Authentication solves this problem through the use of certificates and the SSL authentication protocol. Using SSL certificates, the authenticity of the remote computer can be proven as well as the the machine initiating the connection. Without SSL, a computer can spoof a name and trick the other side into thinking they are connected to a different computer by falsely building confidence that the spoofed computer is one they can trust. This scenario I have described is simple example of how the first half of a man-in-the-middle attack is crafted.
In order for you to enable Certificate-Based Authentication, you must have a certificate infrastructure in place and each server must have a certificate issued by the the Certificate Authority. You could also build the infrastructure if it doesn’t exist but this is not a trivial task. These requirements make Certificate-Based Authentication tough to put in place if you don’t already have that infrastructure setup beforehand and a deep understanding of how certificates work.
Firewall Settings
PowerShell Remoting (and WinRM) listen on the following ports:
- HTTP: 5985
- HTTPS: 5986
Earlier I mentioned that WMI is less firewall friendly because it connects via TCP ports 135, 445, and additional dynamically-assigned ports, typically in the range of 1024 to 1034. WinRM is much easier to secure since you can limit your firewall to only opening two ports. With SSL in place, you only need one port!
The default Windows Firewall rule for PowerShell remoting accepts all connections on private networks. On public networks, the default Windows Firewall rule allows PowerShell remoting connections only from within the same subnet. You have to explicitly change that rule to open PowerShell remoting to all connections on a public network.
WinRM runs as a service under the Network Service account and spawns isolated processes running as user accounts to host PowerShell instances. An instance of PowerShell running as one user has no access to a process running an instance of PowerShell as another user.
Up until now, we have been discussing authentication and firewall settings. Hopefully, it’s clear that there isn’t much that you need to do to improve your security for these two areas but now we’re going to start to discuss some areas where you do have some real options that can increase the security of your PowerShell remoting environment.
Limiting Connections
Out of the box, every Windows computer on your network can make a connection to any other computer on that network if the user connecting has the rights and there is a network path available between the two nodes. One very easy way to beef up the security of your organization is to limit which machines can start a remote connection. For example, let’s assume you are an admin of a computer network that has 500 computers. Of those 500 computers, let’s say you manage 20 servers and that you have an IT support staff of 10 people. You could argue that there are approximately 470 computers that will probably never INITIATE a remote PowerShell connection attempt (500 PC’s – 20 servers – 10 IT admins). If you shut off the ability to make remote PowerShell connections for those 470 computers, you just reduce your PowerShell attack surface by 94%!
The idea is that most of your end users would never need to initiate remote connections, so you can make yourself more secure by turning off the ability for them to do so. This would protect your org when a machine gets PWNED and the attacker attempts to run remote PS commands from that machine. It would also stop an attacker from hopping between nodes via PowerShell easily because most PC’s on the network would refuse the connection.
So, how could you limit which clients could connect to a host via WinRM?
You can’t limit source connections via GPO at the WinRM level. But there are two ways that you can limit conenctons. The first I mentioned earlier: limit who has administrator access to the box (or who is a member of the Remote Management Users group). The other method is to limit connection sources at the host’s firewall. I know that many admins disable the Windows Firewall as a practice because it just makes things easier. However, you need to stop that practice going forward because you are opening the nodes on your network to the greatest possible attack surface.
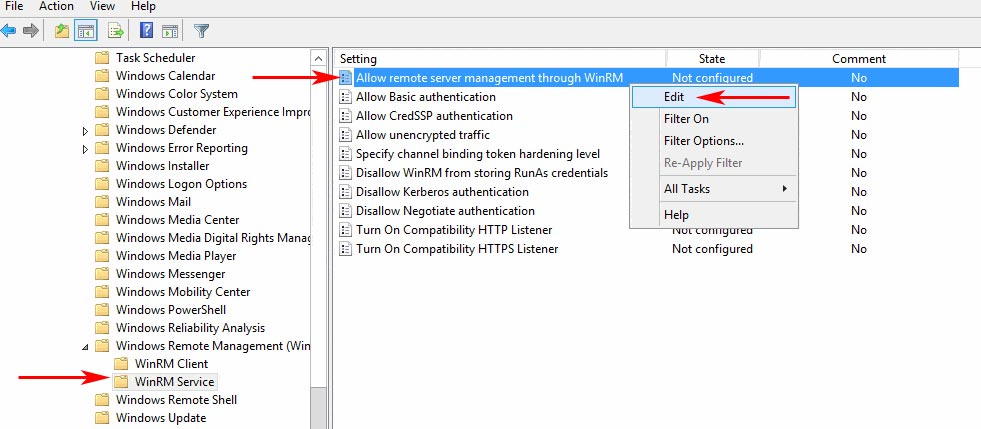
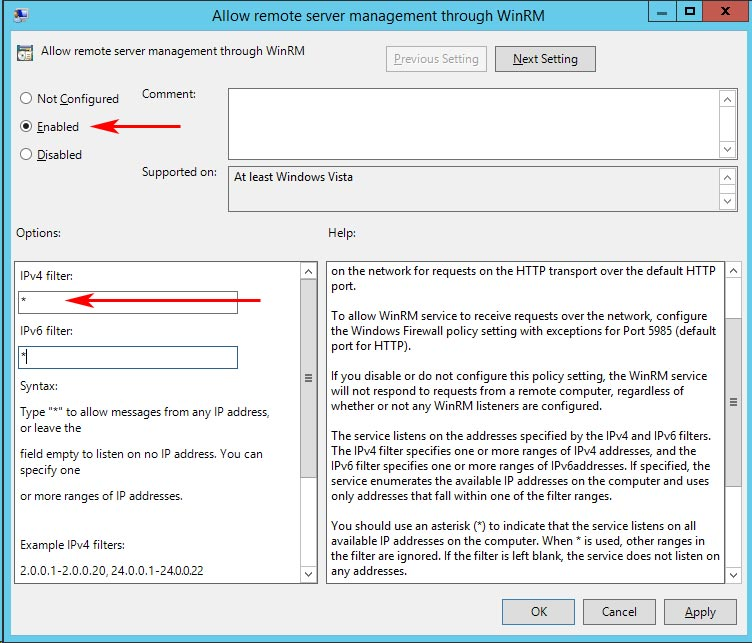
I want to also highlight the GPO setting “Allow remote server management through WinRM“. The usage of the setting in the screencap below can be confusing and I have to admit that I totally misunderstood its purpose the first time I researched the security settings for WinRM. This setting controls what interfaces the HOST listens on, not what clients can connect tot he host.
So, when would you use this setting?
Let’s say you had a server with multiple NIC’s and those NIC’s all served a different purpose. For example let’s say NIC1 is the PROD network, NIC2 is the backup network and NIC3 is a heartbeat network. The setting “Allow remote server management through WinRM” allows you to configure the server so that you can limit which of those NIC’s would be able to accept WinRM connections from remote hosts.
Logging
Logging is another area where Microsoft has given considerable flexibility in how much to log and where to store some of the log information. Keep in mind that some of the options discussed below are only available in PowerShell 5.x, so the recommendation is to upgrade all pc’s to PS 5.x so you can take advantage of all the latest and greatest security features.
PowerShell logs connection attempts and successful connections by default but does not log what commands or scripts are executed by default. The Microsoft team has given us the ability to log in great detail what happens when PowerShell is executed but you need to enable the logging options. Logging is a little bit of an art form because the more logging you turn on, the greater the chance the logging will have a negative impact on the performance of the PC.
There are three log settings that can be enabled to log activity for WinRM remote sessions:
- Module Logging
- Script Block Logging
- Transcription
Module Logging
Module logging records pipeline execution details as PowerShell executes, including variable initialization and command invocations. Module logging will record portions of scripts, some de-obfuscated code, and some data formatted for output. This logging will capture some details missed by other PowerShell logging sources, though it may not reliably capture the commands executed.
Module logging has been available since PowerShell 3.0 and logged events are written to Event ID# 4103. Please be aware, module logging generates a large volume of events! The information captured is useful, especially when trying to figure out what happened during a security breach, but you will definitely blow up your security log and cause it to roll over very easily. If you have a SIEM tool that captures log data, this probably isn’t a concern for you, but if you don’t have SIEM in your org then turning on module logging may not be in your best interest.
Script Block Logging
Script block logging records blocks of code as they are executed by the PowerShell engine, thereby capturing the full contents of code executed by an attacker, including scripts and commands. Due to the nature of script block logging, it also records de-obfuscated code as it is executed. For example, in addition to recording the original obfuscated code, script block logging records the decoded commands passed with PowerShell’s -EncodedCommand argument, as well as those obfuscated with XOR, Base64, ROT13, encryption, etc., in addition to the original obfuscated code. Script block logging will not record output from the executed code.
Script block logging events are recorded in Event ID # 4104. Script blocks exceeding the maximum length of an event log message are fragmented into multiple entries. Scripts are available to re-assemble log messages split across log entries. PowerShell 5.0 will automatically log code blocks if the block’s contents match on a list of suspicious commands or scripting techniques, even if script block logging is not enabled. These suspicious blocks are logged at the “warning” level in Event ID #4104, unless script block logging is explicitly disabled.
Enabling script block logging will capture all activity, not just blocks considered suspicious by the PowerShell process. Script block logging generates fewer events than module logging but the volume still can be considerable.
Transcription
Transcription creates a unique record of every PowerShell session, including all input and output, exactly as it appears in the session.
Transcripts are written to text files, broken out by user and session. Transcripts also contain timestamps and metadata for each command in order to aid analysis. However, transcription records only what appears in the PowerShell terminal, which will not include the contents of executed scripts or output written to other destinations such as the file system.
PowerShell transcripts are automatically named to prevent collisions, with names beginning with “PowerShell_transcript”. By default, transcripts are written to the user’s documents folder but can be configured to any accessible location on the local system or on the network.
I like the idea of turning on transcription and sending those logs to a file share. The logs are simple text files and are easy to read and scan at a glance if necessary. Also, since they’re just text files, they are very efficient to store and can be compressed and archived without much effort. You can setup transcription to write transcripts to a remote, write-only network share. Machines would dump log data there but only a handful of people could remove those logs.
Conclusion
I have walked you through many of the options available for PowerShell Remoting. The take away from this article hopefully is that you realize that, by default, PowerShell authentication is strong. However, detailed logging is not enabled by default. PowerShell only logs connection attempts in its default config, but there is the ability to log in great detail everything that occurs within a PowerShell session. The downside here is that turning on logging has an impact on machine performance and disk space and you will have to figure out for yourself what the best mix is for your org.
Enabling script block logging and transcription will record most activity while minimizing the amount of log data generated. At a minimum, transcription logging should be enabled, in order to identify commands run and code that was executed.
My Recommendations
Follow these recommendations and you will have a very strong security posture with respect to running PowerShell in your organization:
- Turn on transcription logging and have logs write to a central file share
- Lock down who has the ability to remove logs from the central share
- Turn on script block logging and assess the impact on your PC’s
- Module logging is also recommended but it will generate large volumes of event log data, so think carefully before enabling this setting
- Enable a certificate infrastructure for your domain
- Install SSL certificates on all domain computers
- Disable the HTTP port in use for PowerShell after SSL certs have been deployed
- Limit via GPO which PC’s can initiate PowerShell connection attempts
- Install Windows PowerShell v5 on every node in your environment
- Eliminate local administrators on PC’s and servers aggressively
I hope you find this practical guide useful in your research. I welcome you to leave comments below and let me know what concerns or feedback you have. If you like articles like this, don’t forget to sign up for my mailing list. I usually write one article a week and I never share your info with anyone or any business.
PowerForensics – PowerShell Digital Forensics
PowerForensics – PowerShell Digital Forensics

Error Trapping and Handling in PowerShell
How to use the Trap and Try…Catch…Finally constructs
![]() Sometimes when something goes wrong in Windows PowerShell, it isn’t a bad thing. That is, there are certain conditions that you can anticipate and potentially deal with, such as a missing file or a computer that can’t be contacted over the network. In response, you might want to prompt the user for an action to take or just log the error so that you can try again later. Windows PowerShell makes this possible through a scheme called error trapping and handling.
Sometimes when something goes wrong in Windows PowerShell, it isn’t a bad thing. That is, there are certain conditions that you can anticipate and potentially deal with, such as a missing file or a computer that can’t be contacted over the network. In response, you might want to prompt the user for an action to take or just log the error so that you can try again later. Windows PowerShell makes this possible through a scheme called error trapping and handling.
First, You Need an Error
To trap and handle an error, you actually need one to occur. Technically, in PowerShell terminology, you need an exception to occur. That can actually be a little tricky to do, believe it or not. For example, try running the following command. It will fail, but pay attention to what happens:
Get-WmiObject Win32_BIOS -comp 'localhost','not-here'
First, you should see the Win32_BIOS instance from your local computer. Then, you should see an error message (unless you actually have a computer named not-here on your network). Think you’ve seen an exception? Wrong. In PowerShell, just because you’ve seen an error message doesn’t mean an exception was created. You can’t trap or handle an error message. You can only trap and handle exceptions.
What you just saw was an example of a non-terminating exception. That is, an exception really did happen, but it wasn’t so bad that the cmdlet needed to stop executing. So the cmdlet basically held the exception deep inside, suppressing its feelings of failure, and continued trying to do what you’d asked. You can’t help the cmdlet if it isn’t going to be more open with its feelings. In other words, you can’t trap and handle non-terminating exceptions. Many of the problems a cmdlet can run into will typically generate a non-terminating exception. That’s because cmdlets don’t want folks to start calling them crybabies, so if something moderately bad happens, they just shut up and keep going.
This cmdlet behavior is controlled by a built-in PowerShell variable named $ErrorActionPreference. You can view its contents by simply typing the variable’s name at the command line:
$ErrorActionPreference
By default, it’s set to Continue, which is what cmdlets do when they encounter a non-terminating error—they keep going. The cmdlets also display error messages by default, but you can shut them off by setting $ErrorActionPreference to SilentlyContinue. Try it:
$ErrorActionPreference = "SilentlyContinue"
Get-WmiObject Win32_BIOS -comp 'localhost','not-here'
This time, the failure occurred but not a word was said about it. Our cmdlet just bit its lip and kept on going, not so much as whimpering about the error. Now, this is where a lot of new PowerShell users go wrong, so I need you to picture me standing up on a table and screaming, “Do not set $ErrorActionPreference to SilentlyContinue just to make the error messages go away.”
Error messages are, by and large, good things. They tell us what’s broken. They’re like the nerves in your fingertips that tell you the stove you’re about to touch is very hot. People who have problems with those nerves often burn themselves. We usually want to see error messages. What we don’t want to see are the error messages that we can anticipate and deal with on our own.
Just Cry Out Loud
When you anticipate a cmdlet running into a problem that you want to deal with, you need to tell that cmdlet to stop bottling up its emotions. You’re not doing this for every cmdlet across the shell, but just for a specific cmdlet that you know you can handle. Since you don’t want to make a global behavior change, you should leave $ErrorActionPreference set to Continue. Instead, you can modify the error action for just one cmdlet.
Every cmdlet in PowerShell supports a set of common parameters, one of which is -ErrorAction (which can be abbreviated -ea). It accepts the same values as $ErrorActionPreference, including stop, which tells the cmdlet to turn a non-terminating exception into a terminating exception—and terminating exceptions are ones you can trap and handle. For this example, you’d run the command
Get-WmiObject Win32_BIOS -comp 'localhost','not-here' -ea stop
Tricky Traps
The first way you can trap an error is to use a Trap construct. Listing 1 shows an example of a trap that’s defined within a function. This code works in PowerShell 1.0 as well as PowerShell 2.0.
Function Do-Something {
  Trap {
    Write-Host 'Error in function' -fore white -back red
    Continue
  }
  Write-Host 'Trying' -fore white -back black
  gwmi Win32_BIOS -comp localhost,not-here -ea stop
  Write-Host 'Tried' -fore white -back black
}

Write-Host 'Starting' -fore white -back green
Do-Something
Write-Host 'Ending' -fore white -back green
Figure 1 shows the output from the code in Listing 1. As you can see, PowerShell first displayed the line Starting. It then executed the function, which displayed the line Trying.

Next, PowerShell ran Get-WmiObject, which can be abbreviated as gwmi. It first ran this cmdlet against localhost, and you can see the Win32_BIOS output. But it ran into a problem trying to contact not-here, so an exception occurred. The -ea stop parameter turned that into a terminating exception, so PowerShell looked for a Trap construct within the same scope. It found one inside the function and executed it. That’s why Error in functiondisplayed. The trap finished with the Continue statement, which kept the execution inside the same scope (i.e., inside the function), and Tried was displayed. Finally, the function exited and Ending was displayed.
Traps can be tricky because they are their own scope. Specifically, they’re a child of whatever scope they live in. Consider the modified Trap construct in Listing 2.
Function Do-Something {
  Trap {
    Write-Host 'Error in function' -fore white -back red

# BEGIN CALLOUT A
    $test = 'Two'
# END CALLOUT A
    Continue
  }
  $test = 'One'
  Write-Host "Trying $test" -fore white -back black
  gwmi Win32_BIOS -comp localhost,not-here -ea stop
  Write-Host "Tried $test" -fore white -back black
}

Write-Host 'Starting' -fore white -back green
Do-Something
Write-Host 'Ending' -fore white -back green
Figure 2 shows the output from this version, and I want you to follow the value of the $test variable.

The script set the $test variable to One, and that’s displayed in the Trying One output. When the exception occurred, the trap set the $test variable to Two. However, when the trap exited, the output still displayed Tried One. What happened? As a child scope, a trap can access its parent’s variables for reading only. So, when the trap tried to modify $test, it actually created a new local $test variable, which means that $test from the parent scope (i.e., the function) was never changed. This is a real bummer if you want your trap to modify something so that your script can continue. There are ways to remedy this. For example, you can replace the command in callout A in Listing 2 with the following command to change the variable’s contents:
Set-Variable -name test -value 'Two' -scope 1
The -scope parameter treats scope 0 as the local scope, which is within the trap. The next scope up—the trap’s parent—is scope 1. So by changing test in scope 1, you’re modifying the variable that had been set to One. Note that when you use the Set-Variable cmdlet (as well as the other -Variable cmdlets), you don’t use a dollar sign ($) when specifying a variable’s name.
There’s one more tricky bit about traps that I want to share. Take a look at the alternative Trap construct in Listing 3.
Trap {
  Write-Host 'Error in script' -fore white -back red
  Continue
}
Function Do-Something {
  Trap {
    Write-Host 'Error in function' -fore white -back red
    Break
  }
  Write-Host "Trying" -fore white -back black
  gwmi Win32_BIOS -comp localhost,not-here -ea stop
  Write-Host "Tried" -fore white -back black
}

Write-Host 'Starting' -fore white -back green
Do-Something
Write-Host 'Ending' -fore white -back green
What I’ve done is defined a trap within the script itself, prior to the function’s definition. I’ve also modified the trap within the function to use a Break statement rather than a Continue statement. The Break statement forces the trap to exit the scope in which the error occurred (in this case, the function) and to pass the exception to the parent scope, which is the script. The shell will then look to see if a trap exists in that scope, and I have indeed defined one.
Figure 3 shows what the results look like.

When the exception occurred in the function, its trap executed and “broke out of” the function. The exception was passed to the script, so its trap executed. Notice that Tried isn’t displayed. That’s because the function exited before that command could run. All you see is Ending, which is the last line in the script. Although the script’s trap concludes with the Continue statement, all it does is keep the shell’s execution in the same scope (i.e., the script). The shell can’t dive back into the function; it broke out of the function and is out for good unless you call the function afresh.
As this example shows, you can include more than one Trap construct in a script. This means you can set different traps for different types of errors. To get more details, run the command
Help about_Trap
if you’re using PowerShell 2.0. Although PowerShell 1.0 supports the Trap construct, there isn’t a Help file for it. So, if you’re using PowerShell 1.0, you need to access the information at technet.microsoft.com/en-us/library/dd347548.aspx.
Try a Different Approach
Frankly, I find the Trap construct and its scope rules pretty confusing. Fortunately, PowerShell 2.0 offers an alternative: the Try…Catch…Finally construct, which Listing 4 shows.
Try {
  gwmi Win32_BIOS -comp localhost,not-here -ea stop
} Catch {
  Write-Host 'Something bad happened' -fore white -back red
} Finally {
  Write-Host 'Glad that is over'
}
As you can see, you put the command that might fail in the Try block and the command that deals with the failure in the Catch block. You can even add a Finally block that will execute whether or not an error occurred.
Within the Catch block, you can do almost anything, including writing to log files, logging an event log entry, and sending email messages. It’s even possible to create multiple Catch blocks, each of which deals with a certain kind of error. In PowerShell 2.0, you can run the command
Help about_Try_Catch_Finally
for more details.
What’s Your Preference?
In PowerShell 1.0, you must use the Trap construct to trap and handle errors. In PowerShell 2.0, you have a choice between the Trap and Try…Catch…Finally constructs. I prefer using the latter. Not only is the Try…Catch…Finally construct easier to use, but it also keeps the error-handling logic closer to the location of the command that might fail. If you’re using PowerShell 1.0 and you often need to catch and handle exceptions, you might consider upgrading to PowerShell 2.0 so that you can take advantage of this new error trapping and handling tool.
Hide OneDrive from File Explorer – Power Tips – PowerTips – IDERA Community
Are you tired of OneDrive icons polluting your file explorer tree view? If you don’t use OneDrive, then here are two handy functions that hide and show the OneDrive icons in File Explorer:
function Disable-OneDrive
{
  $regkey1 = 'Registry::HKEY_CLASSES_ROOT\CLSID\{018D5C66-4533-4307-9B53-224DE2ED1FE6}'
  $regkey2 = 'Registry::HKEY_CLASSES_ROOT\Wow6432Node\CLSID\{018D5C66-4533-4307-9B53-224DE2ED1FE6}'
    Set-ItemProperty -Path $regkey1, $regkey2 -Name System.IsPinnedToNameSpaceTree -Value 0
}


function Enable-OneDrive
{
    $regkey1 = 'Registry::HKEY_CLASSES_ROOT\CLSID\{018D5C66-4533-4307-9B53-224DE2ED1FE6}'
    $regkey2 = 'Registry::HKEY_CLASSES_ROOT\Wow6432Node\CLSID\{018D5C66-4533-4307-9B53-224DE2ED1FE6}'
    Set-ItemProperty -Path $regkey1, $regkey2 -Name System.IsPinnedToNameSpaceTree -Value 1
}
Source: Hide OneDrive from File Explorer – Power Tips – PowerTips – IDERA Community
How to Detect Who Created a Scheduled Task on Windows Server
This how-to shows two ways of detecting who created a new scheduled task on your windows server.
Source: How to Detect Who Created a Scheduled Task on Windows Server