Linux Desktop Themes
Source: B00merang Project
Linux Desktop Themes
Source: B00merang Project
How To Connect And Mount iSCSI Onto Linux Servers
TLDR;
Discovering targets in iSCSI server:
iscsiadm –mode discovery -t sendtargets –portal 192.168.1.141 192.168.1.141:3260,1 iqn.2006-01.com.openfiler:tsn.d625a0d9cb77
login with the iSCSI LUN:
[root@machine1 ~]# iscsiadm --mode node --targetname iqn.2006-01.com.openfiler:tsn.d625a0d9cb77 --portal 192.168.1.141 --loginMount the iscsi target:
mount /dev/sdb2 /mnt
Disconnect/remove target:
umount /mnt
[root@machine1 ~]# iscsiadm –mode node –targetname iqn.2006-01.com.openfiler:tsn.d625a0d9cb77 –portal 192.168.1.141 –logout
Optionally delete the record from the database:
iscsiadm -m node -o delete -T iqn.2006-01.com.openfiler:tsn.d625a0d9cb77 –portal 192.168.1.141:3260
Details:
iscsi Server: 192.168.1.141
Centos Server: 192.168.1.137
The commands bellow should be working in other Linux distro.
First, install some needed packages.
Centos :
yum -y install iscsi-initiator-utils
service iscsid start
service iscsi start
Ubuntu:
sudo apt-get install open-iscsiOpensuse
# zypper install open-iscsiDiscovering targets in iSCSI server:
 [root@machine1 ~]# iscsiadm --mode discovery -t sendtargets --portal 192.168.1.141
192.168.1.141:3260,1 iqn.2006-01.com.openfiler:tsn.d625a0d9cb77
Trying to login with the iSCSI LUN:
[root@machine1 ~]# iscsiadm --mode node --targetname iqn.2006-01.com.openfiler:tsn.d625a0d9cb77 --portal 192.168.1.141 --loginLogging in to [iface: default, target: iqn.2006-01.com.openfiler:tsn.d625a0d9cb77, portal: 192.168.1.141,3260] (multiple) Login to [iface: default, target: iqn.2006-01.com.openfiler:tsn.d625a0d9cb77, portal: 192.168.1.141,3260] successful. [root@machine1 ~]#With this command is responsible of the update of iSCSI targets database for the files located in /var/lib/iscsi/ :
[root@machine1 ~]# cat /var/lib/iscsi/send_targets/192.168.1.141,3260/st_config
 # BEGIN RECORD 6.2.0-873.10.el6
 discovery.startup = manual
 discovery.type = sendtargets
 discovery.sendtargets.address = 192.168.1.141
 discovery.sendtargets.port = 3260
 discovery.sendtargets.auth.authmethod = None
 discovery.sendtargets.timeo.login_timeout = 15
 discovery.sendtargets.use_discoveryd = No
 discovery.sendtargets.discoveryd_poll_inval = 30
 discovery.sendtargets.reopen_max = 5
 discovery.sendtargets.timeo.auth_timeout = 45
 discovery.sendtargets.timeo.active_timeout = 30
 discovery.sendtargets.iscsi.MaxRecvDataSegmentLength = 32768
 # END RECORD
 [root@machine1 ~]#
Now check if the disk add to your machine
[root@machine1 ~]# fdisk -lDisk /dev/sda: 17.8 GB, 17791238144 bytes 255 heads, 63 sectors/track, 2162 cylinders Units = cylinders of 16065 * 512 = 8225280 bytes Sector size (logical/physical): 512 bytes / 512 bytes I/O size (minimum/optimal): 512 bytes / 512 bytes Disk identifier: 0x000a0b90Device Boot Start End Blocks Id System /dev/sda1 * 1 1275 10240000 83 Linux /dev/sda2 1275 1913 5120000 8e Linux LVM /dev/sda3 1913 2066 1228800 82 Linux swap / SolarisDisk /dev/mapper/vg_machine1-LogVol01: 209 MB, 209715200 bytes 255 heads, 63 sectors/track, 25 cylinders Units = cylinders of 16065 * 512 = 8225280 bytes Sector size (logical/physical): 512 bytes / 512 bytes I/O size (minimum/optimal): 512 bytes / 512 bytes Disk identifier: 0x00000000Disk /dev/mapper/vg_machine1-LogVol00: 2097 MB, 2097152000 bytes 255 heads, 63 sectors/track, 254 cylinders Units = cylinders of 16065 * 512 = 8225280 bytes Sector size (logical/physical): 512 bytes / 512 bytes I/O size (minimum/optimal): 512 bytes / 512 bytes Disk identifier: 0x00000000Disk /dev/sdb: 369 MB, 369098752 bytes 12 heads, 59 sectors/track, 1018 cylinders Units = cylinders of 708 * 512 = 362496 bytes Sector size (logical/physical): 512 bytes / 512 bytes I/O size (minimum/optimal): 512 bytes / 512 bytes Disk identifier: 0x00000000[root@machine1 ~]#Create file system in this disk (for new iscsi disk only)
[root@machine1 ~]# fdisk  /dev/sdb
 Device contains neither a valid DOS partition table, nor Sun, SGI or OSF disklabel
 Building a new DOS disklabel with disk identifier 0x41c55bb7.
 Changes will remain in memory only, until you decide to write them.
 After that, of course, the previous content won't be recoverable.
Warning: invalid flag 0x0000 of partition table 4 will be corrected by w(rite)WARNING: DOS-compatible mode is deprecated. It's strongly recommended to switch off the mode (command 'c') and change display units to sectors (command 'u').Command (m for help): n Command action e extended p primary partition (1-4) p Partition number (1-4): 2 First cylinder (1-1018, default 1): Using default value 1 Last cylinder, +cylinders or +size{K,M,G} (1-1018, default 1018): Using default value 1018Command (m for help): w The partition table has been altered!Calling ioctl() to re-read partition table. Syncing disks.and
[root@machine1 ~]# mkfs.ext4 /dev/sdb2
 mke2fs 1.41.12 (17-May-2010)
 Filesystem label=
 OS type: Linux
 Block size=1024 (log=0)
 Fragment size=1024 (log=0)
 Stride=0 blocks, Stripe width=0 blocks
 90112 inodes, 360340 blocks
 18017 blocks (5.00%) reserved for the super user
 First data block=1
 Maximum filesystem blocks=67633152
 44 block groups
 8192 blocks per group, 8192 fragments per group
 2048 inodes per group
 Superblock backups stored on blocks:
 8193, 24577, 40961, 57345, 73729, 204801, 221185
Writing inode tables: done Creating journal (8192 blocks): done Writing superblocks and filesystem accounting information: doneThis filesystem will be automatically checked every 37 mounts or 180 days, whichever comes first. Use tune2fs -c or -i to override.Prepare the directory to mount the disk.
[root@machine1 ~]#[root@machine1 ~]# mkdir  /iscsi-openfiler
 [root@machine1 ~]# mount  -t ext4 /dev/sdb2  /iscsi-openfiler/
 [root@machine1 ~]# df -h
 Filesystem            Size  Used Avail Use% Mounted on
 /dev/sda1             9.7G  2.4G  6.9G  26% /
 tmpfs                 751M     0  751M   0% /dev/shm
 /dev/mapper/vg_machine1-LogVol00
 2.0G   35M  1.8G   2% /home
 /dev/mapper/vg_machine1-LogVol01
 194M  5.6M  179M   4% /tmp
 /dev/sdb2             341M   11M  314M   4% /iscsi-openfiler
Please add this to mount the net drive with Linux start.
add this to /etc/fstab./dev/sdb2 /iscsi-openfiler ext4 _netdev,rw 0 0and
chkconfig  netfs  on
chkconfig  iscsi on
There are three ways to disable or delete an iSCSI target.
First, to disable an iSCSI target:
# iscsiadm --m node -T iqn.2006-01.com.openfiler:tsn.d625a0d9cb77 --portal 192.168.1.141:3260 -uSecond, it is possible to delete the target’s record ID:/p>
# iscsiadm -m node -o delete -T iqn.2006-01.com.openfiler:tsn.d625a0d9cb77 --portal 192.168.1.141:3260Thirdly, stop the iSCSI service.
Source: How To Connect And Mount iSCSI Onto Linux Servers | Unixmen
How to Configure Network on Ubuntu 18.04 LTS with Netplan
Netplan is a utility for configuring network interfaces on Linux that uses YAML files. YAML configuration file format is really simple. It has clear and easy to understand syntax. Netplan works with traditional Linux networking systems, systemd-networkd and Network Manager. With Netplan, you can configure the network of your Ubuntu machines easier than ever before.Starting from Ubuntu 18.04 LTS, Ubuntu uses Netplan to configure network interfaces by default.
In this article, I will show you how to use Netplan on Ubuntu 18.04 LTS.
Let’s get started!
Netplan Configuration Files:
On Ubuntu 18.04 LTS, the Netplan YAML configuration files are placed in the /etc/netplan/ directory. To configure a network interface, you have to create or modify the required YAML files in this directory.
YAML configuration files has the .yaml extension. The default Netplan YAML configuration file /etc/netplan/50-cloud-init.yaml is used to configure network interfaces using Netplan.
Configuring Network Interface via DHCP with Netplan:
In this section, I will show you how to configure a network interface via DHCP on Ubuntu with Netplan.
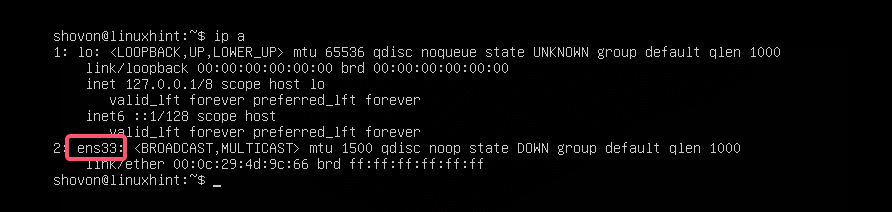
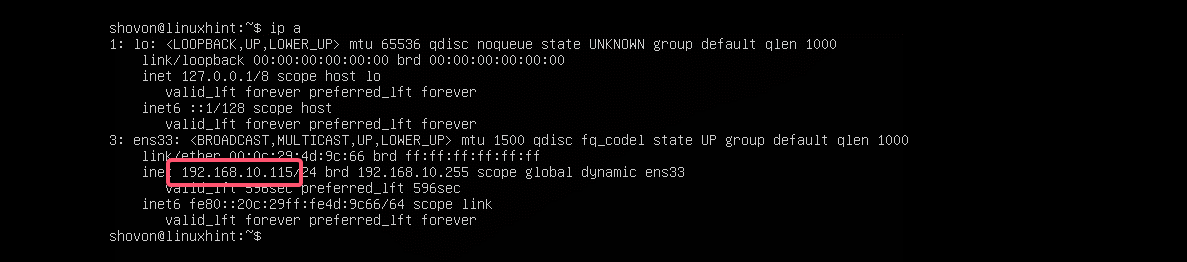
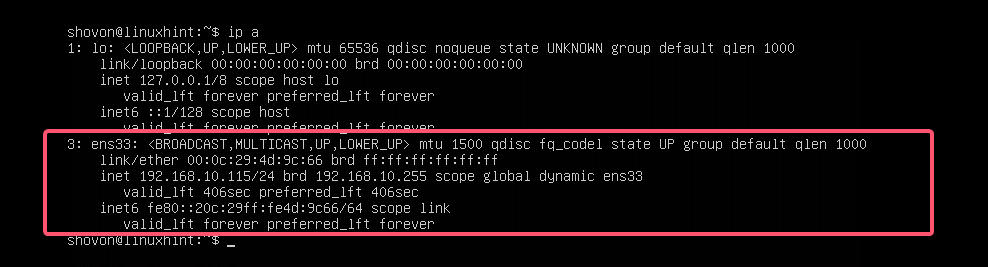
First, find the network interface name that you want to configure with the following command:
$ ip aAs you can see, I have one network interface card (NIC) installed on my Ubuntu 18.04 LTS machine named ens33. It does not have any IP address configured right now. So, let’s use Netplan to configure it via DHCP.
To configure the network interface ens33 via DHCP using Netplan, open the default Netplan configuration file on Ubuntu 18.04 LTS /etc/netplan/50-cloud-init.yaml with the following command:
$ sudo nano /etc/netplan/50-cloud-init.yaml
You should see the following window.
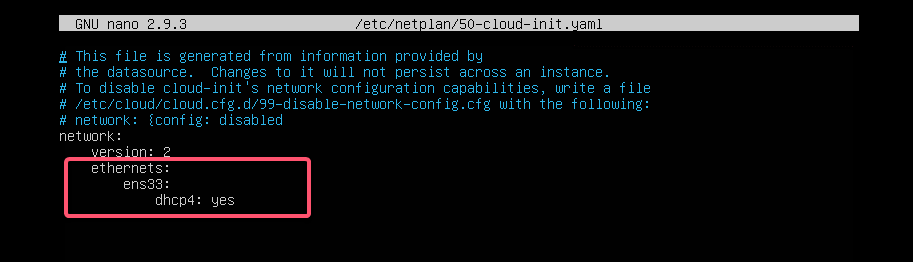
Now add the following lines in the network section.
ethernets:ens33:
dhcp4: yes
Here, dhcp4: yes means, use DHCP for IPv4 protocol to configure the network interface ens33.
NOTE: The indentations are really useful. Make sure you indent each line correctly. It will make the syntax clearer and more comfortable to the eye.
Finally, the configuration file should look something like this.
Now, press <Ctrl> + x, then press y, and followed by <Enter> to save the file.
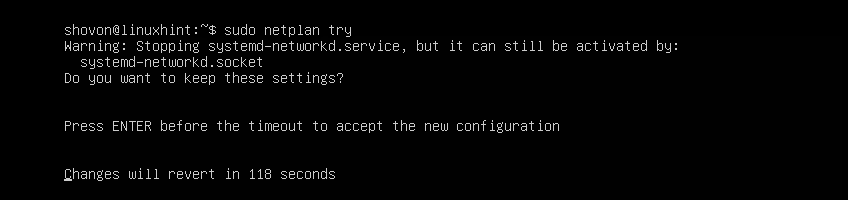
The good thing about Netplan is that before you apply the changes, you can make sure the configuration file has no typos or any other mistakes with the following command:
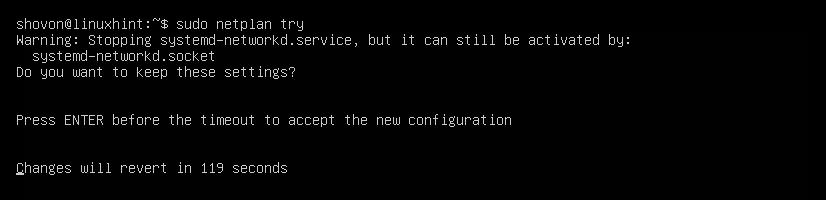
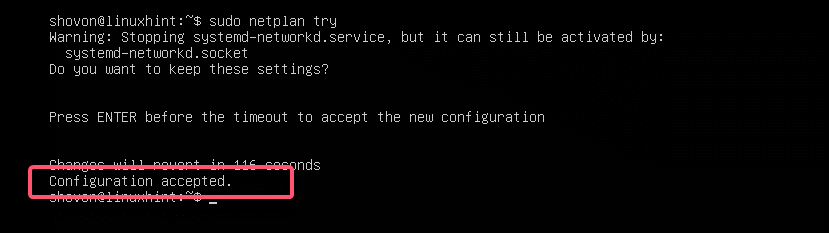
$ sudo netplan tryNow press <Enter>.
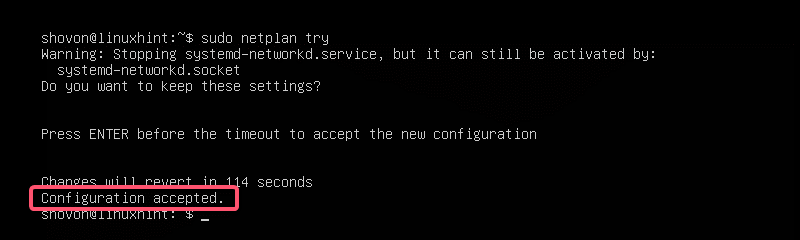
If everything is alright, you should see the Configuration accepted message as marked in the screenshot below.
If there’s any problem with the configuration file, you will see appropriate error messages here.
This feature will surely help you avoid complex hard to track future problems with Netplan configuration files.
Finally, apply the changes permanently using Netplan with the following command:
$ sudo netplan apply
As you can see, the network interface ens33 is configured via DHCP.
Setting Up Static IP Address with Netplan:
If you want to set up a static IP on your network interface using Netplan, then this section is for you.
You can manually set the IP address, name server, gateway, etc. of your network interface using Netplan.
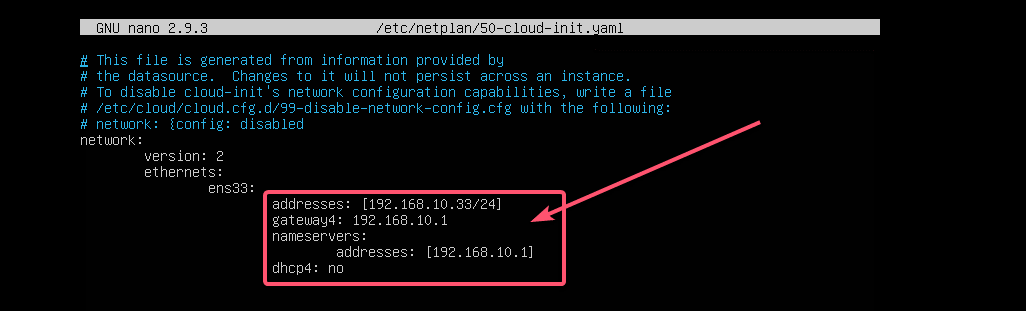
Let’s say, you want to configure your network interface ens33 as follows:
Static IP address: 192.168.10.33
Subnet mask: 255.255.255.0
Gateway: 192.168.10.1
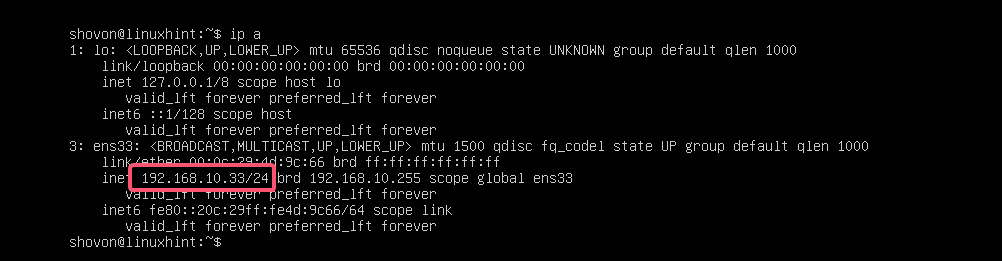
DNS server: 192.168.10.1First, check the network configuration of the ens33 network interface with the following command:
$ ip aThis is to help you verify that the network interface settings really changed.
Now, edit the Netplan YAML configuration file, /etc/netplan/50-cloud-init.yaml, with the following command:
$ sudo nano /etc/netplan/50-cloud-init.yamlIf you’ve followed me throughout the article, then the configuration file should be like this. Now, remove the line as marked in the screenshot below.
And type in the lines as marked in the screenshot below.
NOTE: Remember, indentation is essential for YAML files. If you forget to indent correctly, Netplan will not let you apply the configuration file. So, you must indent every step of the YAML configuration file, as shown in the screenshot below.
Now, press <Ctrl> + x, then press y, and followed by <Enter> to save the file.
Now, check whether there’s any error in the configuration file with the following command:
$ sudo netplan try
Then, press <Enter>.
As you can see, the configuration file is accepted.
Finally, apply the configuration file with the following command:
$ sudo netplan apply
The IP address is changed as expected.
The gateway is also set correctly.
As well as the DNS server.
So, that’s how you install and use Netplan on Ubuntu to configure network interfaces using YAML files. If you want to learn more about Netplan, please visit the official website of Netplan at https://netplan.io.
Source: How to Configure Network on Ubuntu 18.04 LTS with Netplan? – Linux Hint
Configuring Firewall Rules using UFW
UFW stands for uncomplicated firewall and comes pre-installed with all of the latest releases of Ubuntu and Ubuntu Server.
It is one of the easiest ways to set up a firewall on your device or server quickly.
Firewalls are an integral part of maintaining strong network security and are crucial for servers.
In this guide, we will show you how you can use UFW to allow, deny, or rate-limit the ports on your device.
It should be noted that by default UFW will block all incoming connections. UFW will not block outgoing connections by default.
Table of Contents
- Using UFW to Allow Access Through a Port
- Allowing Access for a Specific IP Address
- Denying Access Through Ports using UFW
- Deny Access to a Specific IP Address
- Rate Limiting Connections on a Port
- Deleting Existing Firewall Rules
- Getting the Status of UFW
- Listing UFW Rules While Disabled
- How to Enable or Disable UFW
Using UFW to Allow Access Through a Port
One of the very first things you should learn to deal with is how to allow access through an individual port.
By allowing a port within UFW, connections will be able to be made through it. This allows other devices to connect to yours through your network.
Using UFW, allowing a port is a straightforward process that requires one command.
At its very basics, all you need to do is type in “
ufw allow” followed by the port number you want to access your device through.Optionally you can also specify the protocol that the port should be allowed on, whether that be TCP, UDP, or another protocol.
If you don’t specify a protocol, the port will be accessible through all available protocols.
Allowing Access Through a Port using UFW
At its most straightforward usage, all you need to do it specify the port number you want traffic to be allowed through.
sudo ufw allow PORTAs an example, let us allow access through the default OpenSSH port (Port 22).
sudo ufw allow 22Specifying the Protocol for the Port to be Allowed On
Using this simplified syntax, you can specify the protocol that you want the port to access.
By specifying the protocol, you will not be able to access it using any other protocol.
sudo ufw allow PORT[/PROTOCOL]For reference, two of the most used protocols on the internet are TCP and UDP.
For example, suppose we only wanted our SSH port to be accessible through the TCP protocol. In that case, we can use the following command.
sudo ufw allow 22/tcpAllowing Access by Specifying a Service Name
Using UFW, it is also possible to specify a service to allow by making use of its service name.
sudo ufw allow SERVICENAMEPlease note that this feature only works for services and ports that have been specified within the
/etc/servicesfile.For example, if we wanted to allow access to SSH using UFW, we can run the following command.
sudo ufw allow sshAllowing Access for a Specific IP Address
It is also possible to use UFW to allow access for a specific IP address to access your device.
You can either allow the IP address to have full access to your device or only to a specific IP address.
This method uses a different syntax to allowing global access through a port.
Allowing Complete Access for a Certain IP Address
The easiest way of specifying access for an IP address is to give it complete access to your device.
This isn’t the best practice for security, as they would have a way of completely bypassing your firewall.
The syntax for allowing access from an IP address is “
sudo ufw allow from” followed by the IP address you want to whitelist.sudo ufw allow from IPADDRESSFor example, if we wanted to whitelist the IP address
192.168.0.1, we would use the following command.sudo ufw allow from 192.168.0.1Allowing Access to a Port for a Certain IP Address
Using this more advanced syntax, you can still use it only to access a specific port.
You can also optionally use this to specifying the protocol you want it to have access to.
sudo ufw allow from TARGET to DESTINATION port PORTNUMBER [proto PROTOCOL]With this syntax,
TARGETis the IP address that you are expecting to access your device.
DESTINATIONis the point you want this IP address to access. You can just useanyif this doesn’t matter to you.For example, if we wanted to access our devices SSH port (Port 22) from the IP address
192.168.0.1, we can use the following command.sudo ufw allow from 192.168.0.1 to any port 22 proto tcpDenying Access Through Ports using UFW
In this section, we will show you how to block or deny access to a port on your device using UFW.
Denying connections through a port using UFW is a very straightforward process.
To block a port using UFW, you need to use “
ufw deny” followed by the port number, then optionally the protocol.Like allowing a port, you can block a port on from being accessible through a specific protocol. If no protocol is specified, UFW will automatically assume it should block all protocols.
Denying Access Through a Port
Denying access to a port is as simple as allowing access. The only real difference is that the word “
deny” is used instead of “allow“.sudo ufw deny PORTAs an example of how this works, we can use UFW to block outside access to our MySQL server operating on port 3306.
sudo ufw deny 3306Denying Access Through a Port with a Specific Protocol
You can also optionally specify the specific protocol that you want to deny access through using UFW.
The protocol is specified directly after the port number and is separated by the forward-slash symbol (
/)sudo ufw deny PORT[/PROTOCOL]For example, if we wanted to stop users from accessing our MySQL port when using the UDP protocol
sudo ufw deny 3306/udpDenying Access by using a Service Name
You can also use UFW to deny access to a port or ports by making use of its service name.
These services and the ports they are associated with are referenced with the
/etc/servicesfile.sudo ufw deny SERVICENAMEFor example, if we wanted to block access to
FTPon our device, we can use the following command.sudo ufw deny ftpDeny Access to a Specific IP Address
If you want, you can use UFW to block a specific IP address from accessing your device.
UFW provides you with two separate methods to achieve this. The first allows you to block the IP address from accessing your device on any port. The other method will enable you to only block access on a specific port.
You will find that blocking an IP address requires a different syntax then blocking a port.
Deny Complete Access to a Specific IP Address
To block access from an IP address, you will need to use a slightly different syntax.
All you need to do is use “
ufw deny from” followed by the IP address that you want to block.sudo ufw deny from IPADDRESSFor example, we can block the IP address
192.168.0.2by using the following command.sudo ufw deny from 192.168.0.2Deny Access through a Port to a Specific IP Address
Even with this method, it is still possible to block an IP address from accessing a specific port rather than the entire device.
The protocol for this is slightly more complicated as the way you need to specify the protocol and port numbers is different.
sudo ufw deny from IPADDRESS to PROTOCOL port PORTNUMBERReplace
IPADDRESSwith the IP address that you want to be blocked on the specified port.
PROTOCOLis the protocol that you want to be blocked. If you want to block the IP address on all protocols use the “any” keyword.Lastly, replace
PORTNUMBERwith the port that you want to block the IP address on.For example, if we wanted to block the IP address
192.168.0.2from our SSH port (Port22) onanyprotocol, we can use the following command.sudo ufw deny from 192.168.0.2 to any port 22Rate Limiting Connections on a Port
One of the most useful features of UFW is its ability to easily rate limit the connections being made to a specific port.
You can use this functionality to limit the number of connections that are made to critical ports.
For example, you can reduce the chance of users brute-forcing your SSH login by limiting connections made through your SSH connection
When you limit a connection, UFW will not allow any more than six connections within the last 30 seconds. The firewall will block any additional connections.
Limiting a port is a relatively simple process. Syntax wise it works like the
allowcommand, but instead, you use thelimitkeyword.All you need to do to limit a connection is to use “
ufw limit” followed by the port number and then optionally the connection protocol.sudo ufw limit PORT[/PROTOCOL]For example, we can use the firewall to limit connections to our Raspberry Pi’s SSH port by running the following command.
sudo ufw limit 22As SSH only works over TCP by default, you can limit connections using the TCP protocol.
sudo ufw limit 22/tcpDeleting Existing Firewall Rules
Deleting existing firewall rules using UFW is a reasonably straightforward process.
There are two different methods that you can use to delete existing firewall rules.
To delete a firewall rule, you will need to know either the rule itself or the number assigned to it.
Deleting Using a known Firewall Rule
For this first method, we are going to show you how to delete a firewall rule when you know the exact existing rule.
This method is useful for deleting a rule within UFW while it is not active.
To delete a rule using this method, you will need to use “
sudo ufw delete” followed by the rule.sudo ufw delete RULE1. For example, let us say that we had the following rule applying a limit to our SSH port.
ufw limit 22/tcp2. We can delete this rule by using the following command, referencing the rule we want to delete.
sudo ufw delete limit 22/tcpDeleting Using the Rule Number
The alternative method is to delete the firewall rule by referencing its index number. This number is assigned to the rule by UFW.
Please note that this method will currently only work if you have UFW enabled.
To delete a rule using this way, you will need to use
ufw deletefollowed by the rules number.sudo ufw delete RULENUMBERBelow we have included an example on how to retrieve the number of a rule, and delete it.
1. First, retrieve the list of rules with their numbering by using the following command.
sudo ufw status numbered2. That command will give you a list that should look something like we have below.
Status: active

     To                         Action      From
     --                         ------      ----
[ 1] 22                         LIMIT IN    Anywhere
[ 2] 80                         ALLOW IN    Anywhere
[ 3] 443                        ALLOW IN    Anywhere
[ 4] 22 (v6)                    LIMIT IN    Anywhere (v6)
[ 5] 80 (v6)                    ALLOW IN    Anywhere (v6)
[ 6] 443 (v6)                   ALLOW IN    Anywhere (v6)
The first column is the number that has been assigned to that rule.
3. For example, if we wanted to delete our rule allowing traffic in through the HTTP port (80), we can use the following command.
sudo ufw delete 2Getting the Status of UFW
Checking the status of your firewall is made relatively simple when using UFW.
All you need to do to check the status is to use the following command
sudo ufw statusFrom this command, you will get one of possibly two results.
If UFW has been disabled, you will see the following result notifying you that the firewall is currently inactive.
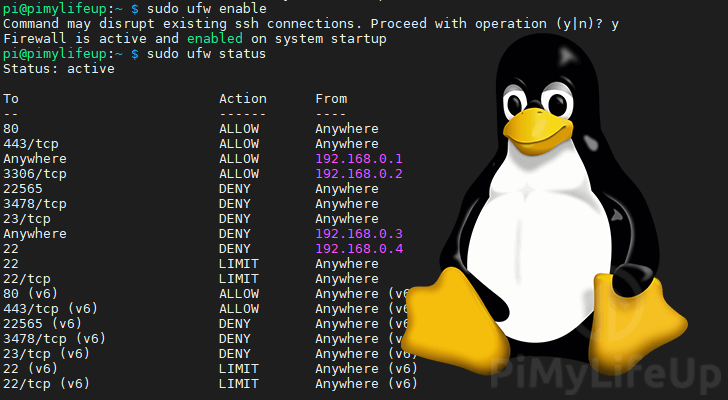
Status: inactiveAlternatively, if you have UFW enabled, you will see something similar to what we have below. This command should list all your firewall rules while UFW is enabled.
Status: active

To                         Action      From
--                         ------      ----
22                         LIMIT       Anywhere
80                         ALLOW       Anywhere
443                        ALLOW       Anywhere
22 (v6)                    LIMIT       Anywhere (v6)
80 (v6)                    ALLOW       Anywhere (v6)
443 (v6)                   ALLOW       Anywhere (v6)
Listing UFW Rules While Disabled
One issue you may run into when using UFW is that the “
ufw status” command does not return your firewall rules while it is disabled.To get around this, we can make use of the following command.
sudo ufw show addedThis command will return all of the rules that have been added to UFW.
As UFW isn’t running, you won’t be able to get the numbers assigned to these rules.
Added user rules (see 'ufw status' for running firewall):
ufw limit 22
ufw allow 80
ufw allow 443
How to Enable or Disable UFW
The last thing we will be touching on is how to disable or enable UFW on your device.
Before enabling your firewall, you should always make sure that you have all of your wanted rules added.
For example, if yourely on an SSH connection, you should ensure that the port has an active “
allow” rule defined.Failure to configure your rules correctly could potentially get you locked out from remotely accessing your device.
Enabling UFW
Enabling UFW is a straightforward process and can be completed by using a single command.
sudo ufw enableBy turning UFW on with this command, it will immediately be enabled. Additionally, it will now start at boot.
Disabling UFW
Disabling UFW is just as easy as enabling it.
To disable UFW, you can make use of the following command.
sudo ufw disableWhen UFW is disabled, it automatically disables itself from starting at boot.
Source: Configuring Firewall Rules using UFW – Pi My Life Up
UFW Essentials: Common Firewall Rules and Commands
Introduction
UFW is a firewall configuration tool for iptables that is included with Ubuntu by default. This cheat sheet-style guide provides a quick reference to UFW commands that will create iptables firewall rules are useful in common, everyday scenarios. This includes UFW examples of allowing and blocking various services by port, network interface, and source IP address.
How To Use This Guide
- If you are just getting started with using UFW to configure your firewall, check out our introduction to UFW
- Most of the rules that are described here assume that you are using the default UFW ruleset. That is, it is set to allow outgoing and deny incoming traffic, through the default policies, so you have to selectively allow traffic in
- Use whichever subsequent sections are applicable to what you are trying to achieve. Most sections are not predicated on any other, so you can use the examples below independently
- Use the Contents menu on the right side of this page (at wide page widths) or your browser’s find function to locate the sections you need
- Copy and paste the command-line examples given, substituting the values in red with your own values
Remember that you can check your current UFW ruleset with
sudo ufw statusorsudo ufw status verbose.Block an IP Address
To block all network connections that originate from a specific IP address,
15.15.15.51for example, run this command:In this example,
from 15.15.15.51specifies a source IP address of “15.15.15.51”. If you wish, a subnet, such as15.15.15.0/24, may be specified here instead. The source IP address can be specified in any firewall rule, including an allow rule.Block Connections to a Network Interface
To block connections from a specific IP address, e.g.
15.15.15.51, to a specific network interface, e.g.eth0, use this command:This is the same as the previous example, with the addition of
in on eth0. The network interface can be specified in any firewall rule, and is a great way to limit the rule to a particular network.Service: SSH
If you’re using a cloud server, you will probably want to allow incoming SSH connections (port 22) so you can connect to and manage your server. This section covers how to configure your firewall with various SSH-related rules.
Allow SSH
To allow all incoming SSH connections run this command:
An alternative syntax is to specify the port number of the SSH service:
Allow Incoming SSH from Specific IP Address or Subnet
To allow incoming SSH connections from a specific IP address or subnet, specify the source. For example, if you want to allow the entire
15.15.15.0/24subnet, run this command:Allow Incoming Rsync from Specific IP Address or Subnet
Rsync, which runs on port 873, can be used to transfer files from one computer to another.
To allow incoming rsync connections from a specific IP address or subnet, specify the source IP address and the destination port. For example, if you want to allow the entire
15.15.15.0/24subnet to be able to rsync to your server, run this command:Service: Web Server
Web servers, such as Apache and Nginx, typically listen for requests on port 80 and 443 for HTTP and HTTPS connections, respectively. If your default policy for incoming traffic is set to drop or deny, you will want to create rules that will allow your server to respond to those requests.
Allow All Incoming HTTP
To allow all incoming HTTP (port 80) connections run this command:
An alternative syntax is to specify the port number of the HTTP service:
Allow All Incoming HTTPS
To allow all incoming HTTPS (port 443) connections run this command:
An alternative syntax is to specify the port number of the HTTPS service:
Allow All Incoming HTTP and HTTPS
If you want to allow both HTTP and HTTPS traffic, you can create a single rule that allows both ports. To allow all incoming HTTP and HTTPS (port 443) connections run this command:
Note that you need to specify the protocol, with
proto tcp, when specifying multiple ports.Service: MySQL
MySQL listens for client connections on port 3306. If your MySQL database server is being used by a client on a remote server, you need to be sure to allow that traffic.
Allow MySQL from Specific IP Address or Subnet
To allow incoming MySQL connections from a specific IP address or subnet, specify the source. For example, if you want to allow the entire
15.15.15.0/24subnet, run this command:Allow MySQL to Specific Network Interface
To allow MySQL connections to a specific network interface—say you have a private network interface
eth1, for example—use this command:Service: PostgreSQL
PostgreSQL listens for client connections on port 5432. If your PostgreSQL database server is being used by a client on a remote server, you need to be sure to allow that traffic.
PostgreSQL from Specific IP Address or Subnet
To allow incoming PostgreSQL connections from a specific IP address or subnet, specify the source. For example, if you want to allow the entire
15.15.15.0/24subnet, run this command:The second command, which allows the outgoing traffic of established PostgreSQL connections, is only necessary if the
OUTPUTpolicy is not set toACCEPT.Allow PostgreSQL to Specific Network Interface
To allow PostgreSQL connections to a specific network interface—say you have a private network interface
eth1, for example—use this command:The second command, which allows the outgoing traffic of established PostgreSQL connections, is only necessary if the
OUTPUTpolicy is not set toACCEPT.Service: Mail
Mail servers, such as Sendmail and Postfix, listen on a variety of ports depending on the protocols being used for mail delivery. If you are running a mail server, determine which protocols you are using and allow the appropriate types of traffic. We will also show you how to create a rule to block outgoing SMTP mail.
Block Outgoing SMTP Mail
If your server shouldn’t be sending outgoing mail, you may want to block that kind of traffic. To block outgoing SMTP mail, which uses port 25, run this command:
This configures your firewall to drop all outgoing traffic on port 25. If you need to reject a different service by its port number, instead of port 25, simply replace it.
Allow All Incoming SMTP
To allow your server to respond to SMTP connections, port 25, run this command:
Note: It is common for SMTP servers to use port 587 for outbound mail.
Allow All Incoming IMAP
To allow your server to respond to IMAP connections, port 143, run this command:
Allow All Incoming IMAPS
To allow your server to respond to IMAPS connections, port 993, run this command:
Allow All Incoming POP3
To allow your server to respond to POP3 connections, port 110, run this command:
Allow All Incoming POP3S
To allow your server to respond to POP3S connections, port 995, run this command:
Conclusion
That should cover many of the commands that are commonly used when using UFW to configure a firewall. Of course, UFW is a very flexible tool so feel free to mix and match the commands with different options to match your specific needs if they aren’t covered here.
Source: UFW Essentials: Common Firewall Rules and Commands | DigitalOcean
DHCP Options in Plain English
Published on 18 May 2013
The following tables list common, configurable DHCP options. Non-configurable options or TLVs have not been included, even though these may be present in a file or on the wire. The following tables also do not include options that are only necessary for the operation of the DHCP protocol. For example, DHCPv4 option 53 is the DHCP message type option that declares whether a particular message is a discovery, request, or other message type. However, the administrator can’t configure this option, so therefore it isn’t included in the lists below.
Of course, there will be some DHCPv4, DHCPv6, and internal DHCP options that are not listed at all. This is because this document aims to act as a guide for the most commonly-used options only. For further information on other DHCP options, refer to the IETF website.Table 1 – DHCPv4 Options
The table below describes DHCP options commonly used in IPv4 networks. Please note: Certain classes of devices will use particular subsets, as listed below:
- Cable Modems: 1, 2, 3, 4, 6, 7, 51, 66, 67, 122.1, 122.2
- MTAs: 1, 2, 3, 4, 6, 7, 51, 122.3, 122.6. If in BASIC mode, also 66, 67
- Generic devices: 1, 3, 6, 51
Option Number Option Name Source Description 1 Subnet Mask RFC 2132 The subnet mask to apply to the address that is assigned to the client. 2 Time Zone Offset RFC 2132 Informs the client about the time zone offset, in seconds. For example, Pacific Standard Time is GMT – 8 hours. This field would be filled with “- 28800”. (Eight hours * 60 minutes/hour * 60 seconds/minute) 3 Gateway RFC 2132 Tells the client which router is the default router. 4 Time Server RFC 2132 Tells the client the IP address of a time server that can determine the client’s current time. This is related to the Time Zone Offset option. 6 Domain Name Server RFC 2132 Carries the IP address(es) of the DNS servers that the client uses for name resolution. 7 Log Server RFC 2132 Carries the IP address of the syslog server that receives the client’s log messages. 12 Hostname RFC 2132 Carries the hostname portion of a client’s fully qualified domain name (FQDN). For example, the “www” part of “www.example.com”. 15 Domain Name RFC 2132 Carries the domain name portion of a client’s fully qualified domain name (FQDN). For example, the “example.com” portion of “www.example.com”. 43 Vendor Specific Information RFC 2132 Carries some configuration data that is not defined in the standard DHCP RFCs. Individual vendors can define different pieces of data that may be found in this option. CableLabs’ eDOCSIS specification, for example, defines certain sub-options that appear in this option. 51 Lease Time Option RFC 2132 This defines the maximum amount of time that the client may use the IP address. 60 Vendor Class Identifier RFC 2132 Carries some identifier from the client that may identify the client’s device class. The DHCP specification does not define what values go into this field, but other specifications do. For example, the DOCSIS specifications state that if the device is DOCSIS-compliant, option 60 must start with “docsis” (and also include other details). 66 TFTP Server Name RFC 2132 Carries the FQDN or IP address (or cluster identifier) that the device should use to download the file specified in option 67. Note that often the data put into option 66 does not actually appear in the DHCP packet as option 66, but may have been moved into the “sname” field of the DHCP packet. Additionally, the FQDN may have been resolved to an IP address and also placed in the “siaddr” field of the DHCP packet. 67 Filename RFC 2132 Carries the filename that is to be downloaded from the server specified in option 66. Note that often data put into option 67 does not actually appear in the DHCP packet as option 67, but may be moved into the “file” field of the DHCP packet. (Note: Address Commander can do some dynamic file name generation for this name.) 82 Relay Agent Information Option RFC 3046 This option carries many other sub-options that are added by relay agents and not the clients themselves. Some of the common options are listed below. 82.1 Circuit ID RFC 3046 This is an identifier added by the relay agent to indicate which interface the client is on. This is commonly used as a subscriber identifier in DSL-based networks. 82.2 Remote ID RFC 3046 This is an identifier added by the relay agent to identify the client. It is commonly used as a subscriber identifier in DOCSIS-based networks. DOCSIS mandates that this option is filled with the MAC address of the cable modem and applies to all traffic from the cable modem, or any device appearing from behind that cable modem. 122 CableLabs Client Configuration Option RFC 3495 This is an option defined by CableLabs to carry the information necessary to configure PacketCable devices. The sub-options are listed below. 122.1 TSP Primary DHCP Server RFC 3495 The multimedia telephony adapter (MTA) portion of the device listens to this IP address of the DHCP server. This has two special values, 0.0.0.0 (which will disable the MTA), and 255.255.255.255 (which will instruct the MTA to accept replies from any DHCP server). 122.2 TSP Secondary DHCP Server RFC 3495 A second DHCP server’s IP address. Otherwise the same as option 122.1 122.3 TSP Provisioning Server’s Address RFC 3495 The MTA contacts the server listed to complete its provisioning process. This is the FQDN of a multimedia provisioning service (MPS), whether a specific MPS, or a cluster identifier. 122.6 TSP Kerberos Realm Name RFC 3495 For PacketCable secure mode provisioning, the name of the Kerberos Realm. There are four more special values that may be in this field: BASIC.1, BASIC.2, HYBRID.1, and HYBRID.2. This indicates whether the device is in basic, hybrid, or secure mode provisioning. The “.1” and “.2” parts indicate whether the MTA notified the provisioning server upon completion of the provisioning process.
Table 2: DHCPv6 Options
The table below describes DHCP options commonly used in IPv6 networks.
Option Number Option Name Source Description 17 Vendor Specific Information Option RFC 3315 This option contains vendor-specific option data, much like DHCPv4 option 43. There is an extra difference in that in DHCPv6, this option carries a vendor ID as well, which allows for data from multiple vendors to be provided to the device. 17[4491] CableLabs Vendor-Specific Information Option CL-SP-CANN-DHCP-Reg-I08-111117 CableLabs has specified a set of sub-options for use with DOCSIS-compliant DHCPv6 devices. The vendor ID for CableLabs is 4491. 17[4491].32 TFTP Server Addresses option CL-SP-CANN-DHCP-Reg-I08-111117 This is a list of IPv6 addresses that the client will use to try to download its boot file (specified in 17[4491].33) using TFTP. 17[4491].33 Configuration File Name CL-SP-CANN-DHCP-Reg-I08-111117 The name of the file to download using the TFTP servers specified in 17[4491].32. 17[4491].34 Syslog Server Addresses CL-SP-CANN-DHCP-Reg-I08-111117 This is the DHCPv6 analogue to the DHCPv4 option 7. 17[4491].37 RFC868 Servers CL-SP-CANN-DHCP-Reg-I08-111117 This is the DHCPv6 analogue to the DHCPv4 option 4 17[4491].38 Time Offset CL-SP-CANN-DHCP-Reg-I08-111117 This is the DHCPv6 analogue to the DHCPv4 option 2. 23 DNS Recursive Name Server Option RFC 3646 This is the DHCPv6 analogue to the DHCPv4 option 6. 24 Domain Search List RFC 3646 This option specifies the list of domain names that the client should use when attempting to resolve basic host names. 39 DHCPv6 FQDN option RFC 4704 This option specifies the clients host and domain names. This is the analogue of both DHCPv4 option 12 and DHCPv4 option 15 combined. References
RFC 2132: http://datatracker.ietf.org/doc/rfc2132/
RFC 3046: http://datatracker.ietf.org/doc/rfc3046/
RFC 3495: http://datatracker.ietf.org/doc/rfc3495/
RFC 3646: http://datatracker.ietf.org/doc/rfc3646/
RFC 4704: http://datatracker.ietf.org/doc/rfc4704/
CL-SP-CANN-DHCP-Reg-I08-111117: http://www.cablelabs.com/specifications/CL-SP-CANN-DHCP-Reg-I08-111117.pdf
Everytime I rebooted or logged out and logged back in, it asked for my owncloud password, showing the message “Reading from keychain failed with error: ‘Could not open wallet: other; Failed to execute program org.kde.kwalletd: No such file or directory'” Of course, I am on a linux mint 19 fresh install, on cinnamon, without anything KDE related. Point is that This owncloud client need to communicate with gnome-keyring, which I had it installed. There was one missing package, called libgnome-keyring0 ( GNOME keyring services library) which after installing it, solved my problem (and owncloud’s password was automatically saved on “Passwords and Keys”, the gnome-keyring’s GUI. Double check if the package libgnome-keyring-common is also installed.
Jack Wallen shows you how to sync files across a network on Linux with a simple command line tool.
Source: How to use Unison to sync files on Linux machines across a network