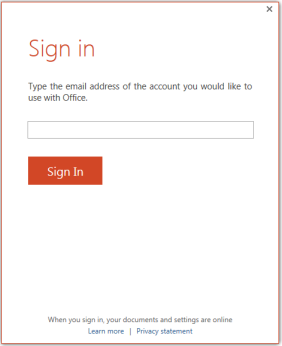
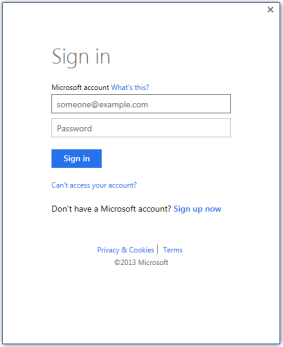
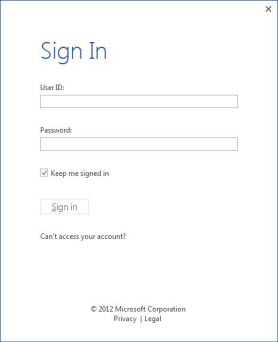
There is no doubt Office 2016/2013 is very well integrated with web. You can install new templates for its components, download clip art and various kind of resources needful for your documents easily in this productivity suite. You can also save your documents to cloud storage service such as OneDrive. So there are many features in Office 2016/2013, which require that you should be signed in. But what if you don’t find the sign in option or even if you find it, you receive the following message when you try to sign in:
This feature has been disabled by your administrator
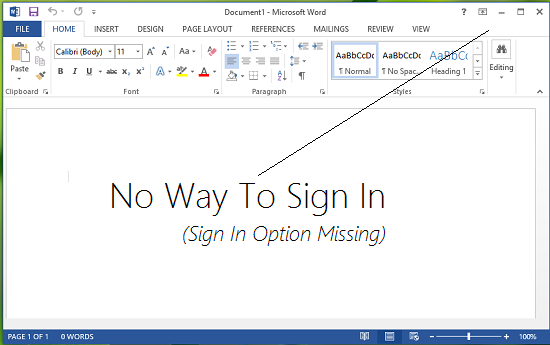
Recently, we found that on one of the Office 2013 copy we have, sign-in option at the right top of the screen is missing. In such a condition, there exists no path which could allow us to get logged in, so that we can personalize our experience with Office. In this article, we’re going to share you the fix for such an issue:
Sign in feature disabled in Office 2013/2016
1. Press Windows Key + R combination, type put Regedt32.exe in Run dialog box and hit Enter to open the Registry Editor.
2. In the left pane, navigate to following location:
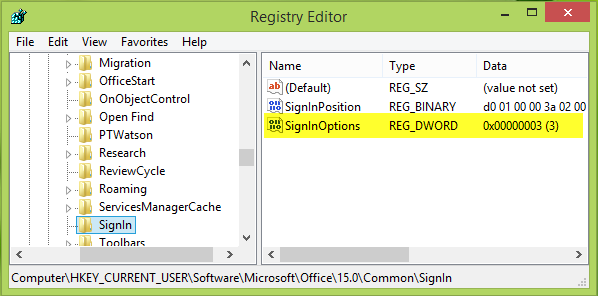
HKEY_CURRENT_USER\Software\Microsoft\Office\15.0\Common\SignIn
3. Since you’re facing the issue, in the right pane of above mentioned key, you’ll see the SignInOptions named registry DWORD (REG_DWORD). It must be showing the Value data equals to 3, double click on this DWORD to modify:
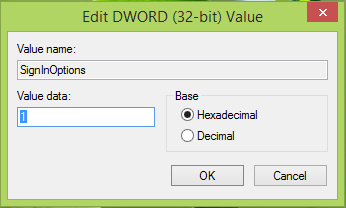
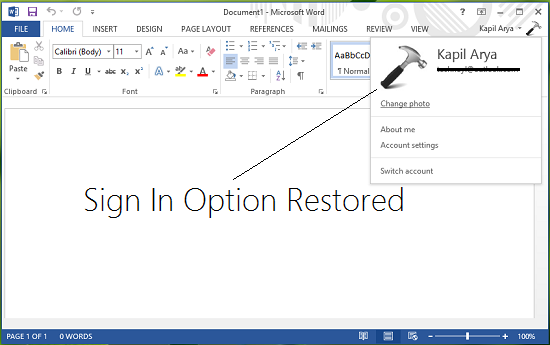
4. In the above shown box, change the Value data to 1 from 3. Click OK. If you like you can delete the same DWORD as well. Now close the Registry Editor and reboot the machine to get results. After reboot, you’ll be able to sign in to Office 2013. (See https://www.marcsiegel.us/configure-user-sign-in-for-office-2013-microsoft-docs/ )
All posts by smarc
SOLVED: How To Disable SHARE Button in Office 2016 Using a GPO – Up & Running Technologies, Tech How To’s
SOLVED: How To Disable SHARE Button in Office 2016 Using a GPO
Note: GPO templates download here.
admx admin templates need to be copied to C:\Windows\PolicyDefinitions
and the corresponding resource files (en-us) need to be copied to C:\Windows\PolicyDefinitions\en-USIf you have Office 2016 and you want to block your staff from easily saving content in the cloud, you can disable the SHARE button using the following Group Policy Object (GPO):
User Configuration -> Administrative Templates -> “Office Product Name” -> Disable Items in User Interface -> Custom -> Disable Commands > ENABLE and enter 26594
26594 does seem like a random number and it probably is, however, Microsoft has made it possible to disable nearly every feature by assigning nearly every button and short cut a number. You can get a list of those numbers from what Microsoft has cleverly named: “Office 2016 Help Files: Office Fluent User Interface Control Identifiers” which you can download directly from Microsoft HERE.
Note that you need to set each Office products rules separately; there is no global “turn off the SHARE button” GPO. That means you have to set:
User Configuration -> Administrative Templates -> Microsoft Word 2016 -> Disable Items in User Interface -> Custom -> Disable Commands > ENABLE and enter 26594
and
User Configuration -> Administrative Templates -> Microsoft Excel 2016 -> Disable Items in User Interface -> Custom -> Disable Commands > ENABLE and enter 26594
and
User Configuration -> Administrative Templates -> Microsoft PowerPoint 2016 -> Disable Items in User Interface -> Custom -> Disable Commands > ENABLE and enter 26594
and..
You can download the codes for Microsoft Office 2013 HERE and Office 2010 HERE to figure out what the codes are for Office 2010 and 2013 products. The codes are different. For example you use code 18147 to disable the SHARE button in Word 2013.
Download Office 2016 Help Files: Office Fluent User Interface Control Identifiers from Official Microsoft Download Center
Office 2016 Help Files: Office Fluent User Interface Control Identifiers
Important! Selecting a language below will dynamically change the complete page content to that language.
Download Administrative Template files (ADMX/ADML) and Office Customization Tool for Microsoft 365 Apps for enterprise, Office 2019, and Office 2016 from Official Microsoft Download Center
https://www.microsoft.com/en-us/download/confirmation.aspx?id=49030&6B49FDFB-8E5B-4B07-BC31-15695C5A2143=1
Remove Sign In box from Office apps
Method 1: You can use the Registry Editor to remove Office Sign In Option from Office 2016.
Here are the steps to follow:
1. On your computer, notebook or laptop go to your Start Screen.
2. From there press “Win + R” dedicated keyboard keys.
3. The Run box will be displayed.
4. There enter “regedit” in order to run Registry Editor.
5. on Registry go to path “HKEY_CURRENT_USER\Software\Microsoft\Office\16.0\Common\SignIn”.
6. Then, go to the right panel of Registry and right click on a blank space.
7. Select “New” and pick “DWORD Value”.
8. Name this new value “SignInOptions”.
9. Right click on the new key and set its value to 3.
10. Close Registry Editor and Reboot your Windows 7, open an Office App to check if it works.Method 2: You can use the Group Policy to remove Office Sign In Option from Office 2016.
Here are the steps to follow:
1. Download the Office 2016 Administrative Template files and install it.
After self-extracting, we can get a folder and open the admx folder inside, where you can see some language-specific folders and Office application specific admx files.
Copy the ADMX files to C:\Windows\PolicyDefinitions
Copy the adml file under the corresponding language file to the corresponding language folder in C:\Windows\PolicyDefinitions
2.Press Windows+R to open Run>type gpedit.msc > hit Enter to launch the Group Policy Editor
3.Go to this path: Local Computer Policy > User Configuration > Administrative Templates > Microsoft Office 2016 > Miscellaneous
4. You should now see the option ‘Block signing into Office‘ > double click on it
Select ‘None allowed’ to disable the sign-in option.
5. Reboot your Windows 7, open an Office App to check if it works.Note: Blocking signing in Office may affect the use of the Office cloud service.
Beyond basic modal editing. Using vim’s command-line mode.
Vim is famous for its fabulous modal editing. Its
normal,insert, andvisualmodes quickly become magic in the hands of an able user. But many are unaware or ignore the existence of vim’scommand-linemode with its Ex commands.Whereas vim’s
normalandinsertmode work in the locale of your cursor, vim’scommand-linemode can help you deal with things far from your cursor. Or as Drew Neil puts it in his Practical Vim book,Vim’s Ex commands strike far and wide.
Let’s look at a few of them.
Copy (copy, t), move (m), and delete (d)
We’ll start by copying, moving, and deleting lines. You access vim’s
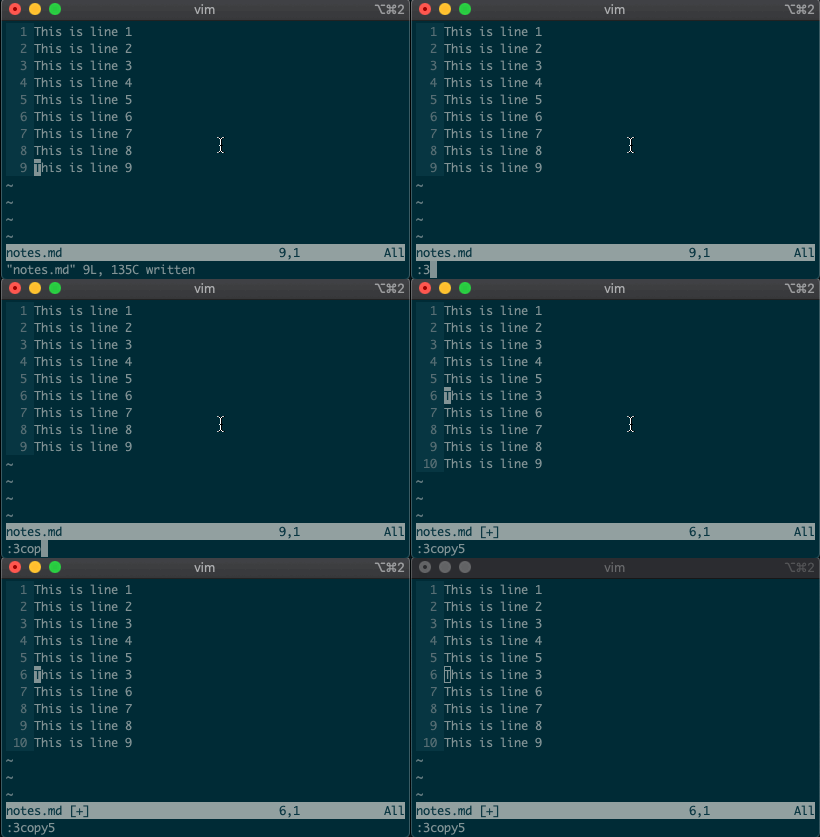
command-linemode with:. Copying, moving, and deleting can be intuitive. What would you say this command did?:3copy5If you guessed copy line three to line five, then you got it!
tis shorthand for copy (think copy to). So:3t5does the same thing as the command above.Do move and delete work the same way? You betcha.
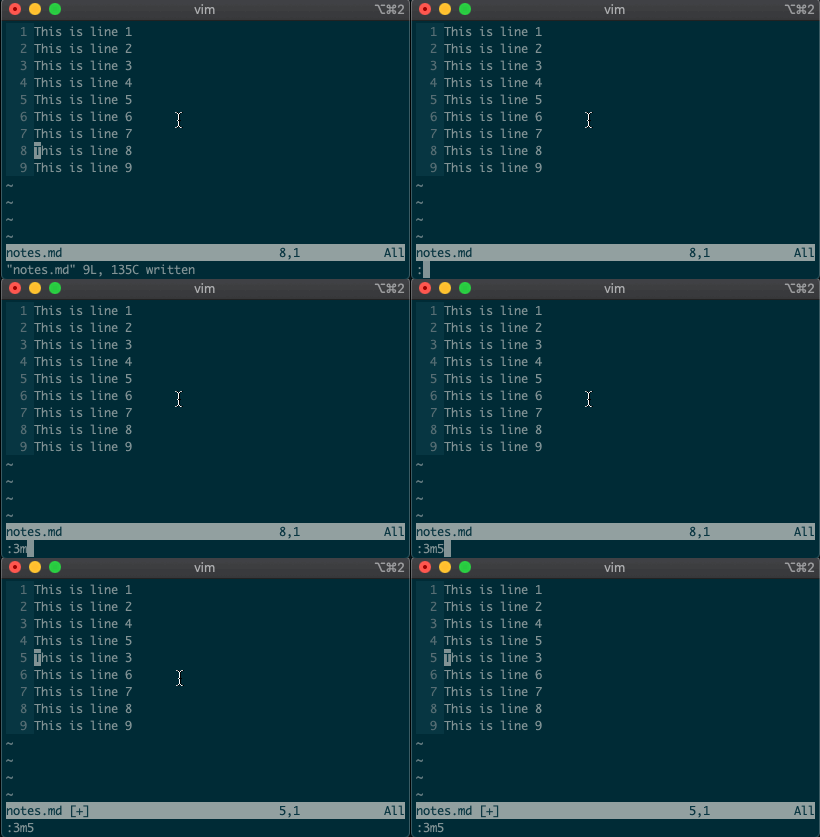
Try moving a line with
:3m5.
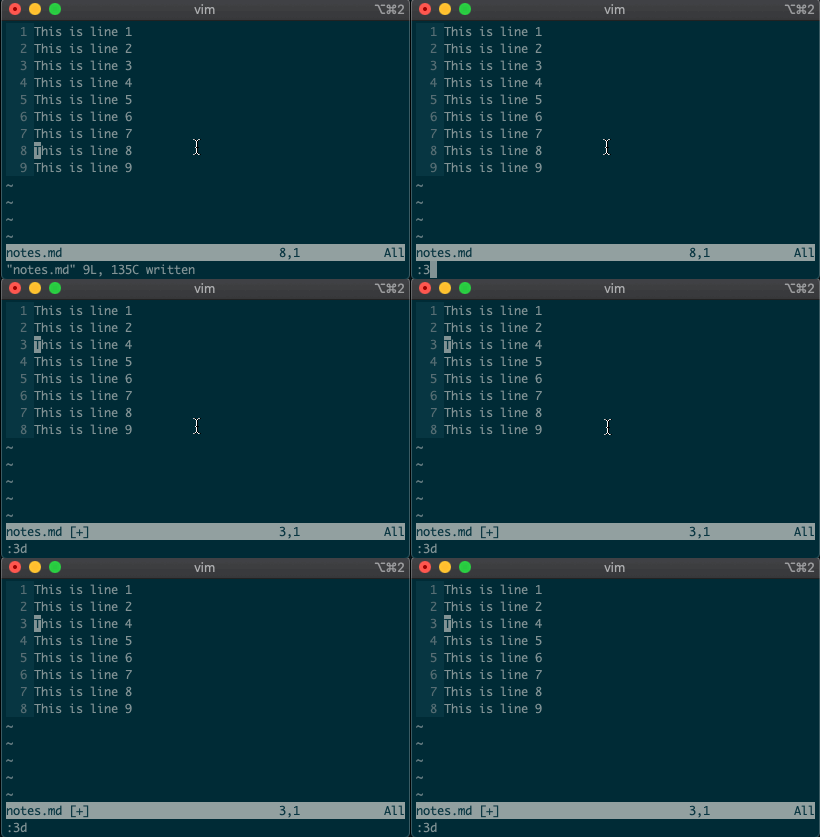
Now try deleting a line with
:3d.
Acting on ranges
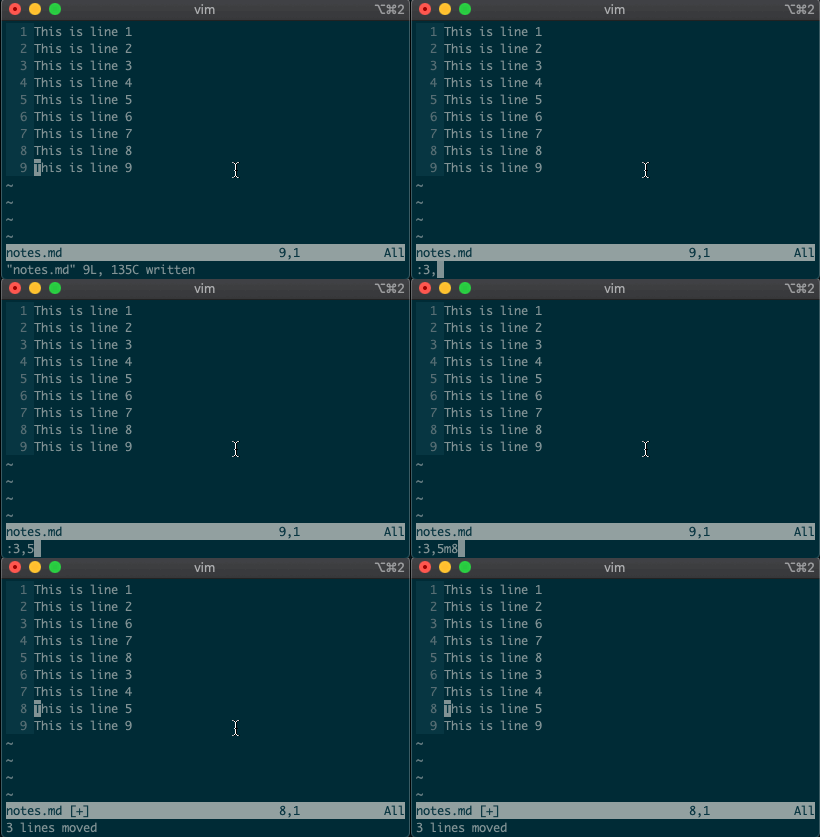
But that’s not all. Ex commands aren’t limited to single lines. They can act on ranges. Want to move lines 3-5 to line 8? You got it:
:3,5m8
Relative ranges
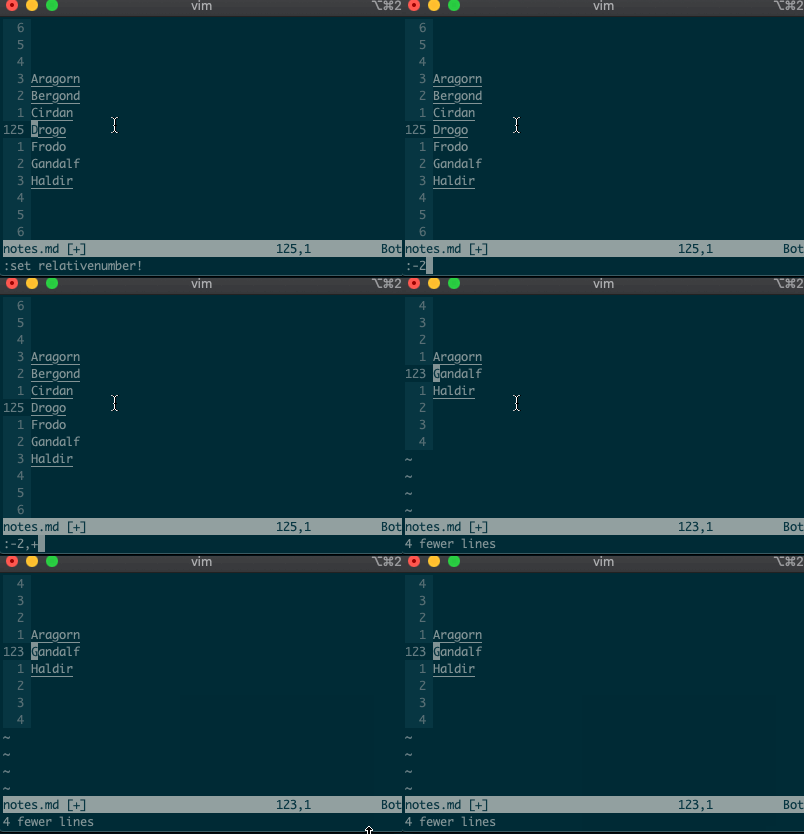
I know what you’re thinking, “But what if I’m on line 125, and I use relative numbers!” Not to worry. Vim has a range for you too:
:-2,+1d
The visual range
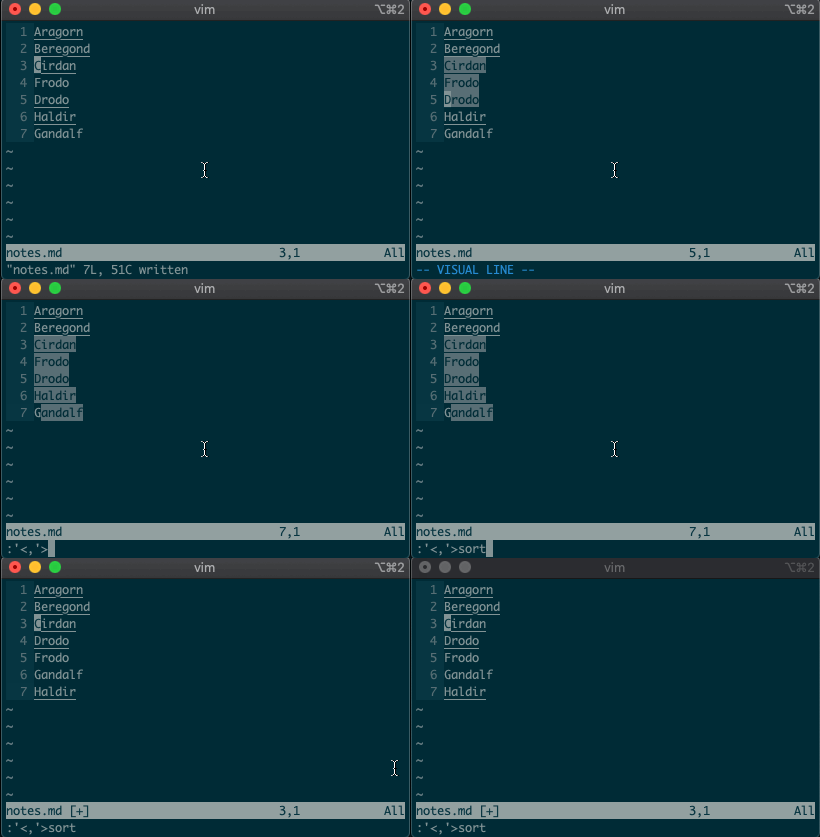
What about using a visual selection as a range? If you’re like me, you’ve probably used vim to help you sort lines by visually selecting them and typing
:sort. Did you ever notice the range vim inserts for us? It’s the special visual selector range::'<,'>sort
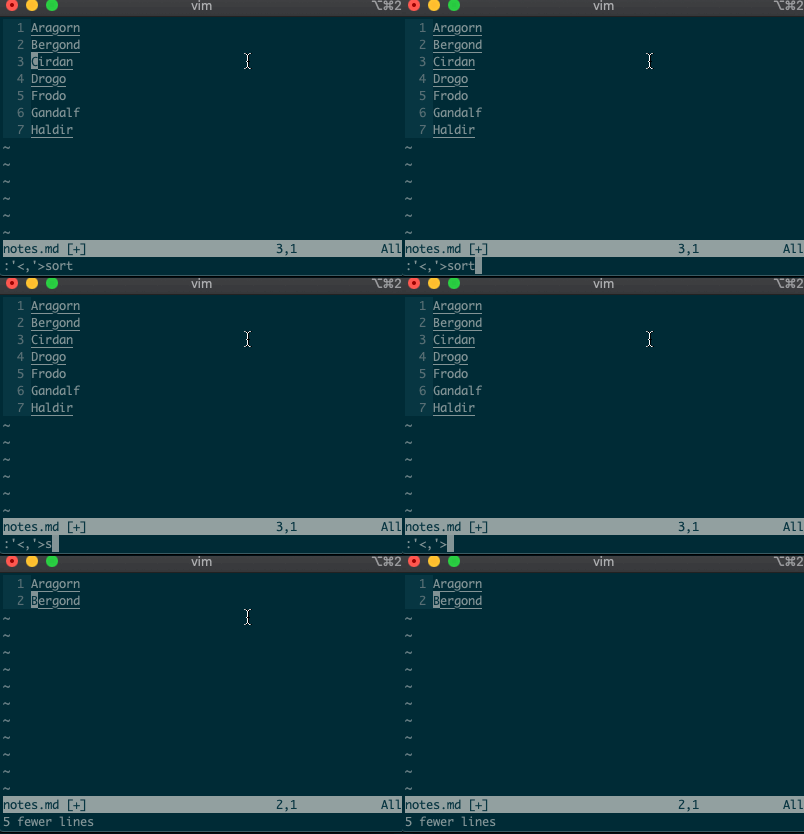
Want to perform other actions on that same visual block? The visual selector range (
'<,'>) continues to operate on the previous visual selection, even when that range is no longer selected! Let’s delete the lines we sorted last time::'<,'>d
Want to learn more about the visual selector range? As it turns out, ranges can be delimited by marks, and
'<and'>are just a couple of special marks. That opens ranges to a world of possibilities! Try'{,'}for paragraphs and'(,')for sentences.Search and replace
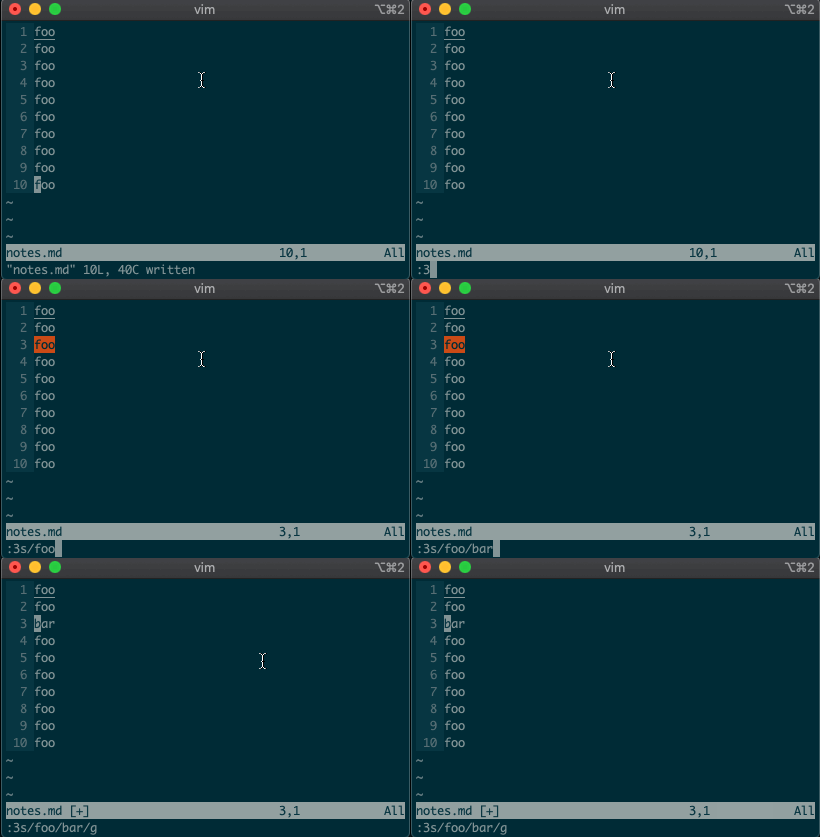
Perhaps you’ve never stopped to think about the magical incantation you use to search and replace words in a file. Well, we can finally uncover the mystery:
swill replace things (think substitute). Want to replacefoowithbaron line 3?:3s/foo/bar/g
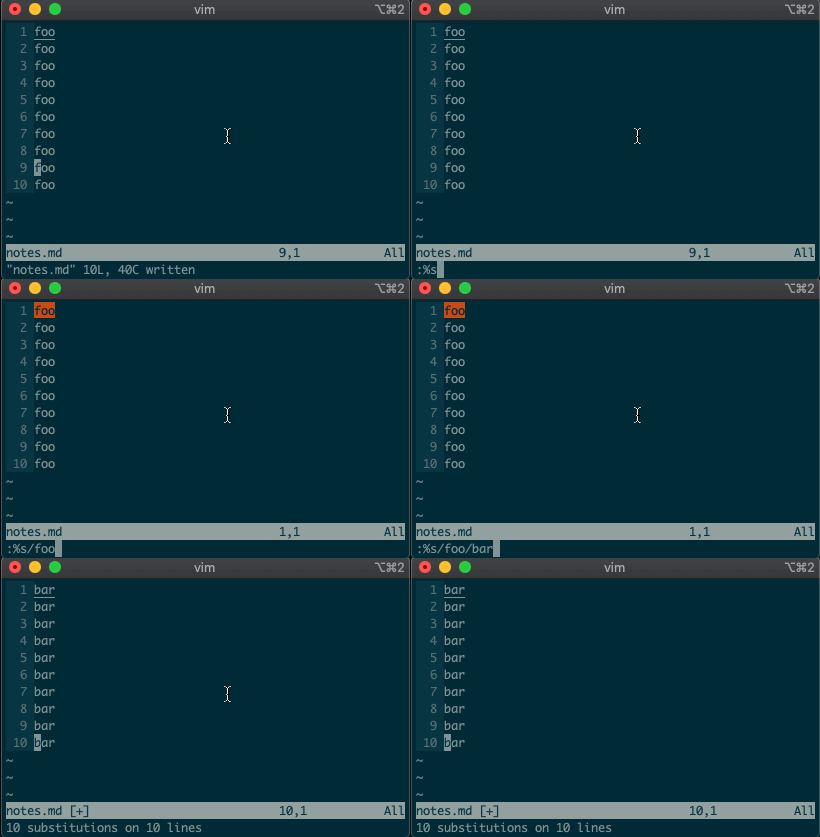
What if you want to search and replace in the entire file? We can use a range from the first line to the end of the file:
1,$, or even better, we can use vim’s shorthand for the whole file:%. Go ahead. Type it in, and see the magic work::%s/foo/bar/g
Repeat a normal command
In addition to modal editing, vim is known for its ability to repeat the last command with
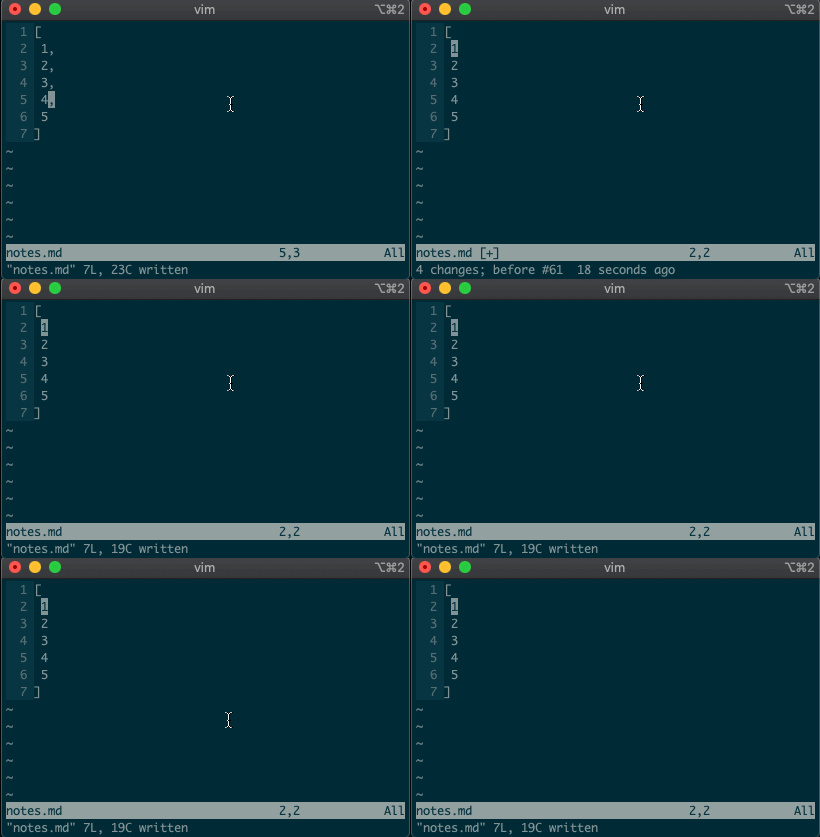
.. Maybe you delete a line withdd, then you realize you need to delete the next one. No need to pressddagain, just type.and you’re good to go.But what about repeating the same command across many lines? What would you do if you wanted to append a comma at the end of each line in a list? Ex commands are here to help you:
:2,5normal A,
Repeat the last Ex command
.repeats the last normal command. What if we want to repeat the last Ex command? We can do that too.@:
If you’ve ever used macros in vim, you might notice this looks like a macro for the
:register. Find that interesting? Take a look at your registers (:reg) and see what you find for:.What next?
I hope you see the power of Ex commands. Instead of typing
2Gddto go to the second line and delete it, you can delete it from afar with:2d. And instead of going to line 3, visually selecting lines 3-5, yanking them, going down to line 10, and pasting the lines with3GVjjjy10Gp, you can just do it from anywhere in the file with:3,5t10.If you want to learn more, I highly recommend Drew Neil’s Practical Vim book, or take a look at the excellent documentation for different vim modes and for the Ex commands copy, move, delete, substitute. And if you want to dig deeper, help is just a
:helpaway.Until next time!
Source: Beyond basic modal editing. Using vim’s command-line mode.
Setting up Palette 2 with prusaslicer and p2pp
You need python 2.7 or 3.7 installed on your computer.
Octoprint needs the Palette 2 plugin installed https://gitlab.com/mosaic-mfg/palette-2-plugin
Grab the P2PP scripts, unpack it somewhere on your computer. There are instructions for setting up & configuring the p2pp scripts. Decent video at https://www.youtube.com/watch?v=JuTdq-IlRj4&t=1s
Scripts are at https://github.com/tomvandeneede/p2pp
Other useful links: https://support.mosaicmfg.com/Guide/Slic3r-PrusaSlicer+and+Chroma+Setup/76
Configure PrusaSlicer for p2pp
Printer settings tab – Capabilites:
extruders = 4
single extruder multimaterial = yes
enable variable layer height = no
once those are done, you will have options for “Single extruder MM setup” – select that and set all those values to zero / unchecked.
For extruders 1 – 4, change the filament color so you can see what is happening on the Plater tab.
Save the new printer profile as a new name.
Print settings tab –> Multiple extruders –> Wipe tower -> Enable= on, Prime all printing extruders = off
Output options-> Post processing scripts -> insert path to p2pp.bat
Output filename format -> edit format string so that it ends in .mcf.gcode instead of just .gcode
Now go back to printer settings tab
Custom Gcode –> Start G-code. Insert code in bottom of that section: code from https://github.com/tomvandeneede/p2pp
edit the code inserted: P2PP PRINTERPROFILE= THe value for this needs to come from a previously generated chroma processed gcode file. The line will begin with 022. Copy the string (without the initial capital D) and paste that as the value for “P2PP PRINTERPROFILE”
The next couple values can come from the Chroma postprocessor app. Start it, edit the printer profile, and look at the values for Min|Max|Early Transistion Length and Target Position (defaults are probably 140mm, 140mm, 140mm and 40%).
Edit the values for
P2PP SPLICEOFFSET= Make this number 40% of the Min Early Transistion Length (ie; 140mm – 40% = 56mm) Use the actual number found in your Transistion Target field – might not be 40.
P2PP MINSTARTSPLICE=100 this is due to hardware limitations, leave it alone
P2PP MINSPLICE=80 Same as above
The values for P2PP MATERIAL_TYPES 0_0_0 are as follows Heat factor, compression factor, cooling factor. Used for tuning. You can look at material profiles in the Chroma post processor to see what you have set in there
;P2PP LINEARPING (leave this in)
;P2PP LINEARPINGLENGTH=500 – might need to tweak this – too low and printer may pause. too long it it may not be well calibrated. Dont go below 350
;P2PP EXTRAENDFILAMENT=150 – figure the length of your hot end + bowden tube and add a little extra so you can pull filament out
Not sure about the SIDEWIPE settings yet…
Now in the “After layer change G-code section append this code: ;LAYER[layer_num]
Now off to Filament Settings Tab
Go to Advanced–> Rammer settings button. Set Total Ramming Time to zero, No Ramming at all.
Now to configure Purging Volumes.
Go to Plater tab, click Purging volumes button. To get the number for the unloaded and loaded fields, take the number from the Chroma post processor, look in the printer profile -> Transistions tab and see what number the Min Transistion length is. That number is in millimeters. Prusaslicer wants cubic millimeters. 1mm of filament is basically 2.4 cubic mm, so multiply the min transistion length number by 2.4. Then divide that number in half, and insert half in unloaded and loaded fields. If you need to finetune it later, like when switching from a dark color to light color, you could adjust the ratio between loaded / unloaded, but the total of the two boxes should still equal (min transition length * 2.4).
Solutions
1. Use the UNC path to access the network folder
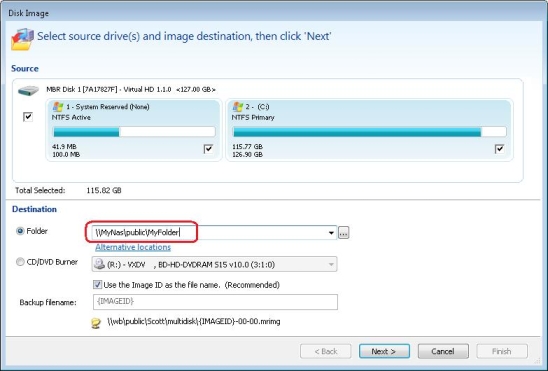
Rather than browsing for mapped drive letter you can locate the same folder by entering/browsing for the full Universal Naming Convention (UNC) path, i.e, \\server\share.
In the above example the Server name is ‘MyNas’ the Share name is ‘public’ and the folder is ‘MyFolder’. So the UNC path is \\MyNas\public\MyFolder’.
2. Alternatively, change Windows to make mapped shares visible
Note: This solution involves changing the Windows registry.
1. Press the Windows button, type ‘regedit.exe’ and press enter.
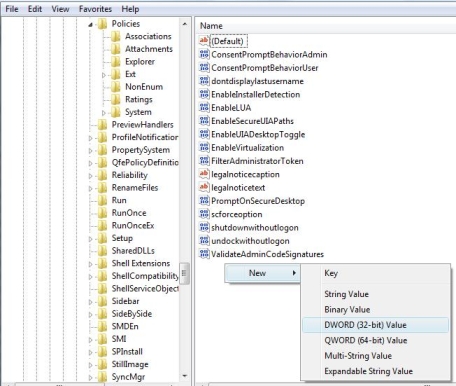
2. In the Windows that opens, navigate to:HKEY_LOCAL_MACHINE\SOFTWARE\Microsoft\Windows\CurrentVersion\Policies\System
3. Point to New, and then click DWORD Value.
4. Type EnableLinkedConnections, and then press ENTER.
5. Right-click EnableLinkedConnections, and then click Modify.
6. In the Value data box, type 1, and then click OK.
7. Exit Registry Editor, and then restart the computer.After making this registry change network shares mapped to a drive letter will be visible to all programs, including those that require elevated privileges
QuickBooks 2016 License Registration
Step 1. To start the procedure please follow these instructions:
1. Double-click on the icon labeled QuickBooks 2016 on the desktop. (You will be
prompted with a small window labeled, “QuickBooks 2016 License Agreement.”)
2. Click on View License Agreement. (When the webpage opens you can simply close
the window which will bring you back to the small window labeled “QuickBooks
2016 License Agreement.”)
3. Click “Yes” to accept the terms of the Intuit End User License Agreement.
Step 2. QuickBooks will now need to be registered. If QuickBooks is already registered
(press F2 to confirm) you may skip to Step 3.
1. Close the registration window by clicking on the “X” in the upper right-hand corner
of the registration window.
2. Click Help in the top right corner. (SEE BELOW)
3. Select About QuickBooks 2016 at the bottom of the list.
4. Next you will see a green QuickBooks 2016 splash screen appear listing your
license information. On this screen you will need to press and hold the following
sequence on the keyboard: CTRL (control) key, “R”, and then “P.”
5. On this screen enter the validation code: and click Next.