Requirements
- Windows computer running server or desktop OS that is in support.
Mounting the NFS Share
- Make sure that the NFS Client is installed.
- Open a Powershell command prompt.
- Run the appropriate command for your situation:
- Server OS: Install-WindowsFeature NFS-Client
- Desktop OS: Enable-WindowsOptionalFeature -FeatureName ServicesForNFS-ClientOnly, ClientForNFS-Infrastructure -Online -NoRestart
- Mount the share using the following command, after making the required modifications (Note – mount cmd from CMD shell, not powershell):
- mount -o anon nfs.share.server.name:/share-name X:
- Replace nfs.share.server.name with the name of the server the NFS share is on (eg. files.umn.edu)
- Replace share-name with the name of the NFS share (eg. OIT-Test)
- Replace X: with the desired drive letter.
- mount -o anon nfs.share.server.name:/share-name X:
Enable Write Permissions for the Anonymous User
With the default options you will only have read permissions when mounting a UNIX share using the anonymous user. We can give the anonymous user write permissions by changing the UID and GID that it uses to mount the share.
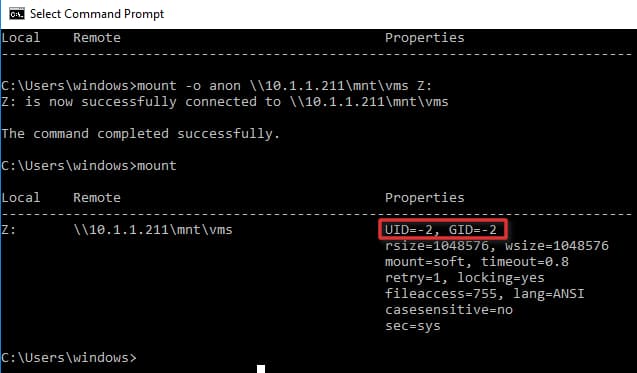
The image below shows the a share mounted using the default settings.
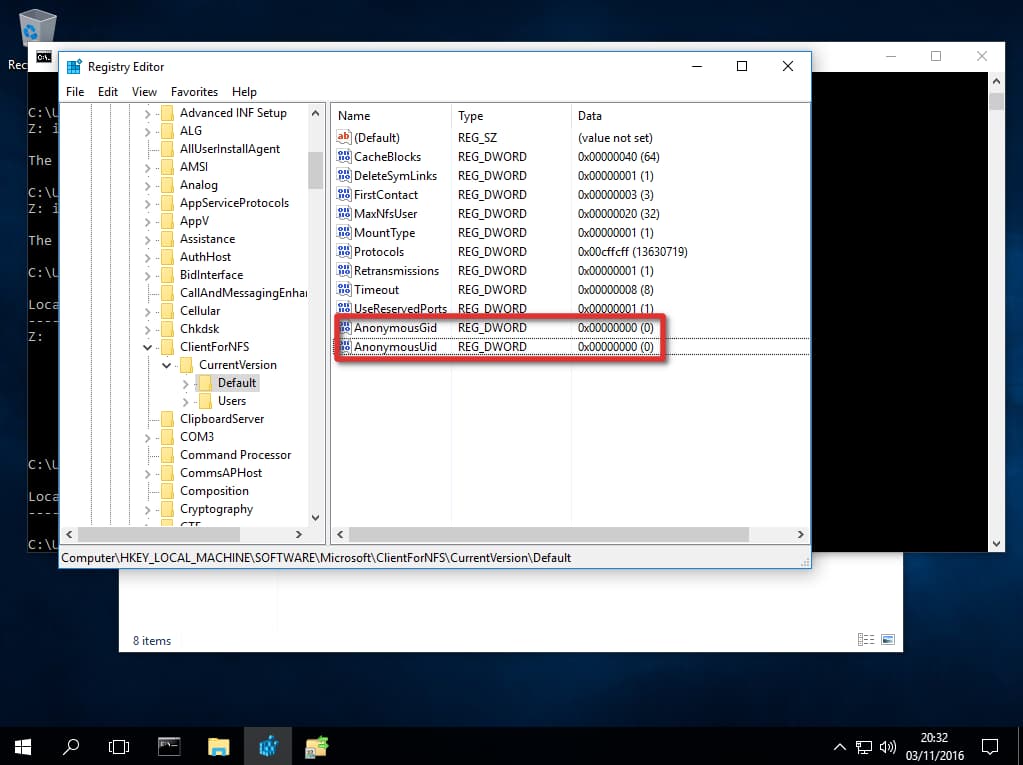
To change the UID and GID we need to make a simple change to the Windows registry by performing the following steps:
- Open regedit by typing it in the search box end pressing Enter.
- Browse to HKEY_LOCAL_MACHINE\SOFTWARE\Microsoft\ClientForNFS\CurrentVersion\Default.
- Create a new New DWORD (32-bit) Value inside the Default folder named AnonymousUid and assign the UID found on the UNIX directory as shared by the NFS system. (Use Decimal values)
- Create a new New DWORD (32-bit”) Value inside the Default folder named AnonymousGid and assign the GID found on the UNIX directory as shared by the NFS system. (Use Decimal values).
- Restart the NFS client or reboot the machine to apply the changes.
- To Restart NFS client without having to restart Windows:
- net stop nfsclnt
net stop nfsrdr
net start nfsrdr
net start nfsclnt
- net stop nfsclnt
How to Mount an NFS Share
Assuming your NAS device is on the same network as your Windows machine and the IP address of the device is 10.1.1.211, the following command will mount a share on the NFS system at /mnt/vms.
C:\Users\windows> mount -o anon \\10.1.1.211\mnt\vms Z:
Z: is now successfully connected to \\10.1.1.211\mnt\vms

The command completed successfully.
The share is now mounted and we can access the data by navigating to the Z: drive.