Monthly Archives: May 2021
YubiKey Personalization Tool | Yubico
Hacking the newer APC ups’s – mini worklog/howto | OCAU Forums
sorttable: Make all your tables sortable
Terminals
What is the difference between F1 and F2 Terminals?
F1 and F2 represent the type of connector that is located on the top of the battery. F1 terminals are .187 inch wide (the contact towards the end narrows) and F2 terminals are .250 inch wide (the contact towards the end narrows). Most emergency light applications use a F1 terminal and most emergency power backup (UPS) applications use F2 terminals.
FASTON CONNECTOR F1 FASTON CONNECTOR F2 What other common terminals are available?
NUT AND BOLT NB THREADED INSERT IT U CONNECTOR U INSULATED WIRE LEADS WL FASTON CONNECTOR F1/0


Source: Terminals
Prusa Knowledge Base | Linear Advance
Ubuntu Manpage: ufw – program for managing a netfilter firewall
How To Install Windows Apps Without a Microsoft Account – CCM
How To Install Windows Apps Without a Local Account
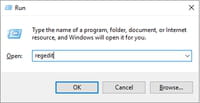
- Right-click on the Start menu to display your Power User options. Select the Run command. Next, type in
regeditfollowed by Enter to open the Registry Editor:
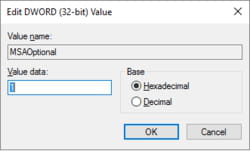
- Navigate to HKEY_LOCAL_MACHINE\SOFTWARE\Microsoft\Windows\CurrentVersion\Policies\System.
- Click on the Edit menu, followed by New > DWORD (32-bit) Value. Rename the new key as MSAOptional:
- Set the value of MSAOptional to 1. This will make your Microsoft accounts optional:
- Close the Registry Editor and restart your computer. Once your computer loads, open the Windows Store and search for your desired app. Skip the sign-up procedure and proceed directly to your download.

Source: How To Install Windows Apps Without a Microsoft Account – CCM
How to Configure Network on Ubuntu 18.04 LTS with Netplan? – Linux Hint
How to Configure Network on Ubuntu 18.04 LTS with Netplan
Netplan is a utility for configuring network interfaces on Linux that uses YAML files. YAML configuration file format is really simple. It has clear and easy to understand syntax. Netplan works with traditional Linux networking systems, systemd-networkd and Network Manager. With Netplan, you can configure the network of your Ubuntu machines easier than ever before.Starting from Ubuntu 18.04 LTS, Ubuntu uses Netplan to configure network interfaces by default.
In this article, I will show you how to use Netplan on Ubuntu 18.04 LTS.
Let’s get started!
Netplan Configuration Files:
On Ubuntu 18.04 LTS, the Netplan YAML configuration files are placed in the /etc/netplan/ directory. To configure a network interface, you have to create or modify the required YAML files in this directory.
YAML configuration files has the .yaml extension. The default Netplan YAML configuration file /etc/netplan/50-cloud-init.yaml is used to configure network interfaces using Netplan.
Configuring Network Interface via DHCP with Netplan:
In this section, I will show you how to configure a network interface via DHCP on Ubuntu with Netplan.
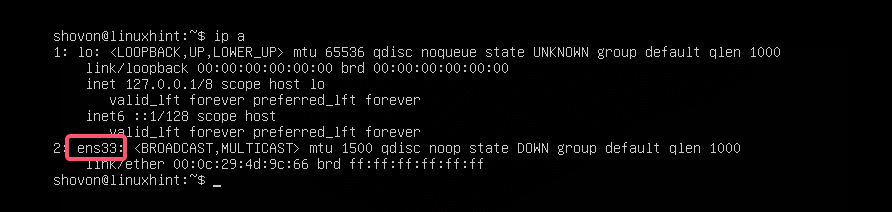
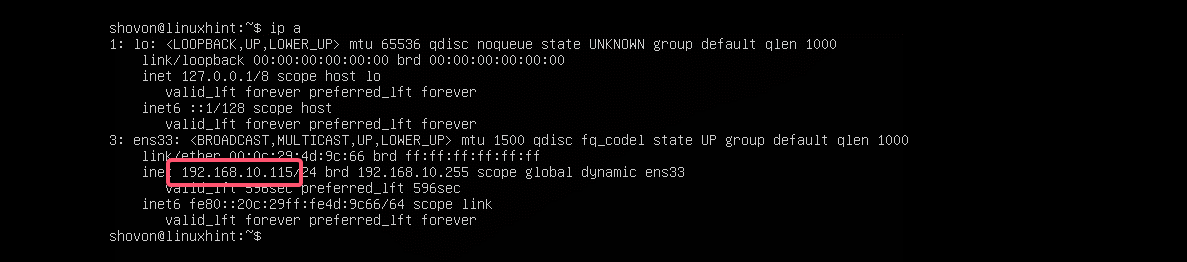
First, find the network interface name that you want to configure with the following command:
$ ip aAs you can see, I have one network interface card (NIC) installed on my Ubuntu 18.04 LTS machine named ens33. It does not have any IP address configured right now. So, let’s use Netplan to configure it via DHCP.
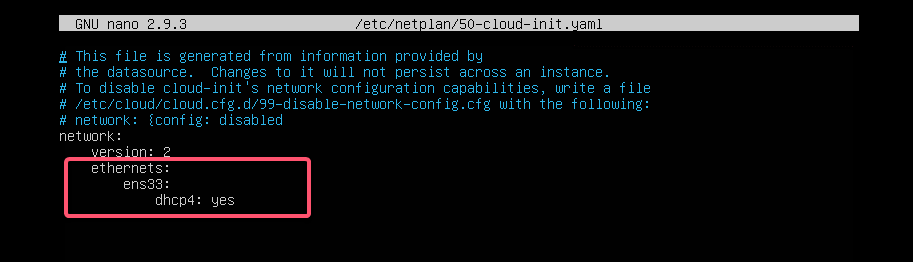
To configure the network interface ens33 via DHCP using Netplan, open the default Netplan configuration file on Ubuntu 18.04 LTS /etc/netplan/50-cloud-init.yaml with the following command:
$ sudo nano /etc/netplan/50-cloud-init.yaml
You should see the following window.
Now add the following lines in the network section.
ethernets:ens33:
dhcp4: yes
Here, dhcp4: yes means, use DHCP for IPv4 protocol to configure the network interface ens33.
NOTE: The indentations are really useful. Make sure you indent each line correctly. It will make the syntax clearer and more comfortable to the eye.
Finally, the configuration file should look something like this.
Now, press <Ctrl> + x, then press y, and followed by <Enter> to save the file.
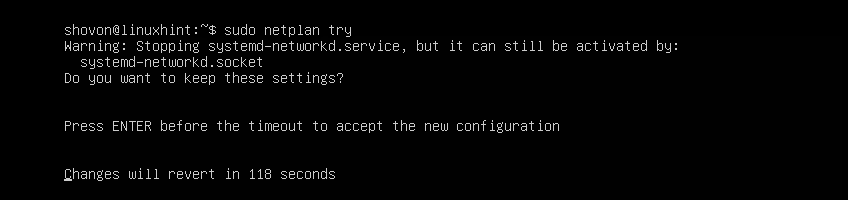
The good thing about Netplan is that before you apply the changes, you can make sure the configuration file has no typos or any other mistakes with the following command:
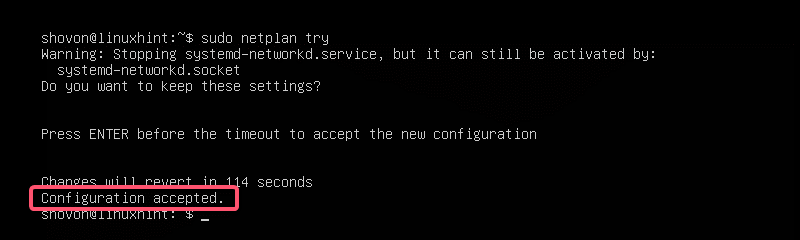
$ sudo netplan tryNow press <Enter>.
If everything is alright, you should see the Configuration accepted message as marked in the screenshot below.
If there’s any problem with the configuration file, you will see appropriate error messages here.
This feature will surely help you avoid complex hard to track future problems with Netplan configuration files.
Finally, apply the changes permanently using Netplan with the following command:
$ sudo netplan apply
As you can see, the network interface ens33 is configured via DHCP.
Setting Up Static IP Address with Netplan:
If you want to set up a static IP on your network interface using Netplan, then this section is for you.
You can manually set the IP address, name server, gateway, etc. of your network interface using Netplan.
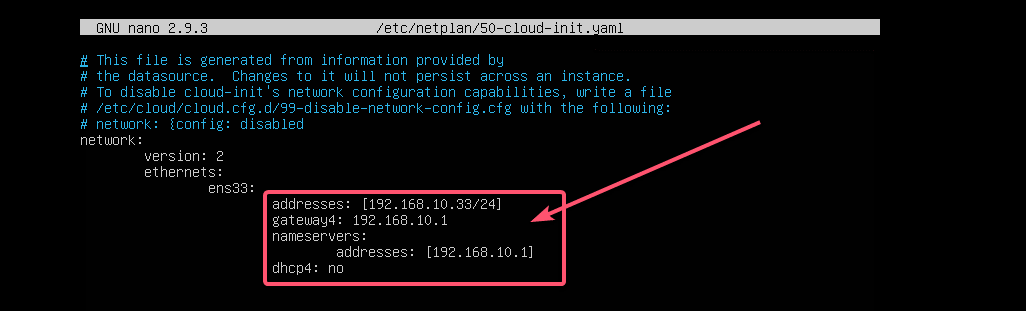
Let’s say, you want to configure your network interface ens33 as follows:
Static IP address: 192.168.10.33
Subnet mask: 255.255.255.0
Gateway: 192.168.10.1
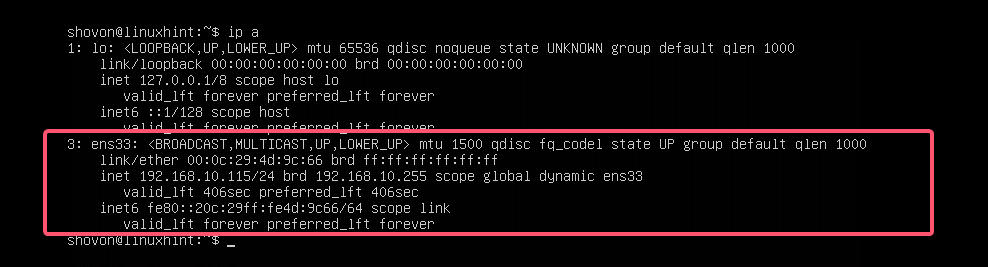
DNS server: 192.168.10.1First, check the network configuration of the ens33 network interface with the following command:
$ ip aThis is to help you verify that the network interface settings really changed.
Now, edit the Netplan YAML configuration file, /etc/netplan/50-cloud-init.yaml, with the following command:
$ sudo nano /etc/netplan/50-cloud-init.yamlIf you’ve followed me throughout the article, then the configuration file should be like this. Now, remove the line as marked in the screenshot below.
And type in the lines as marked in the screenshot below.
NOTE: Remember, indentation is essential for YAML files. If you forget to indent correctly, Netplan will not let you apply the configuration file. So, you must indent every step of the YAML configuration file, as shown in the screenshot below.
Now, press <Ctrl> + x, then press y, and followed by <Enter> to save the file.
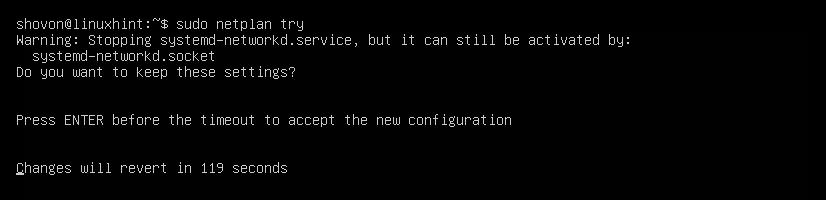
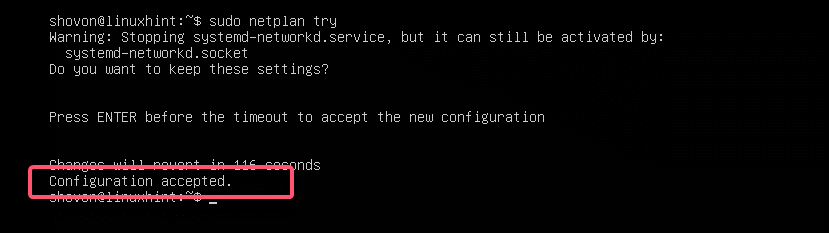
Now, check whether there’s any error in the configuration file with the following command:
$ sudo netplan try
Then, press <Enter>.
As you can see, the configuration file is accepted.
Finally, apply the configuration file with the following command:
$ sudo netplan apply
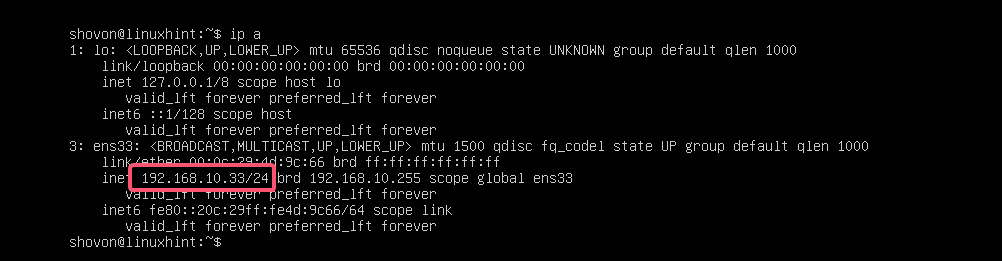
The IP address is changed as expected.
The gateway is also set correctly.
As well as the DNS server.
So, that’s how you install and use Netplan on Ubuntu to configure network interfaces using YAML files. If you want to learn more about Netplan, please visit the official website of Netplan at https://netplan.io.


Source: How to Configure Network on Ubuntu 18.04 LTS with Netplan? – Linux Hint
Raspberry PI Stuff
Headless issues, “Unable to display…” errors in VNC, etc:
Edit /boot/config.txt and uncomment or add settings for framebuffer geometry. Change the values to whatever works for you, ex: width=1280 and height=1024.
# uncomment to force a console size. By default it will be display’s size minus
# overscan.
#framebuffer_width=1280
#framebuffer_height=720
Use raspi-config to set a forced screen resolution. (Choose anything other than monitor default).
The reason is that by default (RPi4), if no screen is connected at boot then a display device is not created. Without a display device the GUI desktop does not start so any program that requires GUI will not start. Other RPi models did not have that issue because they would fall back to composite mode if no HDMI was connected. The RPi4 has composite mode disabled by default so no display device is created.
Setting a resolution mode with raspi-config or the GUI config tool or manual edits to config.txt as mentioned above, will force a display device on boot even without the HDMI connected as long as you don’t choose the monitor default setting.