Monthly Archives: March 2021
Print Quality Guide
Source: Print Quality Guide
Hikvision Download Portal
Netherlands – http://www.hikvisioneurope.com/portal/?dir=portal
UK – http://www.hikvisioneurope.com/uk/portal/
Hikvision RTSP URL address format
Hikvision RTSP URL address format
If you own a Hikvision device such as an IP camera or a NVR/DVR, you can use the RTSP protocol to live stream. RTSP stands for Real Time Streaming Protocol, a network protocol for streaming the videos in real-time. Basically, it’s designed to send audio or video live from one device to another. The same RTSP url format works for Hilook devices as well.
Hikvision RTSP URL format (with Authentication)
Hikvision RTSP: rtsp:// [USER] : [PASS] @ [ADDRESS] : [RTSP PORT] /Streaming/Channels/ [CH] 0 [STREAM TYPE]
Fill in your information as follows:
- [USER] – This is the username to access your device (IP camera, NVR, DVR)
- [PASS] – This is the password to the user
- [ADDRESS] – This can be the IP address or the domain / DDNS name of your device
- [RTSP PORT] – This is the RTSP port of your device, the default is normally 554
- [CH] – This refers to the channel number that you want to pull
- [STREAM TYPE] – 0 for main stream (highest resolution), 1 for substream (low resolution, but faster)
Example 1. Local IP address
The local IP address of the device is: 192.168.1.100 and the RTSP port is 554. These are the RTSP streaming addresses:
Hikvision Main Stream: rtsp://admin:password@192.168.1.100:554/Streaming/Channels/101
Hikvision Sub Stream: rtsp://admin:password@192.168.1.100:554/Streaming/Channels/102Example 2. External IP address
The local IP address of the device is: 105.152.15.99 and the RTSP port is 554. These are the RTSP streaming addresses:
Hikvision Main Stream: rtsp://admin:password@105.152.15.99:554/Streaming/Channels/101
Hikvision Sub Stream: rtsp://admin:password@105.152.15.99:554/Streaming/Channels/102RTSP without Authentication
rtsp://<IP addressof device>:<RTSP port>/Streaming/channels/<channel number><stream number>
Note: <stream number> represents main stream(01), or the sub stream(02)Example:
rtsp://173.200.91.70:10554/Streaming/channels/101 –get the main stream of the first channel
rtsp://173.200.91.70:10554/Streaming/channels/102 –get the sub stream of the first channel
Source: Hikvision RTSP URL address format — SecurityCamCenter.com
OpenEVSE – Electric Vehicle Charging Solutions
Shade Alternate Rows in Excel
Shade Alternate Rows
This example shows you how to use conditional formatting to shade alternate rows. Shading every other row in a range makes it easier to read your data.
1. Select a range.
2. On the Home tab, in the Styles group, click Conditional Formatting.
3. Click New Rule.
4. Select ‘Use a formula to determine which cells to format’.
5. Enter the formula =MOD(ROW(),2)
6. Select a formatting style and click OK.
Result.
Explanation: the MOD function gives the remainder of a division. The ROW() function returns the row number. For example, for the seventh row, MOD(7,2) = 1 because 7 divided by 2 equals 3 with a remainder of 1. For the eight row, MOD(8,2) = 0 because 8 divided by 2 equals 4 with a remainder of 0. As a result, all odd rows return 1 (TRUE) and will be shaded.


ElectroSmash – Electronics for Audio Circuits.
JuiceBox Error Codes – Enel X e-Mobility Support
JuiceBox Error Codes
In the event of a system error, the JuiceBox unit will produce an audible sequence of tones to indicate its error state. Buzzer tone sequences for error states are listed below.
JuiceBox Error Codes
Current generation (built from Feb 2017 to present)
# of Beeps (in Guide) Error Type Solution 1 (Continuous tone-no breaks) Ground Lost (Reconnect ground) Check line and neutral connections as they may be reversed in the adapter or outlet. Unplug and reboot JuiceBox. If issue persists, please contact Support. 1 (Repeating beep-short break) GFI AutoTest Failure (JuiceBox system self-check failure) Unplug JuiceBox for 30 mins to 1 hour. While unit is unplugged, please also power circuit breaker off and on. If issue persists, please contact Support. 2 (short beeps, then break) Car not obeying J1772. (Or plugged into something that’s not an EV). Unplug and reboot JuiceBox. If issue persists, contact Support. 3 (short beeps, then break) GFI Trip (Check your connection) Unplug from car in order to reset the GFI trip count to 0. If issue persists, contact Support. 4 (short beeps, then break) OverHeat Move your JuiceBox to a cooler area, out of direct sunlight, or remove heating sources from area. The JuiceBox will automatically resume when it cools off. 5 (short beeps, then break) Relay Stuck Closed (Disconnect immediately. Contact support) Check your ground wire in both the panel, and at the device termination (hard-wired or outlet plugged into) to make sure all connections are tight. If error persists after unplugging and rebooting the JuiceBox, and your car will not charge, please contact support.
Previous Generation (built Aug 2015 to Feb 2017)
Constant Buzzer Tone: (no interruption)
“No ground” error. Check that your circuit ground connection is established. On 240v single split-phase AC power (US standard), you should find approximately 120V between each line and the ground terminal of your outlet. The Ground connection is usually connected to Neutral at the circuit panel. When using a 240V Line-to-Neutral, single phase mains supply, the Line and Neutral connections should not be reversed on L1 (H) and L2 (H2/N). If this is the case, please reverse them at the panel. If the error persists unplug and reboot the JuiceBox. If it occurs intermittently or continues to occur, contact support.
1-Second Repeating Beep Tone:
This error code Indicates possible failure of Ground Fault Interrupter (GFI) circuitry. If this error persists unplug and reboot the JuiceBox. If it occurs intermittently or continues to occur, contact support.
2-Beep Tones:
This error code Indicates unintended closure of relay in non-charging state. Unplug unit from wall outlet to prevent unsafe charger state. If JuiceBox continues to signal this error, contact support.
3-Beep Tones:
This error code happens after a Ground Fault Interrupter (GFI) trip event. The unit will remain inoperable for 15 minutes, during which time the unit will continue to produce the 3 buzz error tone every 15 seconds, and will self-reset after 15 minutes. After 4 GFI trip events and automatic resets, the unit will not self-reset, and will continue to produce the 3 buzz tones every 3 seconds until the car is unplugged. The GFI trip is likely either caused by a wiring problem in the car or J1772 charging handle, or by significant line noise. If you continue to have this issue please contact support for further instructions.
4-Beep Tones:
This error code indicated that your JuiceBox is overheating. The JuiceBox is too hot (over 80C internally). Move your JuiceBox to a cooler area, out of direct sunlight, or remove heating sources from area. The JuiceBox will automatically resume when it cools off.
5- Beep Tones:
This error code indicated that the relay is stuck open. The relay should have closed for charging. The ground conductor on the circuit may also cause this error. Check your ground wire in both the panel, and at the device termination (hard-wired or outlet plugged into) to make sure all connections are tight and that the ground line is properly connected – see above for “no ground” issues. If error persists after unplugging and rebooting the JuiceBox, and your car will not charge, please contact support.
6-Beep Tones:
This error is an internal system fault – usually related to pilot signal generation. Check that your control pilot (CP) signal pin isn’t shorted. Contact Support if this code persists.
(rare) Early Buzzer codes (July-September 2015):
*Information applies to JuiceBoxes built prior to August 28th 2015
In the event of a system error, the JuiceBox unit will produce an audible sequence of tones to indicate its error state. Buzzer tone sequences for error states are listed below. The sequence is a “Tii-duu” (High-Low) dual tone (intended to mean “Uh-oh!”), followed by a number of “Tii” (high) beeps to indicate which error is signaled. The tone pattern typically repeats so you can identify it.
1-Beep Tone: Ground Monitor Interrupt
- Occurrence of this error state indicates that the unit is not connected to an earth grounded outlet. Please unplug unit and ensure outlet intended for use is earth grounded before attempting to use JuiceBox.
2-Beep Tones: Ground Fault Interrupt Startup Self-Test Failure
- Occurrence of this error state indicates a failure of the ground fault interrupt system self-test during unit power on. Unplug unit from wall outlet to prevent unsafe charger state.
3-Beep Tones: Stuck Relay Event
- Occurrence of this error state indicates unintended closure of the JuiceBox’s relay when the unit is not charging a vehicle. Unplug unit from wall outlet to prevent unsafe charger state.
4-Beep Tones: Ground Fault Interrupt:
4th Fault Error (no beep for first 3 trips with 15-minute auto-reset)
- After a Ground Fault event the JuiceBox will enter an inoperable state for 15 minutes for safety. After 15 minutes, the unit will enter an operational state. If the ground fault is still present, the unit will repeat the 15 minute waiting period. The JuiceBox will repeat this 15 minute waiting process 4 times in total, after which the unit will become inoperable until it is hard reset via power cycling.
Manage Stored Usernames and Passwords in Windows 10
The Stored User Names and Passwords Tool in Windows 10 lets you securely manage user names and passwords as a part of your profile. It lets you automatically enter saved user names and passwords for various network resources, servers, websites, and applications, to authenticate yourself. In this post we will see how to add, remove, edit, backup, restore Stored Usernames and Passwords & Credentials in Windows 10/8/7.
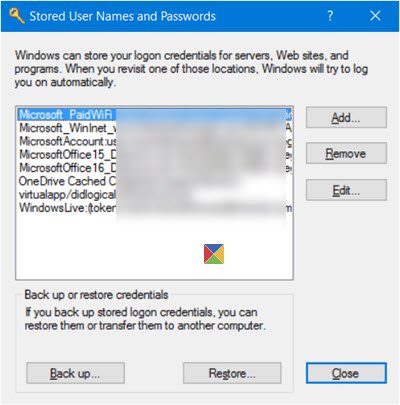
Find stored Usernames & Passwords in Windows 10
To directly access the Stored User Names and Passwords Control Panel applet, via WinX Menu, open Command Prompt (Admin), type the following rundll32 command, and hit Enter:
rundll32.exe keymgr.dll,KRShowKeyMgrThe Stored User Names and Passwords box will open.
Here you will be able to see the saved passwords and user names.
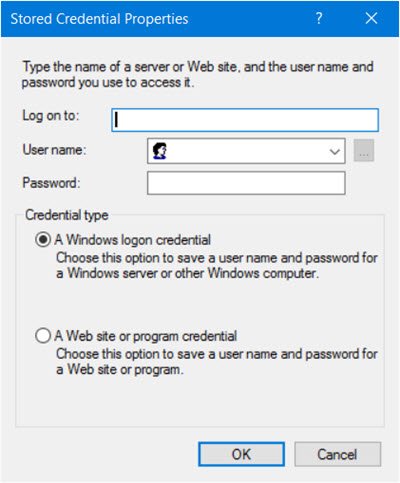
To add a new credential, press the Add button and fill in the required details as follows:
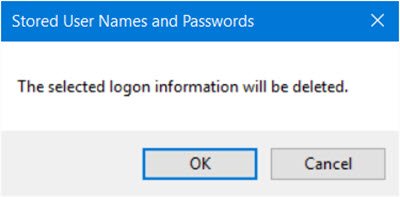
To delete a saved password, select the credential and click on the Remove button.
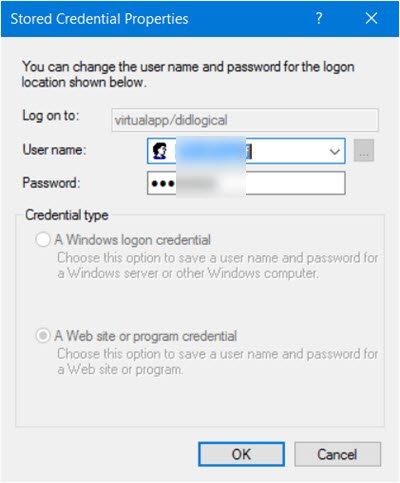
To edit a password, click the Edit button. Here you will be editing the details.
It could be a Windows logon credential or a Website or Program password.
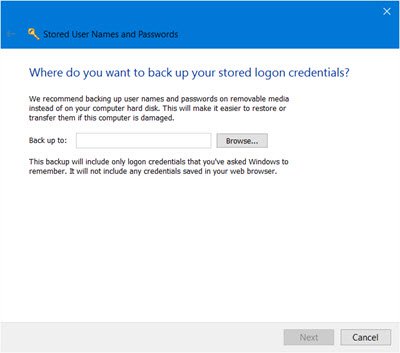
It is always a good idea to back up the stored user names and passwords. To do this, click on the Backup button to open the following wizard.
Select and browse to the backup location, click Next, and follow the wizard to its completion.
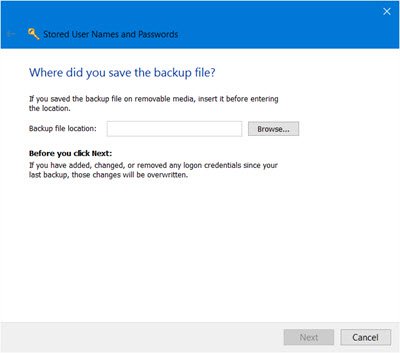
Should the need arise, you can always restore the backup, by clicking on the Restore button and browsing to the backup file location and selecting it.
That’s it!