I wasn’t satisfied about the most of the fan covers available on thingiverse, because the finer details aren’t optimized for 3D printing. That’s why I designed this customizable fan cover, where you are able to use different settings to create your own fan cover. Check out the second picture for some of the available settings and the 3rd picture to sync the line size of the fan cover with the line width of your slicer. Use the Customizer or OpenSCAD to create your fan cover or use the pre-compiled fan covers as .stl-Files, optimized for 0.48mm line width (0.4mm nozzle). How to support me? Do you like my things and do you want to support me? You can use these links if you want to buy something. This helps me doing more things. Thanks! Banggood: https://goo.gl/ZXgx3A Gearbest: https://goo.gl/FfE59f Aliexpress: https://goo.gl/bQLi15
Monthly Archives: August 2019
Using the prosody xmpp/chat server
Using the prosody xmpp/chat server
Prosody is a Lua-powered chat-server, which has been around for a few years now. Prosody is very straight-forward to install and configure, and the reliability means that it is a perfect way to provide chat-services to a small office, company, or group of friends. This brief article will cover installing it, both natively and within docker, along with a few pointers to things you can do with it.
Prosody is a XMPP-based chat-server, which allows multiple users to chat to each other, either directly (person-to-person) or via “conference rooms”.
Conference-rooms are similar to IRC-channels, they allow multiple people to join the same space and chat freely to all participants.
Because XMPP is an open standard there are many clients you can choose from, available for a large number of operating systems. Popular clients include Pidgin, PSI, and empathy.
If you’re new to XMPP-based chat there’s nothing too much to learn, except that all logins for chat-servers consist of both a username and a domain-name – so you’ll login to a chat server with what looks very much like an email address.
Installing Prosody
As always prosody can be installed easily using apt-get or aptitude:
root@chat ~ # apt-get install prosodyOnce installed the configuration of the server consists of two parts:
- The main configuration file, /etc/prosody/prosody.cfg.lua.
- The configuration directory /etc/prosody/conf.d/
The main configuration file controls the servers global options, then includes files from beneath the conf.d/directory – which is where you’ll create configuration for each of your virtual hosts.
As mentioned earlier XMPP servers deal with user-accounts which have two parts: A username, and a domain-name.
To get started we just need to create a configuration file for our domain. Create the file /etc/prosody/conf.d/chat.example.com.cfg.lua with contents:
-- Virtual host for our chat-server

-- Define the host.
VirtualHost "chat.example.com"

-- Allow MUC / conference-rooms
Component "rooms.chat.example.com" "muc"
  name                   = "Chatrooms"
  restrict_room_creation = false
Once you’ve done that you can restart the service:
root@chat ~ # /etc/init.d/prosody restartYour server should now be ready, and will allow two things:
- Connection from users with logins “username@chat.example.com“.
- The creation of arbitrary “rooms”.
If you were creating a chat-server for your own company, or domain, at this point you’d configure the DNS record chat.example.com to point to the IP address of your server.
It isn’t strictly necessary to setup DNS, as most chat-clients allow you to specify both a username (of the form “user@host.com”) along with the actual server-name to connect to (which you would set to the IP of your server).
Firewalling Note
If you’re only concerned with users chatting to each other, via the server, you only need to open port 5222 on your firewall.
Creating Accounts
There are two main ways you can configure account setup on the chat-server:
- Permissively:
- You allow anybody who can access the server to register their own account.
- Strictly:
- You explicitly create accounts for all the users you desire.
These two options are configured via the main server configuration file /etc/prosody/prosody.cfg.lua via the setting:
-- Disable account creation by default, for security
-- For more information see http://prosody.im/doc/creating_accounts
allow_registration = false;
With this setting, as noted, the default, you must create your user accounts manually – which you can do by running:
root@chat ~ # prosodyctl register LOGIN DOMAIN PASSWORDFor example you might create the account steve@chat.example.com with password “reallys3cr3t” like so:
root@chat ~ # prosodyctl register steve chat.example.com reallys3cr3tIf you prefer to allow users to register themselves then you set the value of allow_registration to be true, and restart the server. If your server is not firewalled away from the world expect you’ll find spam accountss have registered themselves eventually.
NOTE: Most clients allow new accounts to be registered easily, for example on the account setup page of Pidgin there is a checkbox “Create account on server”.
Grub2 – Community Help Wiki
Source: Grub2 – Community Help Wiki
BootOptions – Community Help Wiki
Windows 10 version release history tracker • Pureinfotech
How To Reset an APC AP9630 / AP9631 to DHCP Mode | Chris Parker
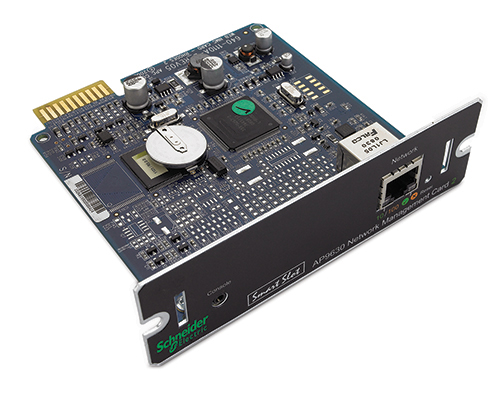
Several years ago I purchased an APC AP9630 Network Management Card 2 (AP9630 NMC) for a Smart-UPS of mine. The manual was not clear how to change the mode of the card to enable DHCP without using a serial cable. (Who even has a laptop with an old serial port?!)
It turns out there are two reset modes for the card:
- Pressing the reset button for 5-7 seconds resets only the password.
- Pressing the reset button for 20 seconds will restore the card to factory default settings and switch it to DHCP mode.
This should also work on the AP9631.
Hopefully, this will get indexed and save some people some time in figuring it out…
Source: How To Reset an APC AP9630 / AP9631 to DHCP Mode | Chris Parker
Universal Auto-Rewind Spool Holder by VincentGroenhuis
Filament load/unload issues? MMU2 taking too much space? Not with this Universal Auto-Rewind spool holder! It keeps filament on the spool during unloading, up to four full revolutions. Video compilation This is a remake of the Original and Parametric Auto-Rewind Spool Holder, but with significant enhancements: Slipping point of the clutch can be adjusted in about 15 steps using the dial. One size fits almost all spools up to 1kg. Inner diameter 30-75 mm, max outer diameter 200 mm, max width 88 mm. Hubs for wider spools can be created with the customizer, same for hubs with narrow diameters. Stand for 3kg spools available here. Spring (v1 and v1.01) works both ways around: towards the axle and towards the outer rim. Note: flipping the direction requires re-calibration of the clutch tension! Spring v1.02+ and 3.x are direction independent, can be flipped around without changes in clutch tension. These versions might also be better protected against spring overloading. If the clutch slips too much then you can put ducttape or electrical tape on the outer rim of the spring, this slows down the slipping action. Spring should be printed with 0.2 mm layer thickness to match the gaps in the structures (see assembly instructions). All other parts can be printed in any layer thickness, 0.2 mm is default. GCode for Prusa i3 MK2/S and MK3(S) /MM(S) can be downloaded here: single color and multi-material. The MM version uses two colors for most parts (three for the stand). First color is the base color (silver grey in shown examples), second color is for decals and markers (vibrant color), third color is for the characters on the stand (white). The parts are designed such that missing layers in the 2nd and 3rd color do not affect the structural strength of all parts, also the number of color changes is kept to a minimum. Four spring styles are available: SpringFlat is to be used with a 3-D printed axle with flat side. SpringRound (available in zip file) is used with a round axle (e.g. metal rod). SpringRound has an anti-rotation block which aligns with the frame, so it is not needed to immobilize the round axle. Both SpringFlat and SpringRound come in two different stiffnesses. The soft version is recommended to start with and the stiff version can be used when more torque is needed. The hub thread length can be customized with the Parametric Auto-Rewind Spool Holder customizer. Use output=”hub”, hubThreaded=”yes”, set hubThreadLength to the desired length and leave all other parameters at its default settings. At Robotics and Mechatronics (RaM), University of Twente some research is done on variable stiffness actuators. Certain mechanisms in this Auto-Rewind Spool Holder were (loosely) inspired by our research there. One side of the stand reads “It’s Rewind Time” while the other side reads “University of Twente”. A stand with no text (blank) is also available. A list of (mostly) compatible stands are on the Parametric Auto-Rewind Spool Holder page. Additional stands, mods and alternative auto-rewinding systems developed by the awesome community: Stands Table/wall/ceilingAutoRewind Spool Stand Hanging Screw Mount (table/wall/ceiling, use SpringRound)Screw-down tabletop, wall, and ceiling mounted stands (table/wall/ceiling, needs different axle)Wall Mount Spool Rewinder Adapter (wall)Wall mount (wall)Strong wall mount (wall)The MMU2s Prusa Final Filament Rewind Solution (wall)Numbered filament stands (table)Multiple Mechanism stand (table)Ceiling or under shelf hanging mount (ceiling) HangersAutorewind HangerHanging bracketHanging holderWire shelving mountHanger for 1×2 wood shelves 2020 series structural framing2020 Top mount, high2020 Top mount, low2020 Side mount2020 Side mount alternative Ikea furnitureIkea Lack table sliding spooler standMMU Spoolholder for Stuva / Besta (for parametric rewinder, check size)MMU V2 Autorewind Spoolholder for IKEA Samla BOX (for parametric rewinder, check size) Spannerhands dry boxAdapter for Spannerhands Spool SystemSpannerHands dual-color hub Printer specificPrusa i3 MK3 top stand, narrowPrusa i3 MK3 top stand, 1 mm bigger In case the narrow one does not fitStand for Wanhao Duplicator i3Anet A8 top stand Rewinder systems Vincent’s Auto-Rewind Spool HoldersOriginal Auto-Rewind Spool HolderParametric Auto-Rewind Spool HolderUniversal Auto-Rewind Spool Holder (this thing)Sisyphus Auto-Rewind Spool Holder (gravity-based)Integrated Auto-Rewind Spool Holder Rewinders by other designersStand and hub for 3kg spoolsYet another rewinding spoolholder Uses rubber O-ringsRemixed spoolholder Narrower, new tube holderUniversal Auto-Rewind Spindle Parametric rewinder with threaded rod and nutsRepRewind Fits inside the RepBox containerWall-mount Auto-rewind Spool ThingParametric Hangable Any-Direction Continuous Slip ClutchCircular Gravity-based Auto-Rewind Spool HolderLinear Gravity-based Auto-Rewind Spool HolderPrusa i3 top mount roller-style gravi
Source: Universal Auto-Rewind Spool Holder by VincentGroenhuis
Prusa i3 MK3: Real Multicolour prints without MMU – Rainer’s World
A MMU is basically just automating the filament swaps. But if you limit the required filament changes to a small number this can be done by hand. People have been using this with layer height-based filament swaps for quite some time. But this forces you to print specific layers completely in just one color each. […]
Source: Prusa i3 MK3: Real Multicolour prints without MMU – Rainer’s World