Monthly Archives: April 2019
Microsoft changes how Windows 10 disconnects USB storage devices | ZDNet
How to secure PowerShell Remoting in a Windows Domain
HOW TO SECURE POWERSHELL REMOTING IN A WINDOWS DOMAIN
Source: How to secure PowerShell Remoting in a Windows Domain
Set-LocalUser
Set-Local
User Modifies a local user account.Syntax
Set-LocalUser
   [-AccountExpires <DateTime>]
   [-AccountNeverExpires]
   [-Description <String>]
   [-FullName <String>]
   [-Name] <String>
   [-Password <SecureString>]
   [-PasswordNeverExpires <Boolean>]
   [-UserMayChangePassword <Boolean>]
   [-WhatIf]
   [-Confirm]
   [<CommonParameters>]
Set-LocalUser [-AccountExpires <DateTime>] [-AccountNeverExpires] [-Description <String>] [-FullName <String>] [-InputObject] <LocalUser> [-Password <SecureString>] [-PasswordNeverExpires <Boolean>] [-UserMayChangePassword <Boolean>] [-WhatIf] [-Confirm] [<CommonParameters>]Set-LocalUser [-AccountExpires <DateTime>] [-AccountNeverExpires] [-Description <String>] [-FullName <String>] [-Password <SecureString>] [-PasswordNeverExpires <Boolean>] [-SID] <SecurityIdentifier> [-UserMayChangePassword <Boolean>] [-WhatIf] [-Confirm] [<CommonParameters>]Description
The Set-LocalUser cmdlet modifies a local user account. This cmdlet can reset the password of a local user account.
Examples
Example 1: Change a description of a user account
PS C:\> Set-LocalUser -Name "Admin07" -Description "Description of this account."This command changes the description of a user account named Admin07.
Example 2: Change the password on an account
PS C:\> $Password = Read-Host -AsSecureString
PS C:\> $UserAccount = Get-LocalUser -Name "User02"
PS C:\> $UserAccount | Set-LocalUser -Password $Password
The first command prompts you for a password by using the Read-Host cmdlet. The command stores the password as a secure string in the $Password variable.
The second command gets a user account named User02 by using Get-LocalUser. The command stores the account in the $UserAccount variable.
The third command sets the new password on the user account stored in $UserAccount.
Parameters
-AccountExpiresSpecifies when the user account expires. To obtain a DateTime object, use the Get-Date cmdlet.
If you do not want the account to expire, specify the AccountNeverExpires parameter.
Type: DateTime Position: Named Default value: None Accept pipeline input: False Accept wildcard characters: False -AccountNeverExpiresIndicates that the account does not expire.
Type: SwitchParameter Position: Named Default value: None Accept pipeline input: False Accept wildcard characters: False -ConfirmPrompts you for confirmation before running the cmdlet.
Type: SwitchParameter Aliases: cf Position: Named Default value: False Accept pipeline input: False Accept wildcard characters: False -DescriptionSpecifies a comment for the user account. The maximum length is 48 characters.
Type: String Position: Named Default value: None Accept pipeline input: False Accept wildcard characters: False -FullNameSpecifies the full name for the user account. The full name differs from the user name of the user account.
Type: String Position: Named Default value: None Accept pipeline input: False Accept wildcard characters: False -InputObjectSpecifies the user account that this cmdlet changes. To obtain a user account, use the Get-LocalUser cmdlet.
Type: LocalUser Position: 0 Default value: None Accept pipeline input: True (ByPropertyName, ByValue) Accept wildcard characters: False -NameSpecifies the name of the user account that this cmdlet changes.
Type: String Position: 0 Default value: None Accept pipeline input: True (ByPropertyName, ByValue) Accept wildcard characters: False -PasswordSpecifies a password for the user account. If the user account is connected to a Microsoft account, do not set a password.
You can use
Read-Host -GetCredential, Get-Credential, or ConvertTo-SecureString to create a SecureString object for the password.If you omit the Password and NoPassword parameters, Set-LocalUser prompts you for the user’s password.
Type: SecureString Position: Named Default value: None Accept pipeline input: False Accept wildcard characters: False -PasswordNeverExpiresIndicates whether the password expires.
Type: Boolean Position: Named Default value: None Accept pipeline input: False Accept wildcard characters: False -SIDSpecifies the security ID (SID) of the user account that this cmdlet changes.
Type: SecurityIdentifier Position: 0 Default value: None Accept pipeline input: True (ByPropertyName, ByValue) Accept wildcard characters: False -UserMayChangePasswordIndicates that the user can change the password on the user account.
Type: Boolean Position: Named Default value: None Accept pipeline input: False Accept wildcard characters: False -WhatIfShows what would happen if the cmdlet runs. The cmdlet is not run.
Type: SwitchParameter Aliases: wi Position: Named Default value: False Accept pipeline input: False Accept wildcard characters: False Inputs
System.Management.Automation.SecurityAccountsManager.LocalUser, System.String, System.Security.Principal.SecurityIdentifier
You can pipe a local user, a string, or a SID to this cmdlet.
Outputs
None
This cmdlet does not generate any output.
Notes
- The PrincipalSource property is a property on LocalUser, LocalGroup, and LocalPrincipal objects that describes the source of the object. The possible sources are as follows:
- Local
- Active Directory
- Azure Active Directory group
- Microsoft Account
PrincipalSource is supported only by Windows 10, Windows Server 2016, and later versions of the Windows operating system. For earlier versions, the property is blank.
Related Links
Source: Set-LocalUser
Configuring WinRM over HTTPS to enable PowerShell remoting – TechNet UK Blog
Configuring WinRM over HTTPS to enable PowerShell remoting
PowerShell remoting allows machines to be remotely managed using PowerShell. PowerShell remoting is commonly used with virtual machines running on Azure. When we create a classic/service manager VM on Azure it is automatically configured with a WinRM endpoint so that we can connect using PowerShell remoting. However if we create a VM using Resource Manager WinRM over HTTPS is not configred by default. I had a query from a collegue regarding enabling WinRM over HTTPS so have documented the steps I provided to get them up and running.
The virtual machines I tested this with were running Windows Server 2012 R2, and the client OS was Windows 10. Both were clean installs with no prior configuration beyond the default configuration made by Azure.
Modify Network Security Group
WinRM over HTTPS uses port 5896. The first step is to enable traffic directed to this port to pass to the VM. This is done by adding a rule to the Network Security Group (NSG).
- Navigate to Virtual Machines | <your_vm> | Settings | Network Interfaces | <your_nic>
- Click on the NSG name:

- Go to Settings | Inbound Security Rules
- Add a rule called WinRM_HTTPS for TCP port 5986. You may choose to (and I would recommend) restricting the source address you your client’s public IP.

- The NSG should now look like this:

Create Firewall Rule inside the server OS
We must enable traffic over 5986 through Windows Firewall.
- Open Windows Firewall with Advanced Security

- Navigate to Inbound Rules | New Rule…
- In the Wizard select Port, TCP, 5986, Allow the connection, leave all network profiles selected, and name it WinRM HTTPS. The rule will look something like this:

-
Create Cert
To secure the connection a certificate needs to be created inside the server VM. You may choose to use a publically trusted certificate, but for our purposes we are using a self signed certificate as I just want to get up and running as quickly as possible. You need to provide a DNS name, later in the post we will sconnect via IP address and skip the DNS name check so it doesn’t actually mattter what you set this to. However best practice would be to ensure you have a DNS name resolving to your Azure VM’s public IP address and use that DNS name.
- Log onto the server using RDP.
- Open a PowerShell prompt as Administrator and execute the following:New-SelfSignedCertificate -DnsName<your_server_dns_name_or_whatever_you_like> -CertStoreLocation Cert:\LocalMachine\My
- Copy the certificate thumbprint returned by the command to the clipboard:

-
Configure WinRM to listen on 5986
By default WinRM over HTTP is configured to listed on 5985. We need to enable it on 5986 and bind the certificate.
- Open a command prompt window as Administrator (not PowerShell)
- Run the following command, pasting your new certificate’s thumbprint into the command (all on one line):
winrm create winrm/config/Listener?Address=*+Transport=HTTPS @{Hostname=”<your_server_dns_name_or_whatever_you_like>”; CertificateThumbprint=”<certificate_thumbprint_from powershell>”}
You should get the following returned:

Connect from the client PC
To connect from the client PC open a PowerShell prompt and execute the following, using your server IP address/DNS name and local admin username. Please note that as we are using a self signed certificate I have skipped the Certification Authority (CA) check and as I am using an IP address skipped the Common Name (CN) check. You will be prompted for the password.
$so = New-PsSessionOption –SkipCACheck -SkipCNCheckEnter-PSSession -ComputerName <ip_address_or_dns_name_of_server> -Credential <local_admin_username> -UseSSL -SessionOption $soYou should now get a prompt as follows:

You can now execute commands on your remote server!


Source: Configuring WinRM over HTTPS to enable PowerShell remoting – TechNet UK Blog
Add computers to TrustedHosts list using PowerShell – Dimitris Tonias
How to view and add new entries to the TrustedHosts list using PowerShell on Windows Server 2016.
When you need to enable remote management of a computer or server through WinRM (Windows Remote Management), especially in a Workgroup environment, you should first add computers to the TrustedHosts list. Otherwise, you may most likely encounter errors when communicating between the two sides.
Using PowerShell, you can see what the current records are in the TrustedHosts file but also how to add new records depending on your scenario. You will need to be a member of the Administrators group and run PowerShell commands with administrator rights to make changes to the file.
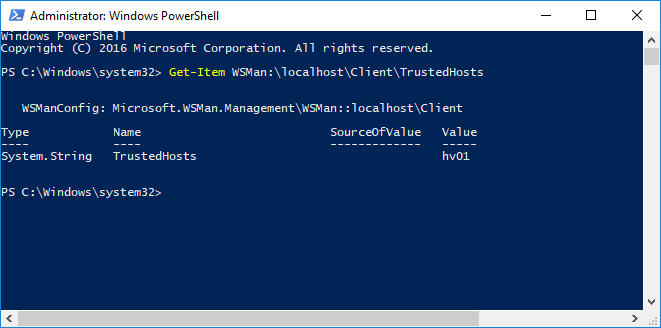
View the computers of TrustedHosts list
To view the list of TrustedHosts added to the machine, type the following command. By default, its value is blank.
Get-Item WSMan:\localhost\Client\TrustedHosts |
Add all computers to the TrustedHosts list
Using the Set-Item cmdlet and the wildcard you can add all the computers to the TrustedHosts list with the following command.
Set-Item WSMan:\localhost\Client\TrustedHosts -Value * |
Add all domain computers to the TrustedHosts list
In the following command, replace .yourdomain.com with your own domain name.
Set-Item WSMan:\localhost\Client\TrustedHosts *.yourdomain.com |
Add specific computers to the TrustedHosts list
You can add specific computers you choose based on their hostname by separating them with a comma (,) using the following command.
Set-Item WSMan:\localhost\Client\TrustedHosts -Value <ComputerName>,[<ComputerName>] |
Where ComputerName can be in the Server01 or Server01.yourdomain.com format
Add a computer to an existing list of TrustedHosts
If you have already added some computers to the TrustedHosts list and want to add an additional computer, without deleting the previous entries, you should use the following method. This is because the TrustedHosts list is updated based on the last Set-Item command you have run overwriting the previous entries.
Use the following command to save the current TrustedHosts computer list to a curList variable.
$curList = (Get-Item WSMan:\localhost\Client\TrustedHosts).value |
To add a computer to the current list, type the following command by specifying both the variable you created and the computer name you are going to add.
Set-Item WSMan:\localhost\Client\TrustedHosts -Value "$curList, Server01" |
Alternatively, to avoid using a variable, add the -Concatenate switch to the Set-Item command to add both new and previous entries. For example:
Set-Item WSMan:\localhost\Client\TrustedHosts -Concatenate -Value Server02 |
Add computers to the TrustedHosts list using the IP address
Similarly to the previous commands, you can use an IPv4 or IPv6 address. In the case of IPv6, you have to type the address between [].
Set-Item WSMan:\localhost\Client\TrustedHosts -Value 10.10.10.1,[0:0:0:0:0:0:0:0] |
That’s it!
Source: Add computers to TrustedHosts list using PowerShell – Dimitris Tonias
How to Run PowerShell Commands on Remote Computers
PowerShell Remoting lets you run PowerShell commands or access full PowerShell sessions on remote Windows systems. It’s similar to SSH for accessing remote terminals on other operating systems.
PowerShell – Testing if a String is NULL or EMPTY
PowerShell – Testing if a String is NULL or EMPTY
Checking if a string is NULL or EMPTY is very common requirement in Powershell script. If we do not checked that we will get some unwanted results when we try to perform some operation on that string variable which is empty or null.
The following method is used to check if a string is NULL or empty.
$mystring ='hello'
if($mystring) {
    Write-Host "Your string is not EMPTY"
} else {
    Write-Host "Your string is EMPTY or NULL"
}
We can also use the .NET Class “System.String” to check null or empty string. It has a method IsNullOrEmpty() which returns true if the passed string is null or empty. Check the below example.
$mystring ='hello'
IF([string]::IsNullOrEmpty($mystring)) {
    Write-Host "Your string is EMPTY or NULL"
} else {
    Write-Host "Your string is not EMPTY"
}
We can also use the method IsNullOrWhiteSpace() from “System.String” class to detect a given string is NULL or EMPTY and whether it has WHITESPACE.
$mystring = " "
IF([string]::IsNullOrWhiteSpace($mystring)) {
    Write-Host "Your string is NULL or EMPTY or it has WHITESPACE"
} else {
    Write-Host "Your string is not EMPTY"
}
Note: The method IsNullOrWhiteSpace() is available only from .NET Frmaework 4.0, so, this method do not work in Powershell 2.0 and it will work only from Powershell 3.0.
You will get below error, when you run this method in Powershell 2.0.
IsNullOrWhitespace : Method invocation failed because [System.String] doesn’t contain a method named ‘IsNullOrWhiteSpace’
Advanced Event Log Filtering Using PowerShell
Advanced Event Log Filtering Using PowerShell
Monitoring Event Logs with PowerShell
Monitoring Event Logs with PowerShell